github
玩转github
目录
[toc]
1、如何创建并维护好一个github上的开源项目?
0.💘 实战:如何创建一个属于自己的github仓库?-2022.4.14(亲测有效)
(1)注册github账号
来到GitHub官网:https://github.com/
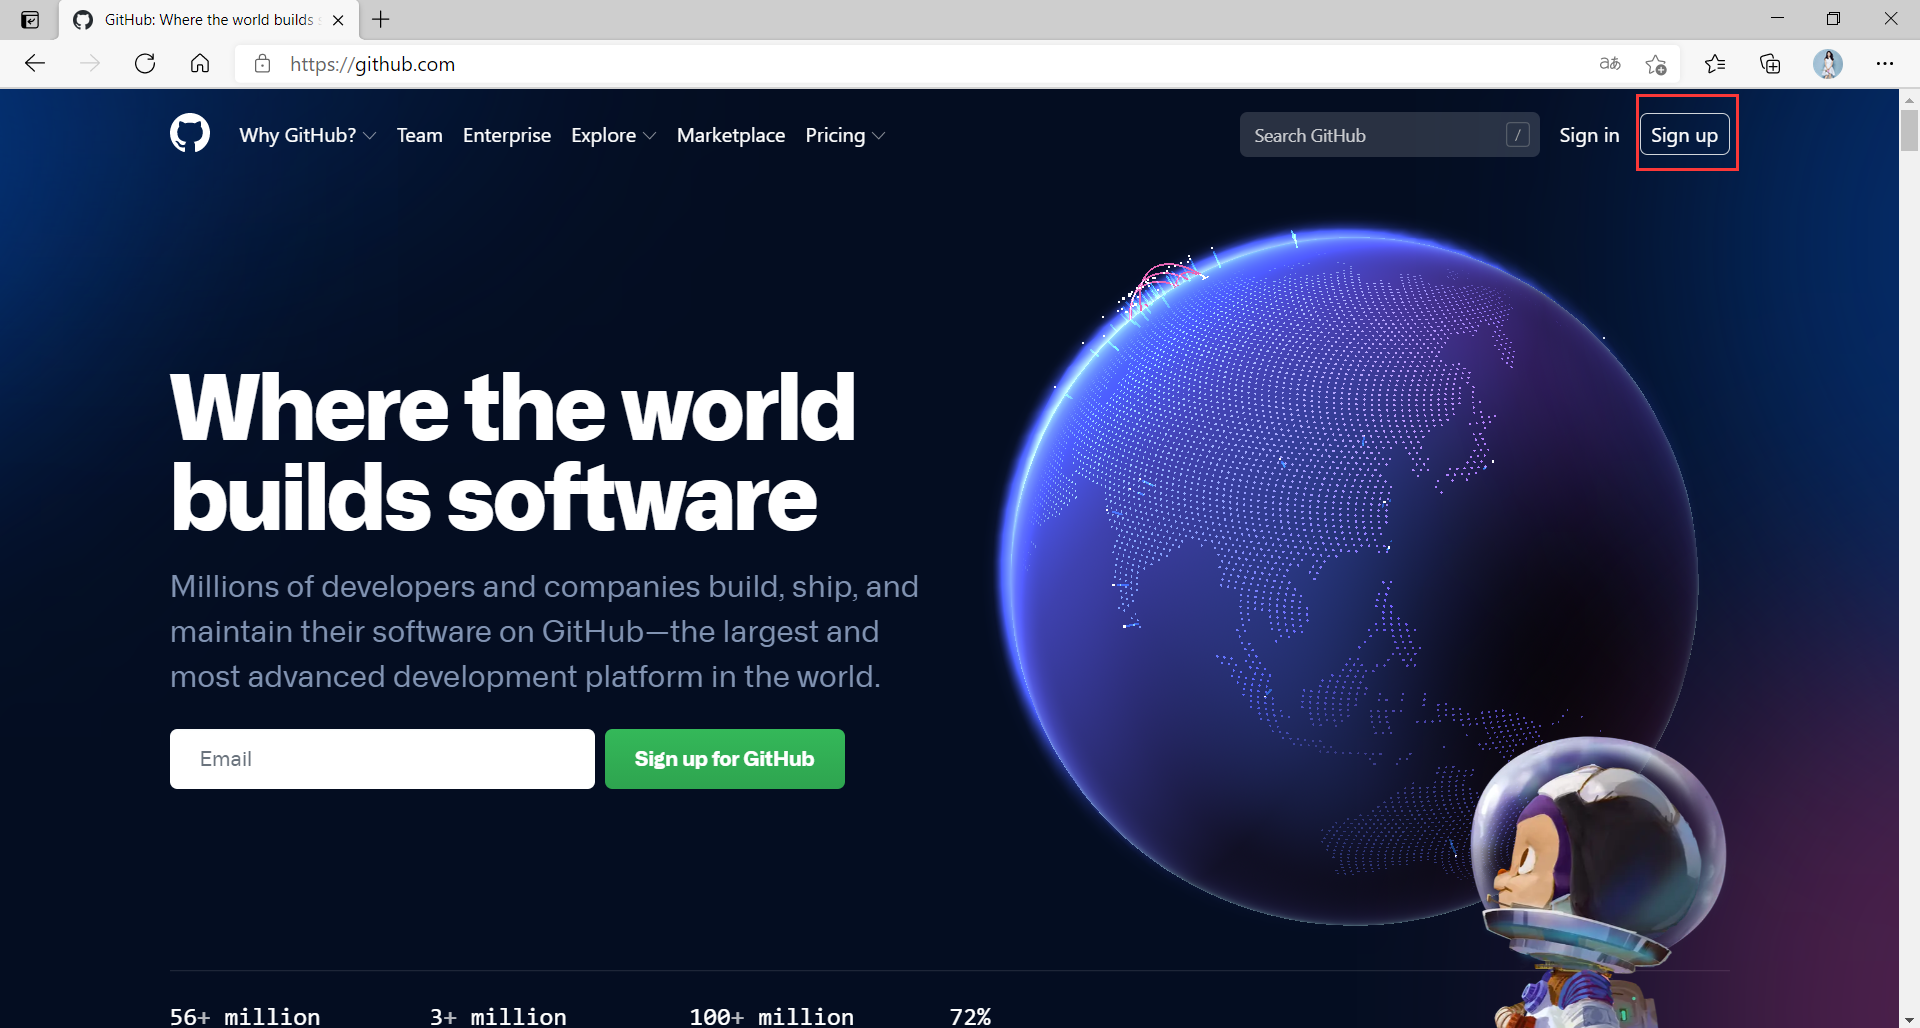
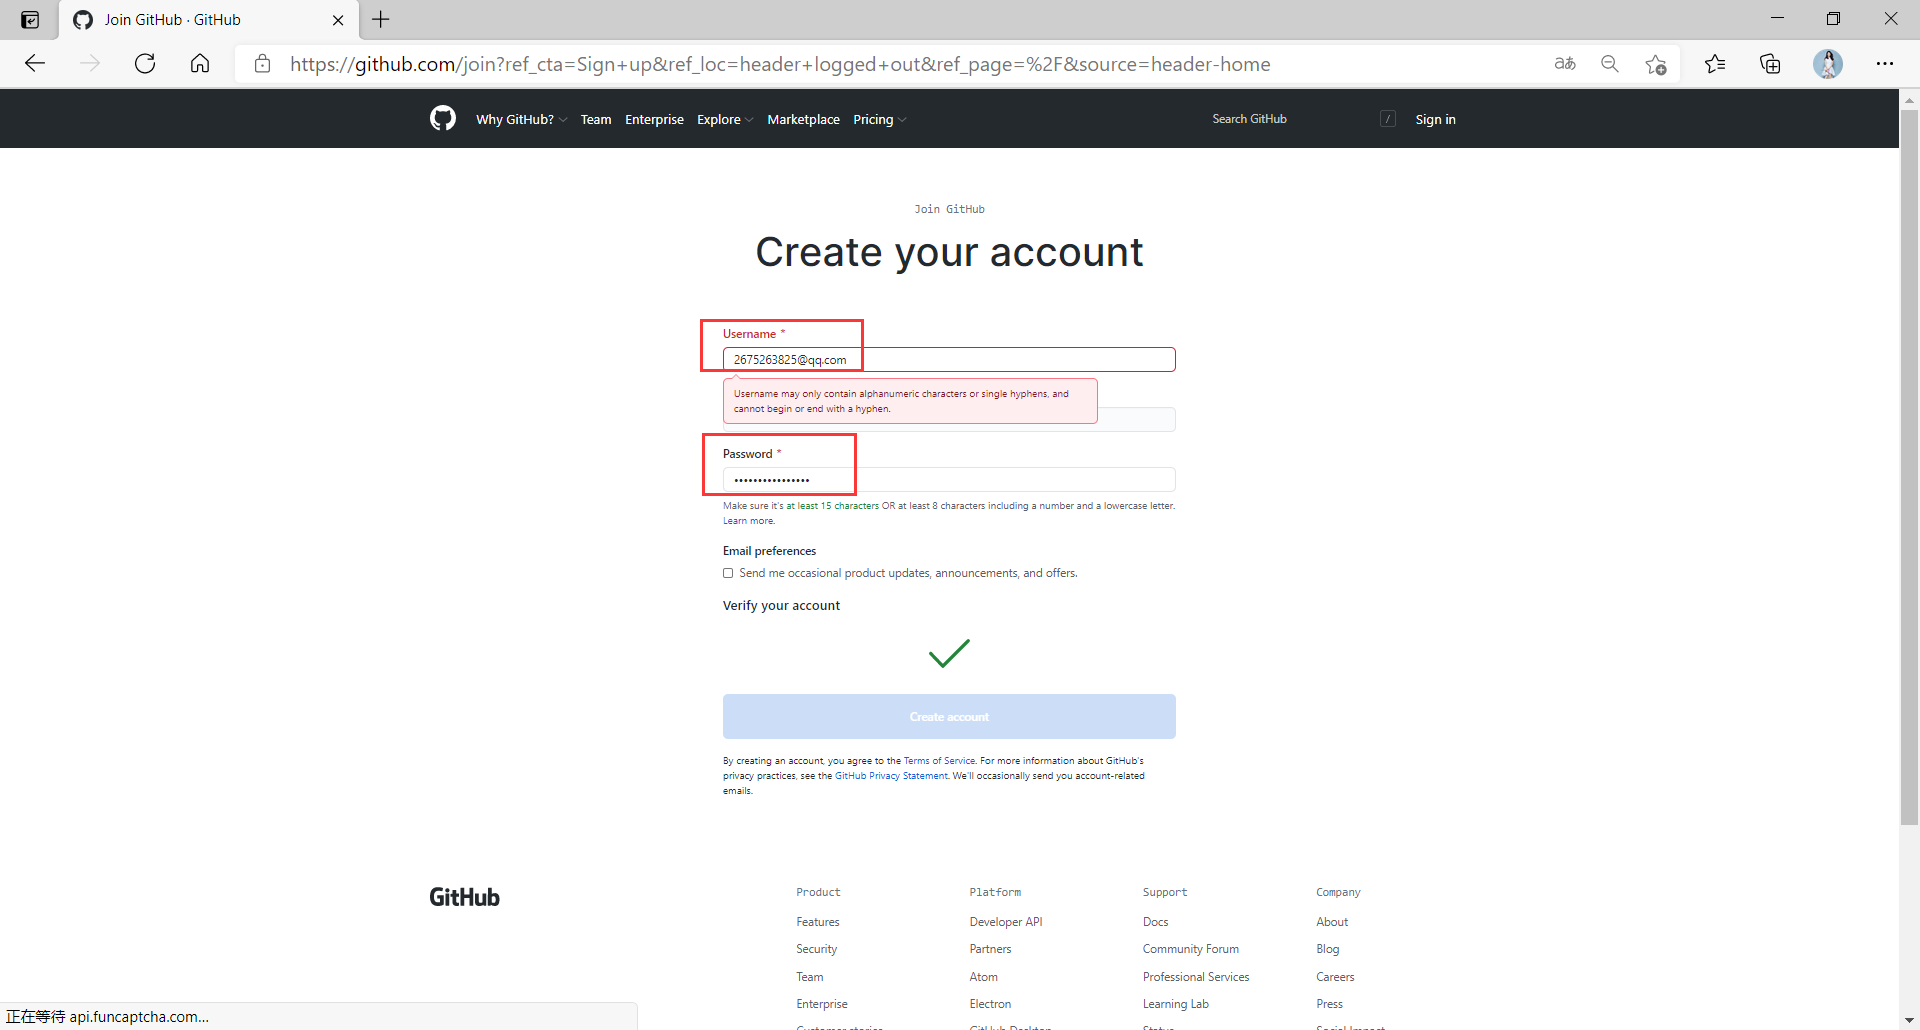
注册完成后登录GitHub:
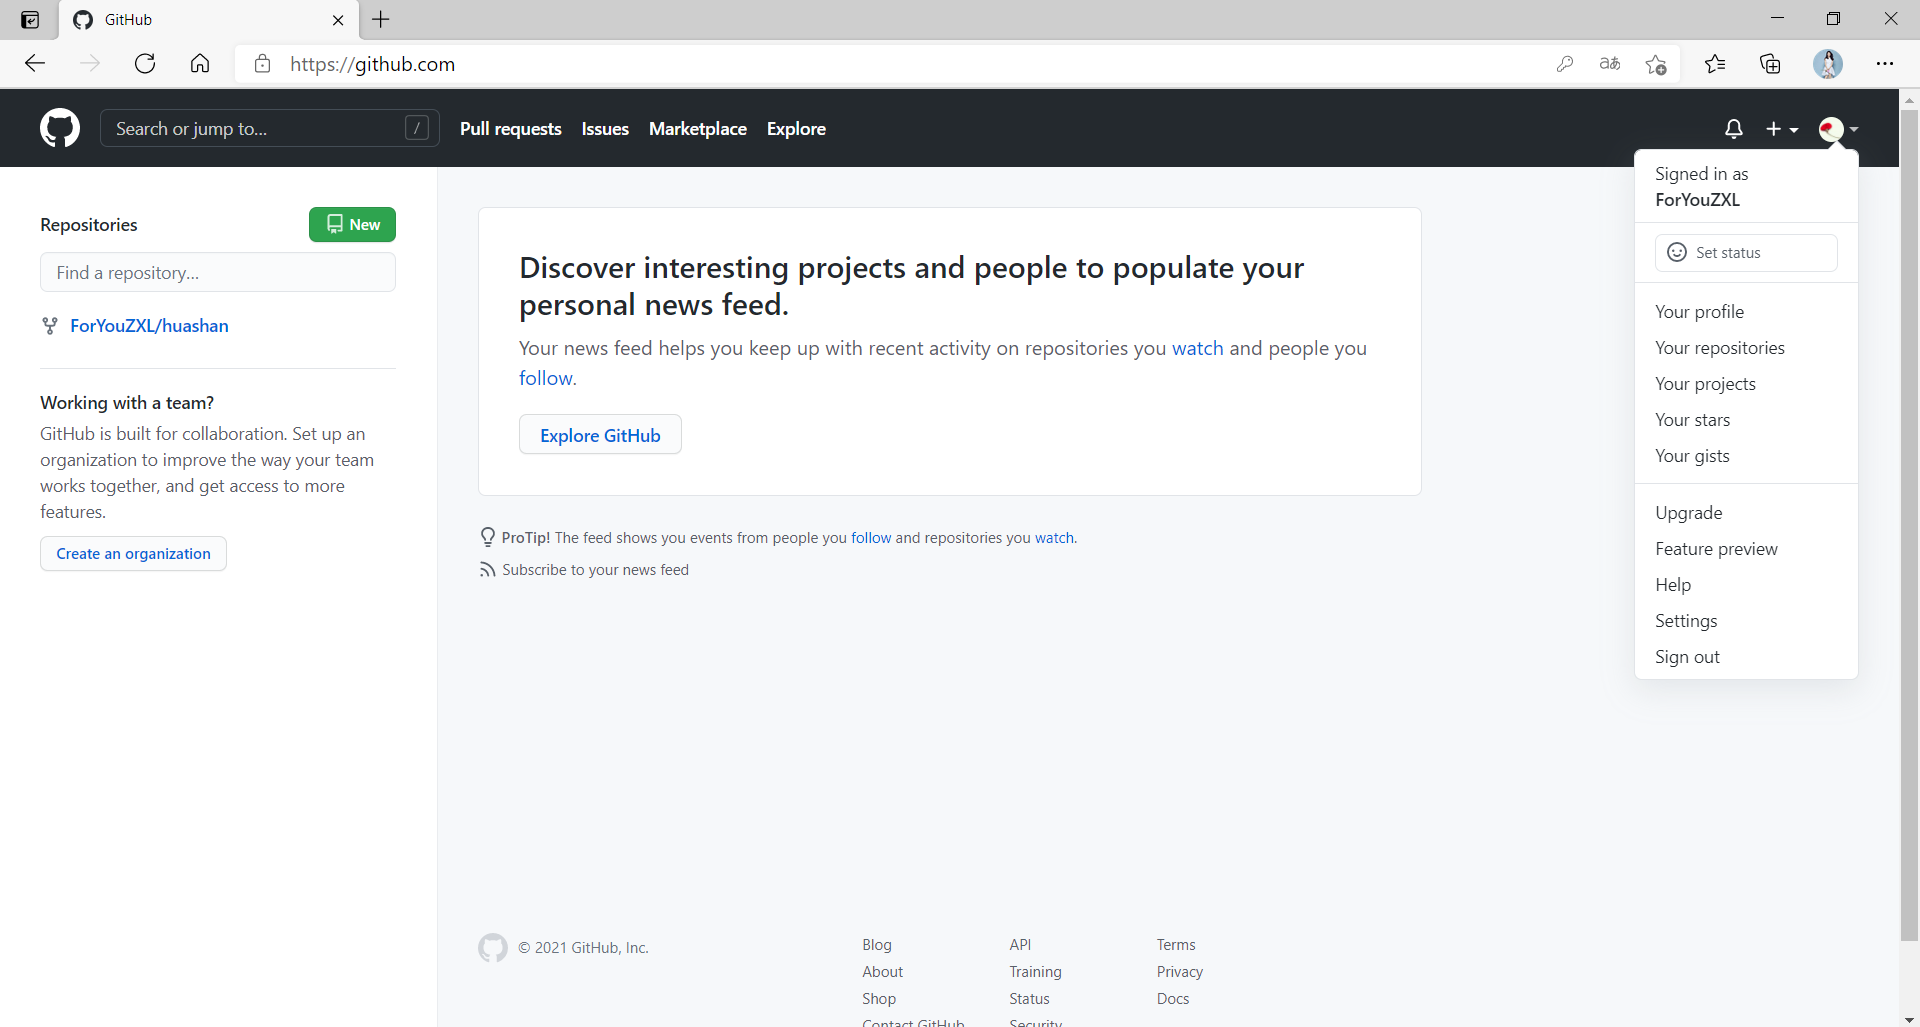
(2)创建仓库
1️⃣ 开始创建仓库:
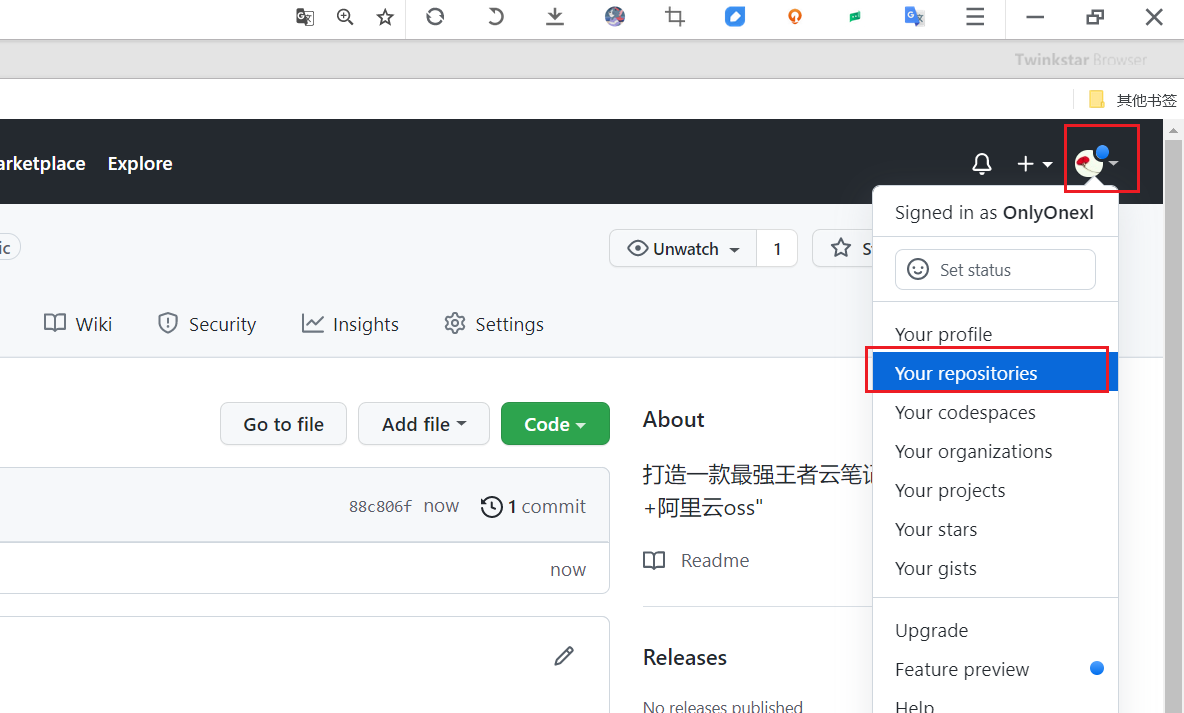
点击头像那里,选择Your repositories:
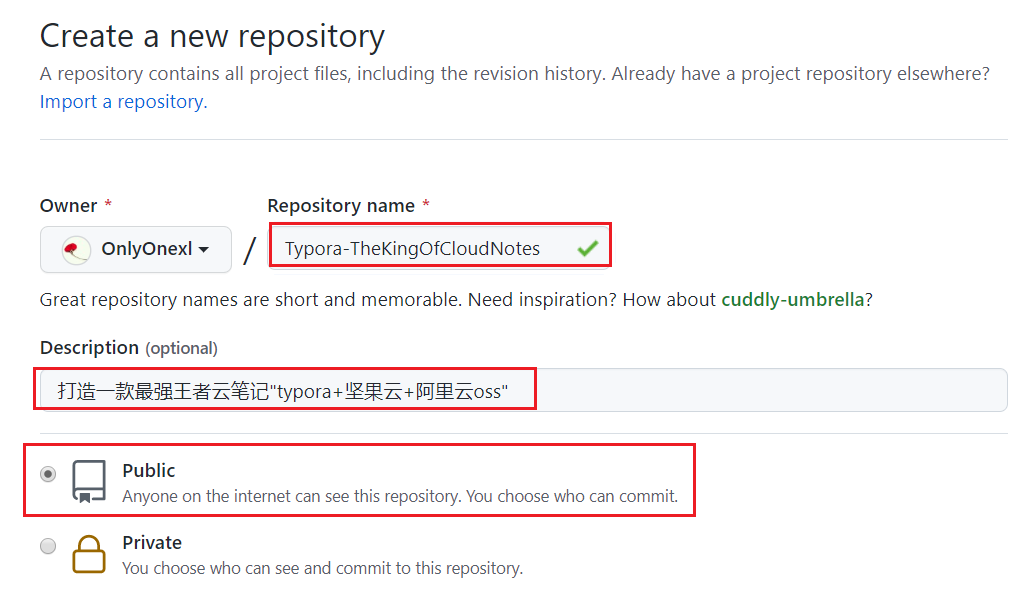
这里填写好仓库名称,描述,选择public(根据自己需求看选择public还是private),勾选一个Add a Readme file,选择完成后点击Create repostriory
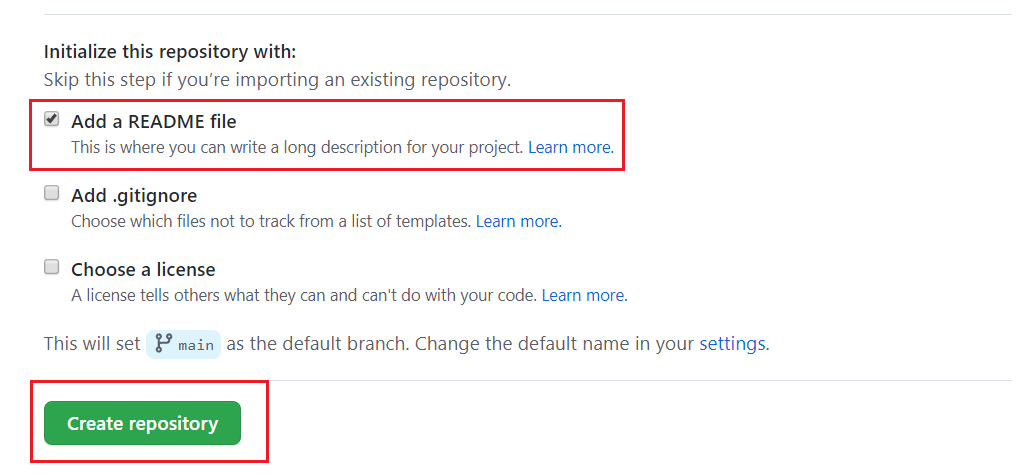
⚠️ 注意:README这个文件很重要,你在github里搜索的时候,它会从README文件里的关键字进行搜索的;
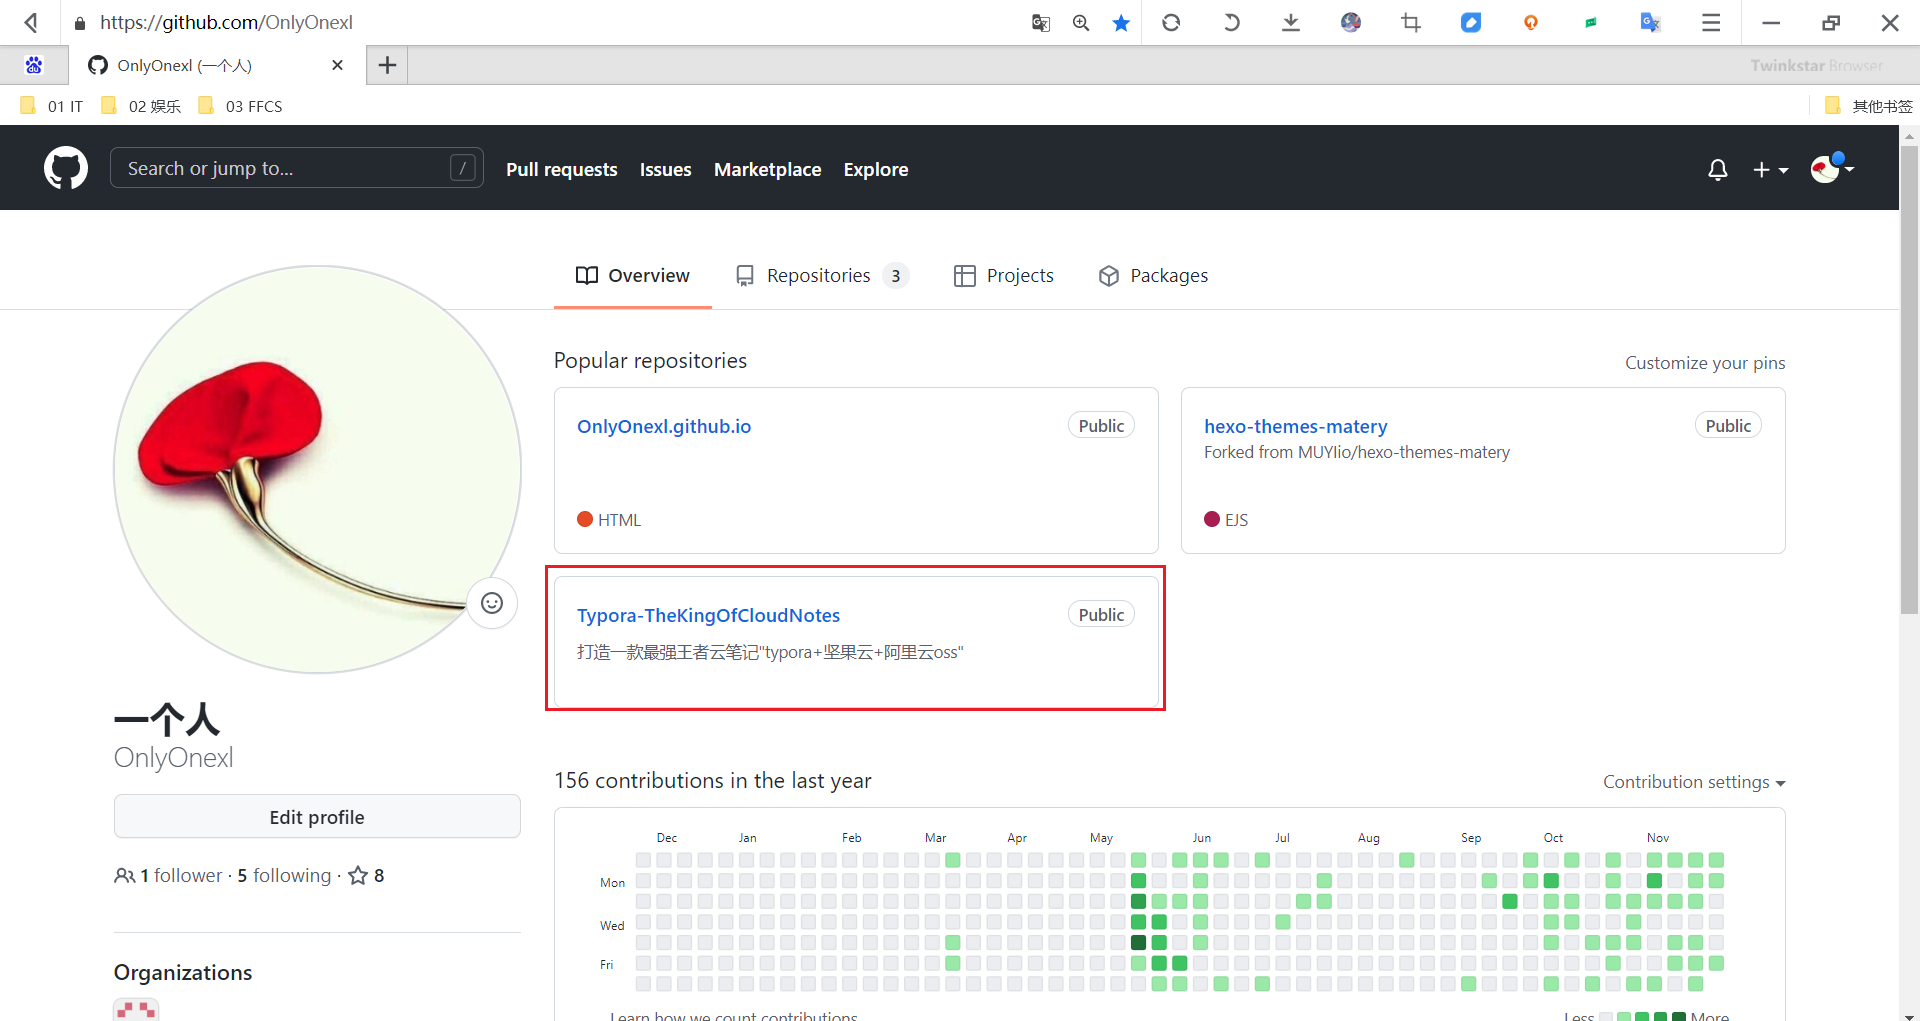
2️⃣ 查看创建好的仓库:
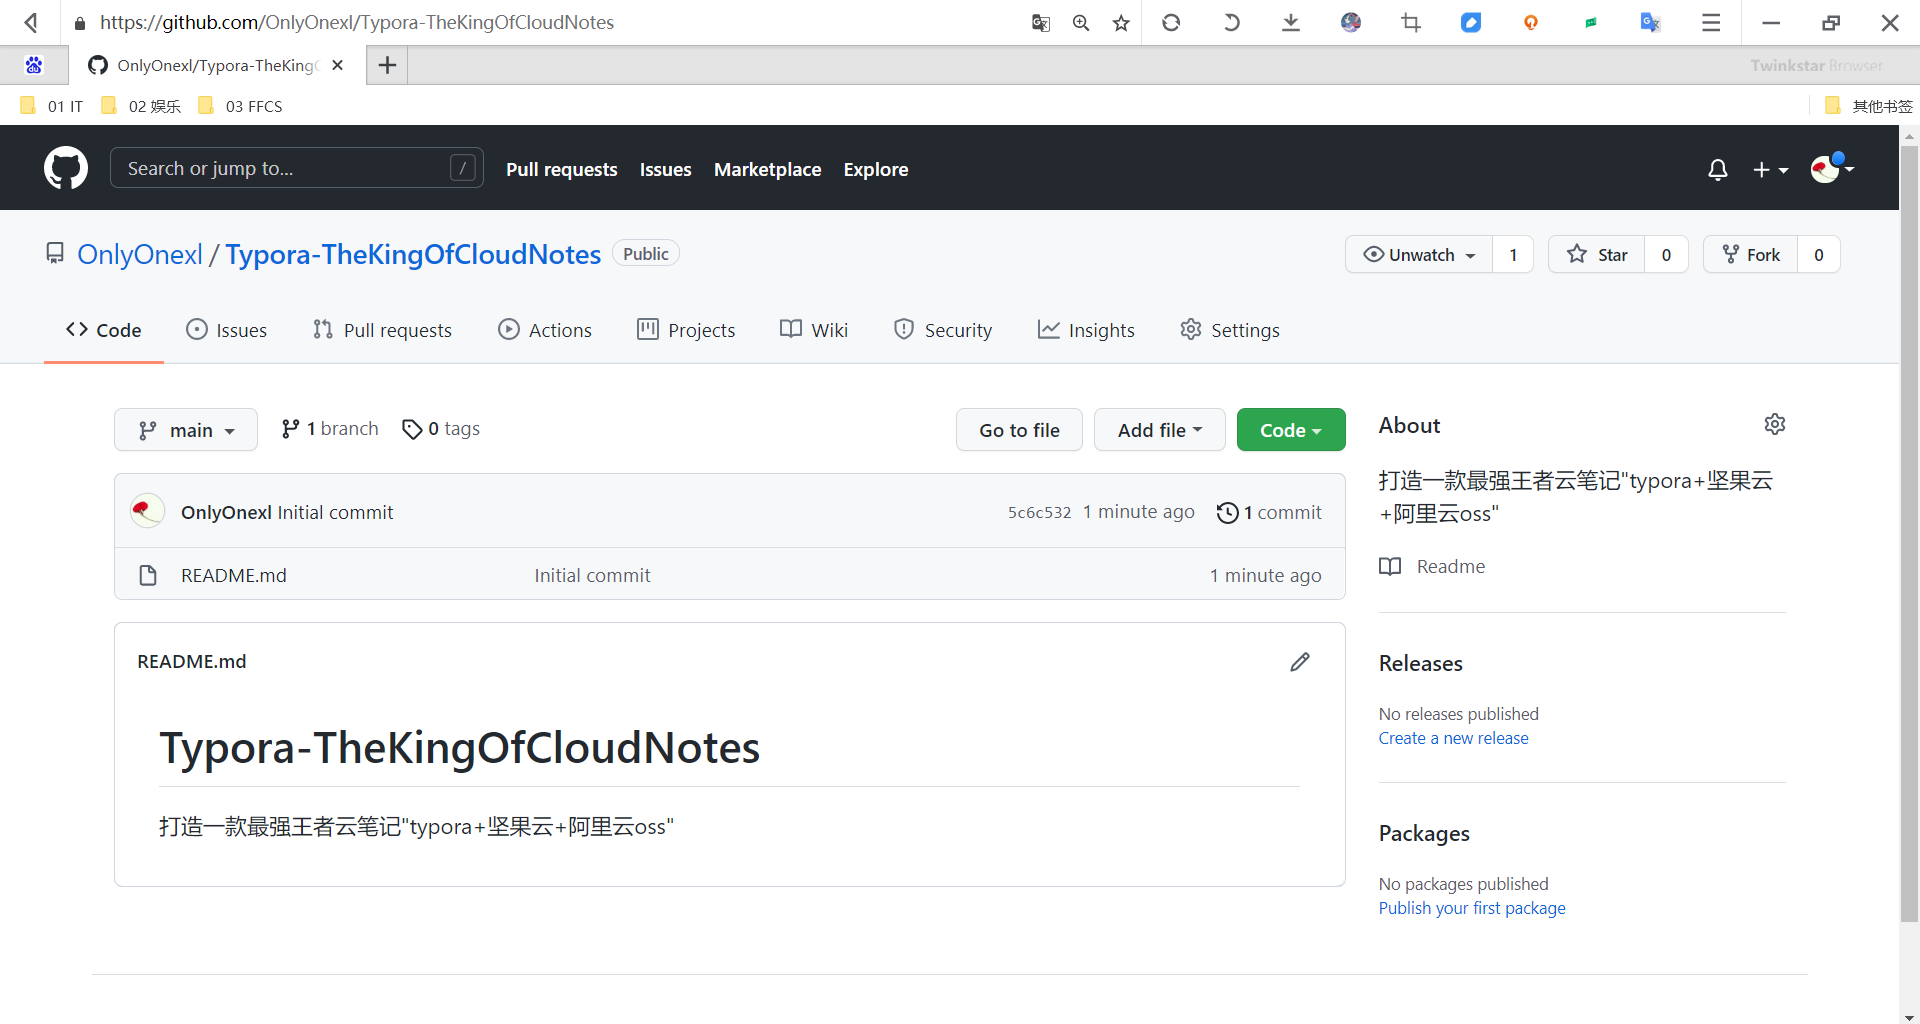
(3)安装git并配置公私钥
1、winodws上安装git:请参考如下文章
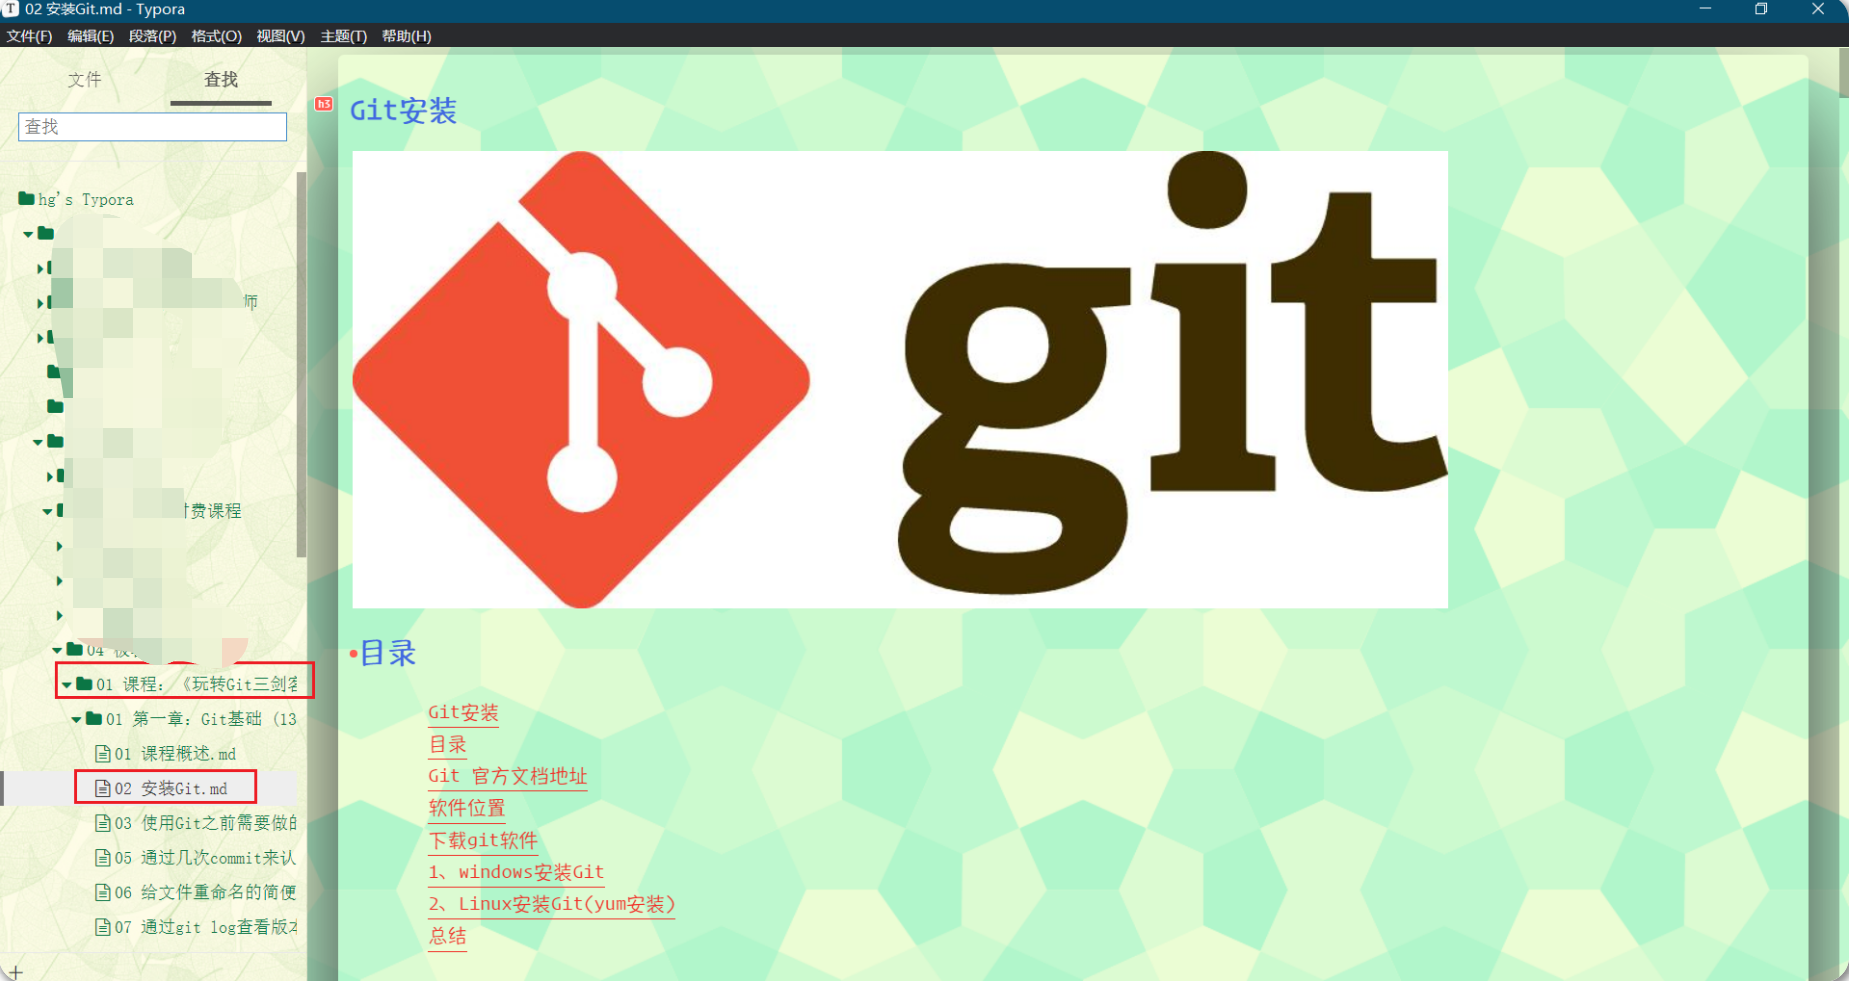
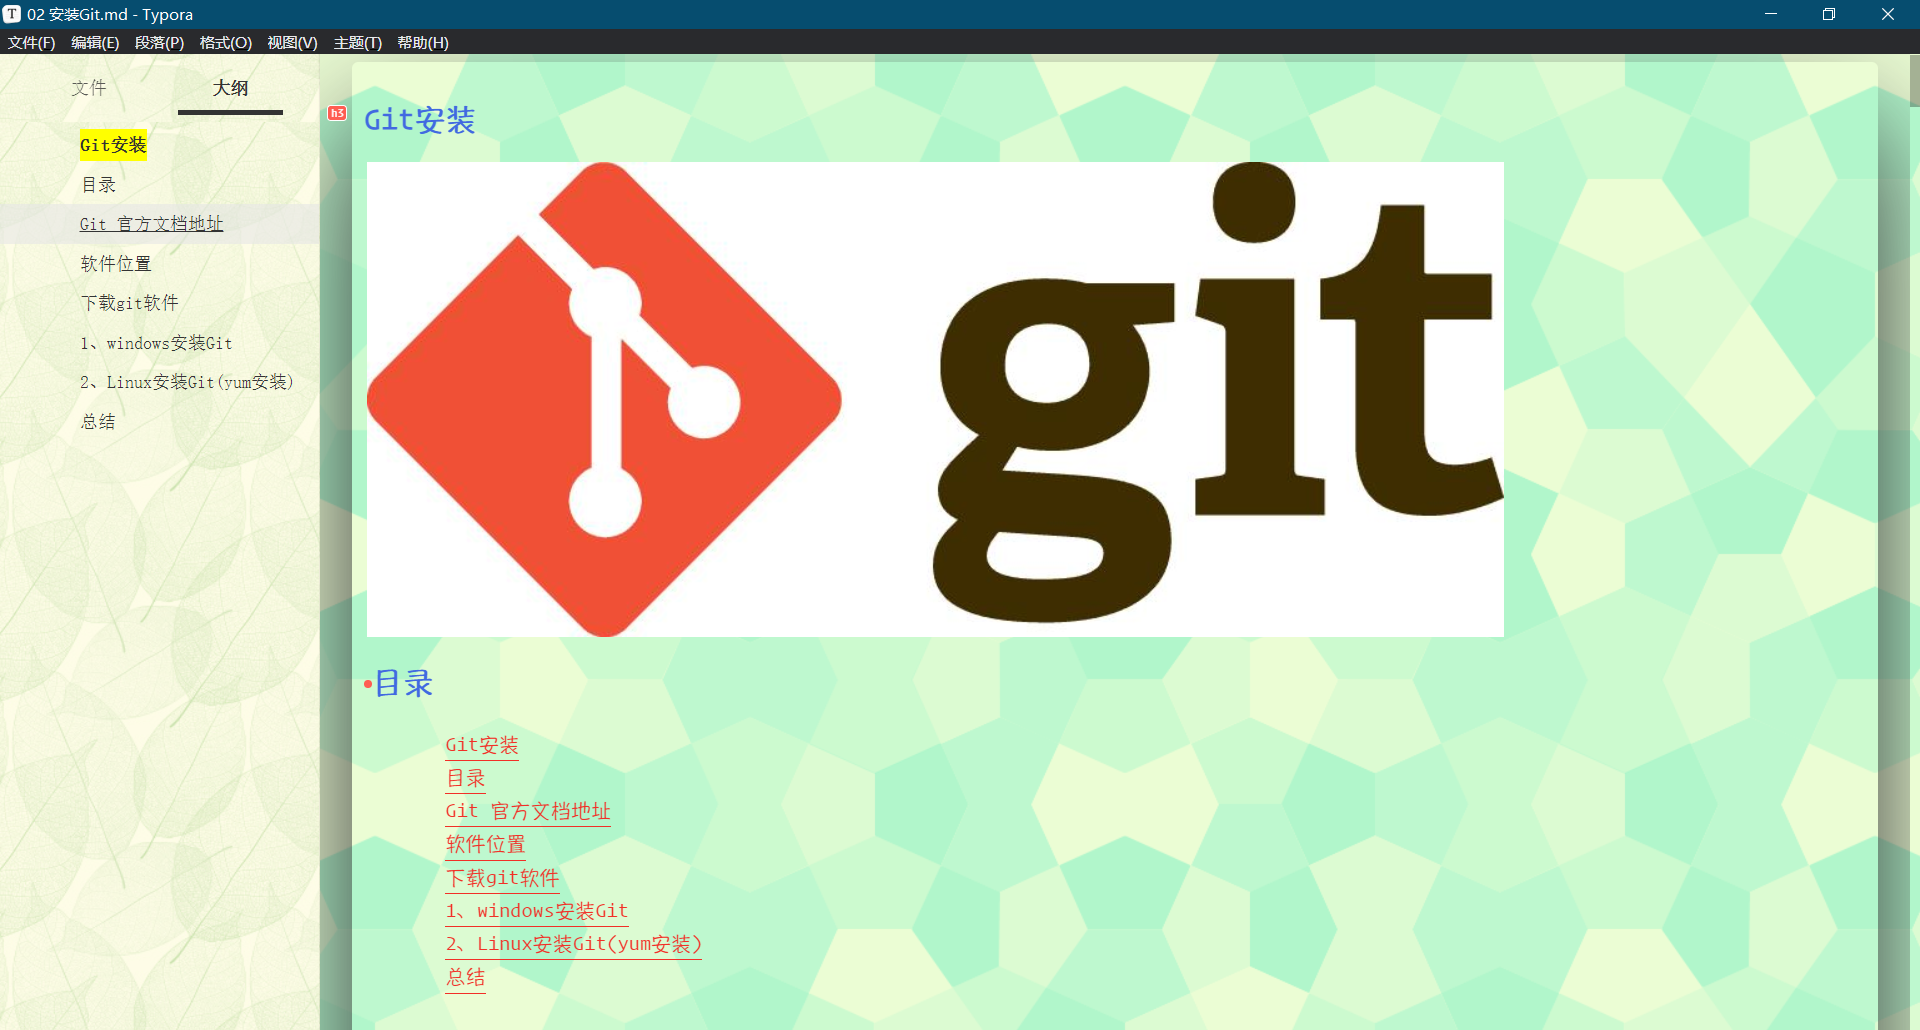
2、Git配置ssh登录GitHub管理自己的代码
🍀 检测本地pc是否已存在ssh秘钥(不存在可忽略次步骤)
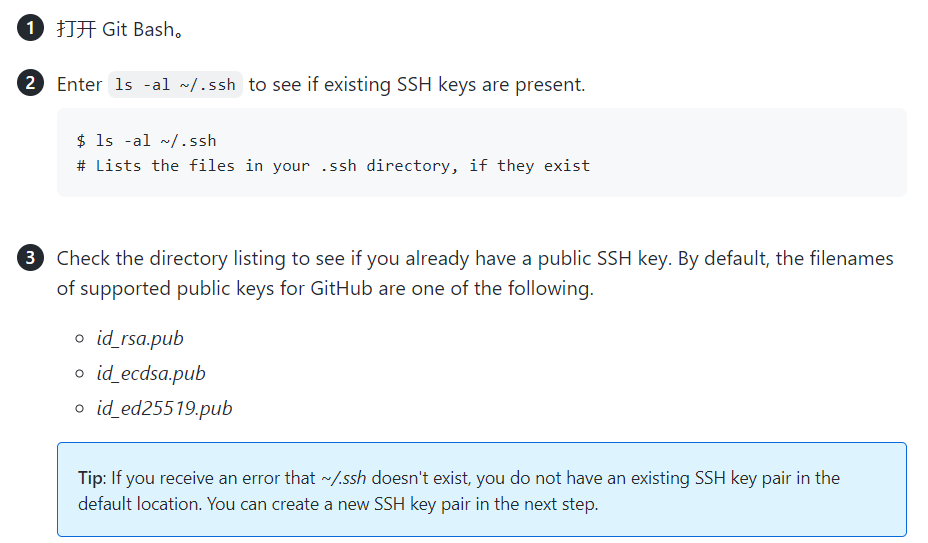
1️⃣ 设置签名
右键单击鼠标,点击 Git Bash Here输入以下命令,设置签名:
git config --global user.name  "hg"
git config --global user.email "2675263825@qq.com"2️⃣ 生成ssh秘钥
然后生成密钥(公钥和私钥):
ssh-keygen -t rsa -C "2675263825@qq.com"

#备注:
1.过程中按2次回车就好;
2.也可以添加-b选项 # ssh-keygen -t rsa -b 4096 -C "your_email@example.com"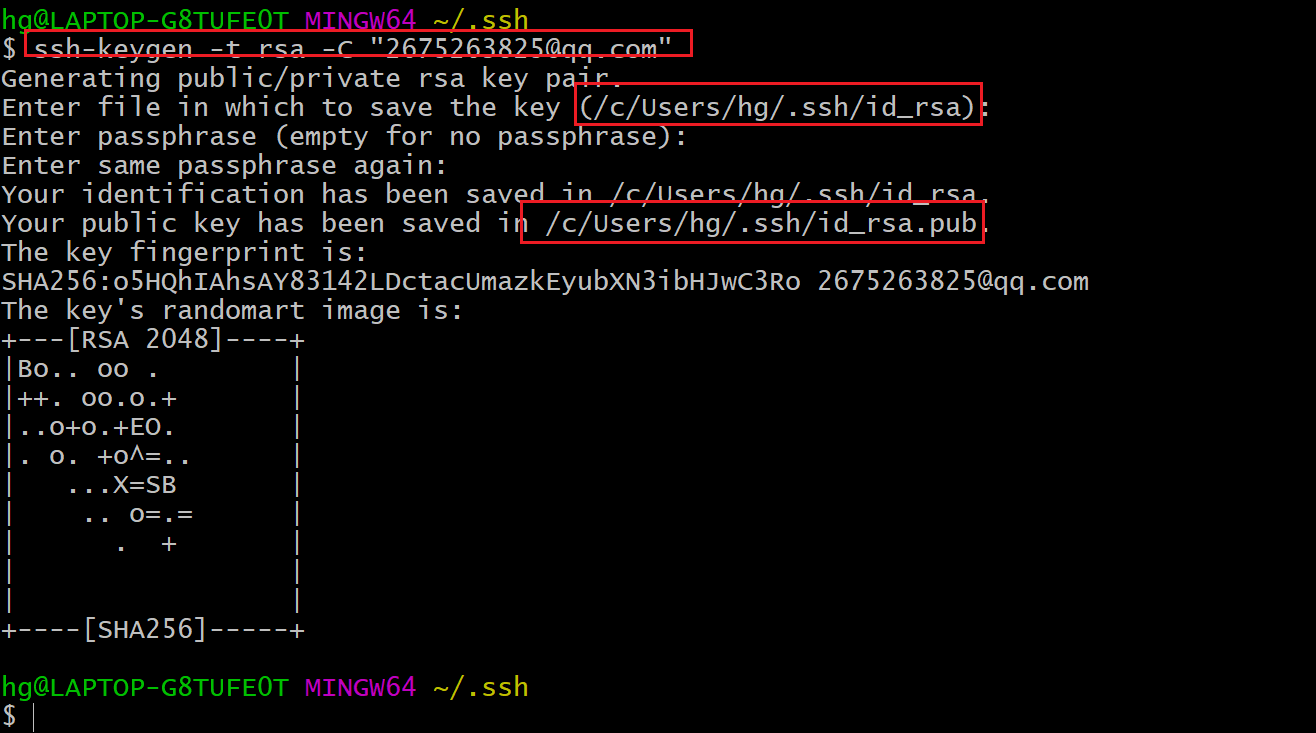
3️⃣ 复制ssh公钥到github
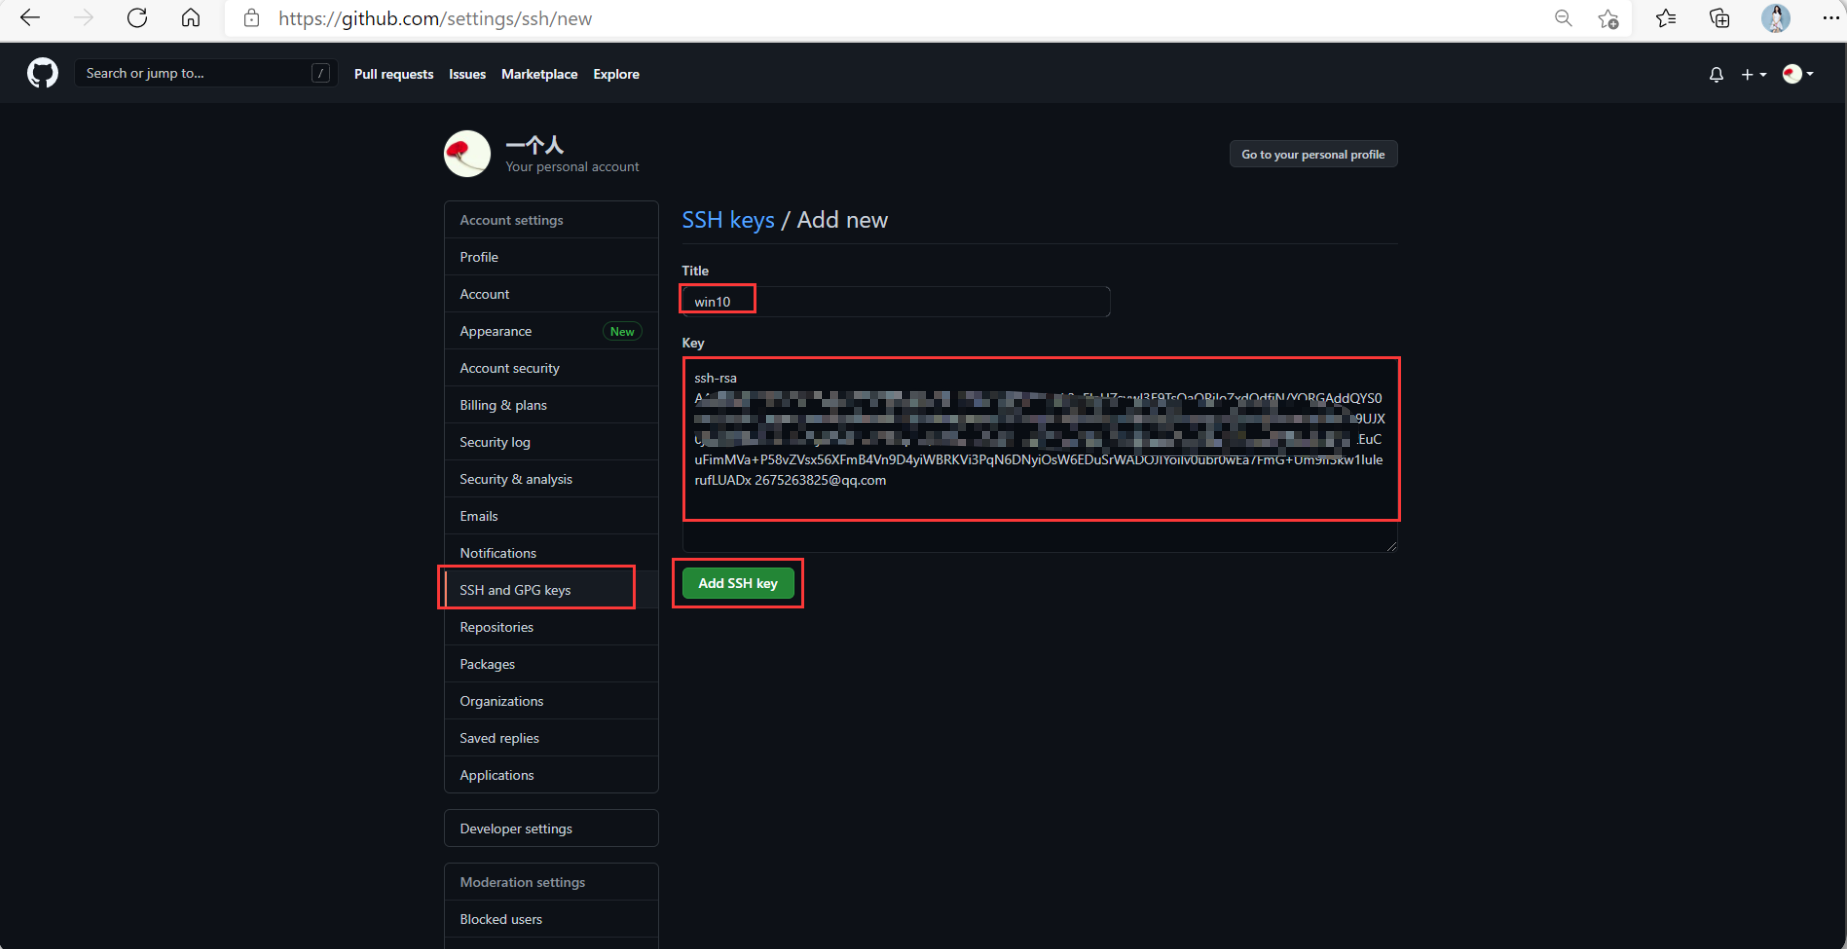
现在密钥已经生成,一般存放在(/c/Users/you/.ssh/id_rsa.pub.),我们运行下面的命令将密钥复制为粘贴板,等会儿会粘贴到github上去:


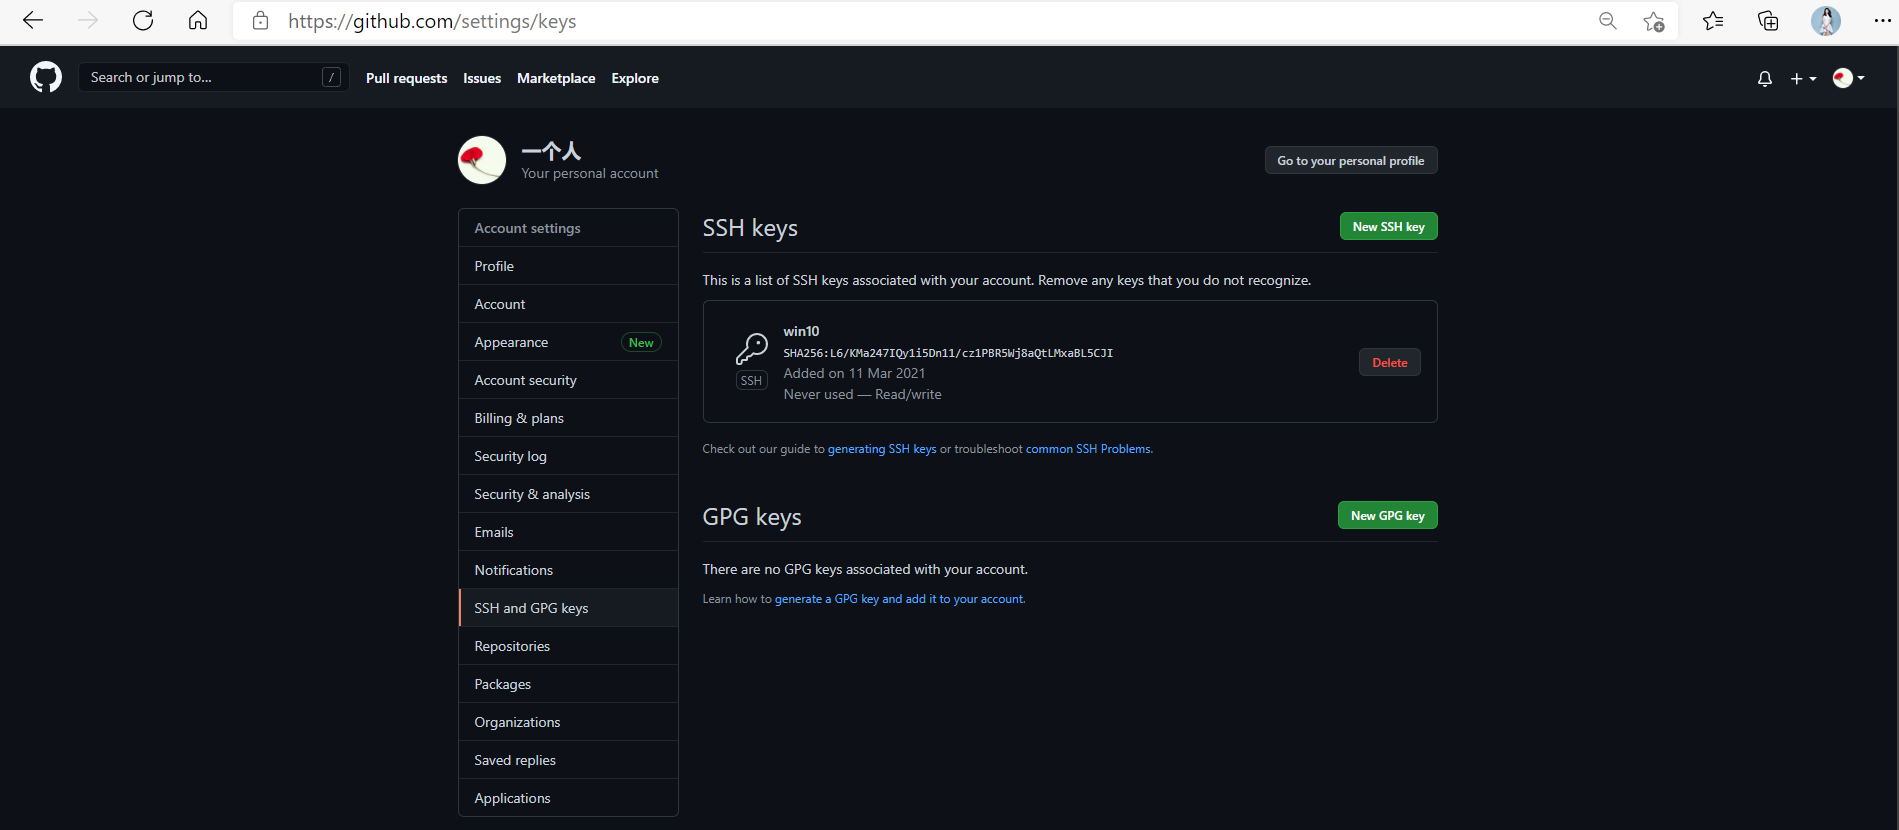
复制 id_rsa.pub 文件内容,登录 GitHub,点击用户头像→Settings→SSH and GPG keys,New SSH Key,输入复制的密钥信息,保存:
4️⃣ 验证:本地连接Github
右键单击鼠标,点击 Git Bash Here输入以下命令,如果如下图所示,出现你的用户名,那就成功了
$ ssh -T git@github.com
(4)clone远程库到本地然后进行push/pull操作
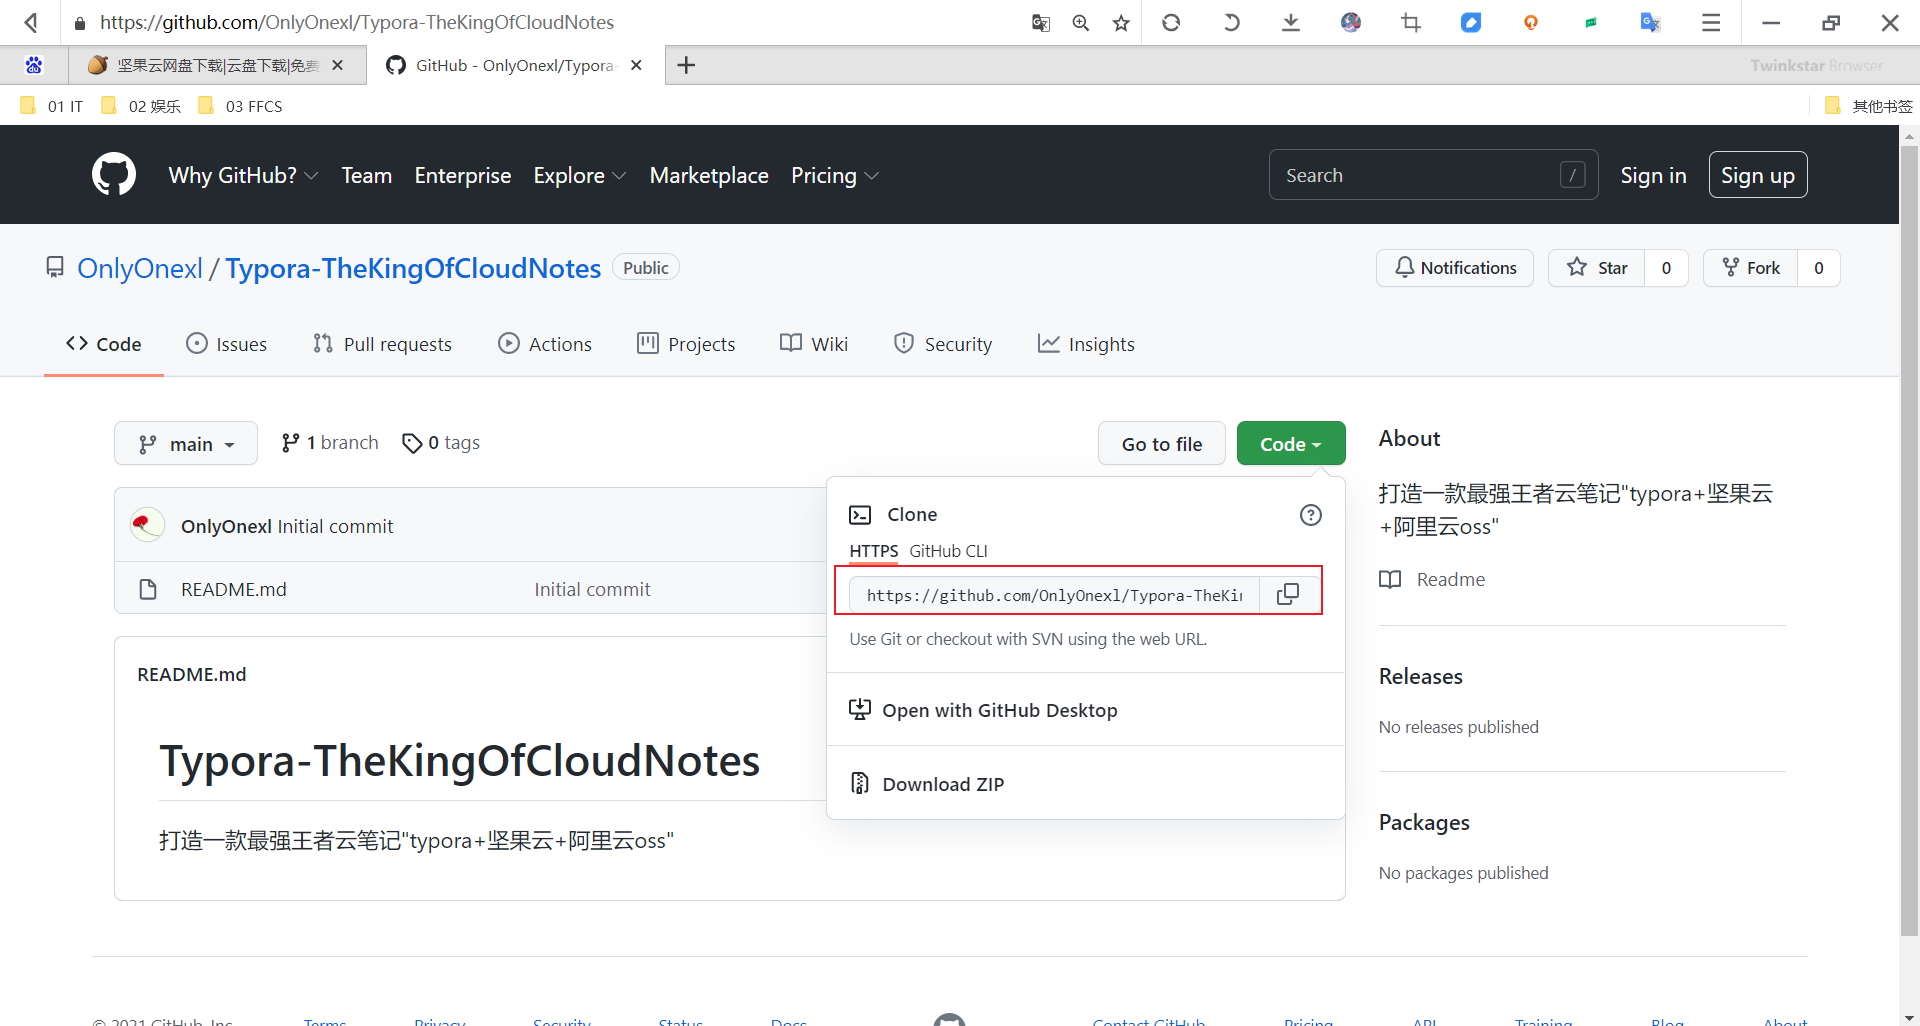
🍀 测试过程:拉取一个自己github上刚创建好的仓库
hg@LAPTOP-G8TUFE0T MINGW64 /d/IT/01 IT/github_repo/06 MyGitHub-OpenSourceProject
$ ls

hg@LAPTOP-G8TUFE0T MINGW64 /d/IT/01 IT/github_repo/06 MyGitHub-OpenSourceProject
$ git clone https://github.com/OnlyOnexl/Typora-TheKingOfCloudNotes.git
Cloning into 'Typora-TheKingOfCloudNotes'...
remote: Enumerating objects: 3, done.
remote: Counting objects: 100% (3/3), done.
remote: Compressing objects: 100% (2/2), done.
remote: Total 3 (delta 0), reused 0 (delta 0), pack-reused 0
Unpacking objects: 100% (3/3), done.

hg@LAPTOP-G8TUFE0T MINGW64 /d/IT/01 IT/github_repo/06 MyGitHub-OpenSourceProject
$ ls
Typora-TheKingOfCloudNotes/

hg@LAPTOP-G8TUFE0T MINGW64 /d/IT/01 IT/github_repo/06 MyGitHub-OpenSourceProject
$ cd Typora-TheKingOfCloudNotes/

hg@LAPTOP-G8TUFE0T MINGW64 /d/IT/01 IT/github_repo/06 MyGitHub-OpenSourceProject/Typora-TheKingOfCloudNotes (main)
$ ls
README.md

hg@LAPTOP-G8TUFE0T MINGW64 /d/IT/01 IT/github_repo/06 MyGitHub-OpenSourceProject/Typora-TheKingOfCloudNotes (main)
$ gs #个人第git status做了别名的
On branch main
Your branch is up to date with 'origin/main'. #up to date最新的,最近的

nothing to commit, working tree clean

hg@LAPTOP-G8TUFE0T MINGW64 /d/IT/01 IT/github_repo/06 MyGitHub-OpenSourceProject/Typora-TheKingOfCloudNotes (main)🍀 编辑好文件后,现在打算push仓库:
查看下当前环境:发现原来仓库的Readme.md文件被我删除了,但又新创建一个文件
$ ls
$ gs
现在的目的就是如何把我当前新增的东西push到远程仓库呢?
我们再来看看当前的分支情况:
$ git branch -av
$ gitk --all
$ git log --all --graph
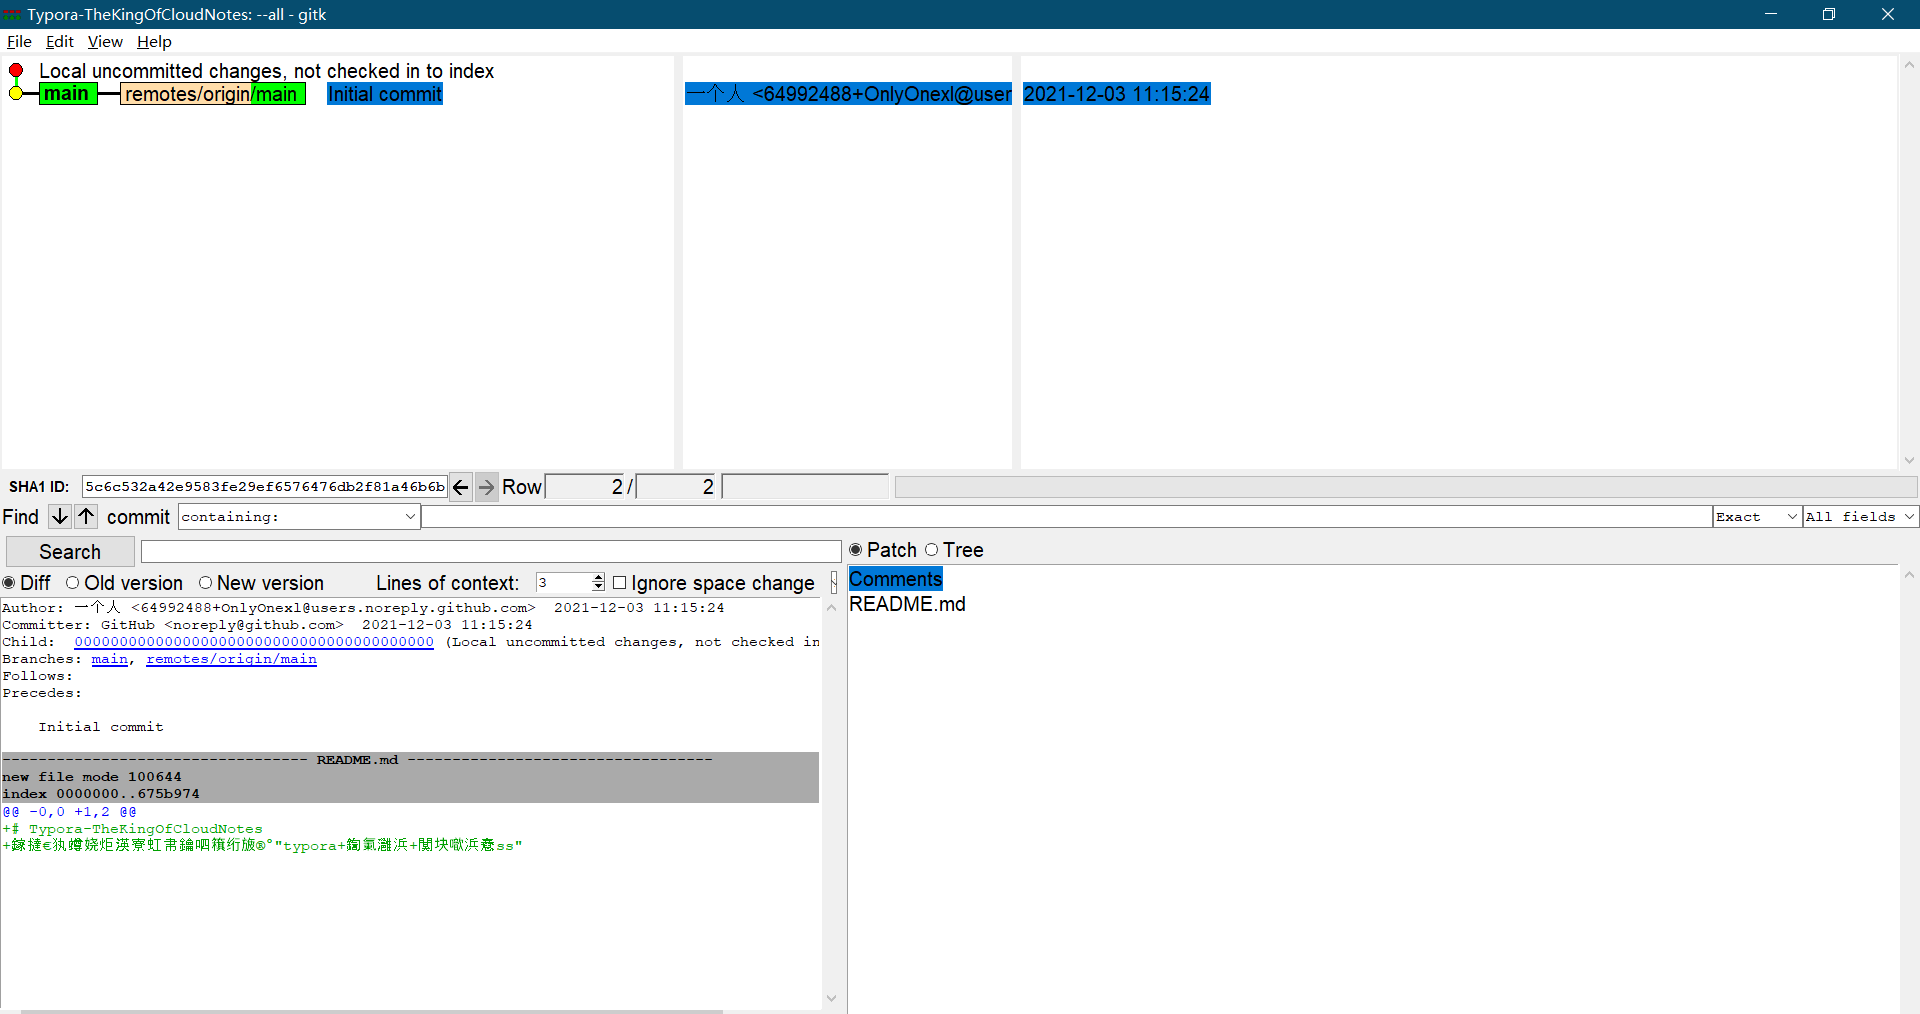

现在有个问题,我该以什么分支名提交呢?,我们再来看看当前仓库信息
$ cat .git/config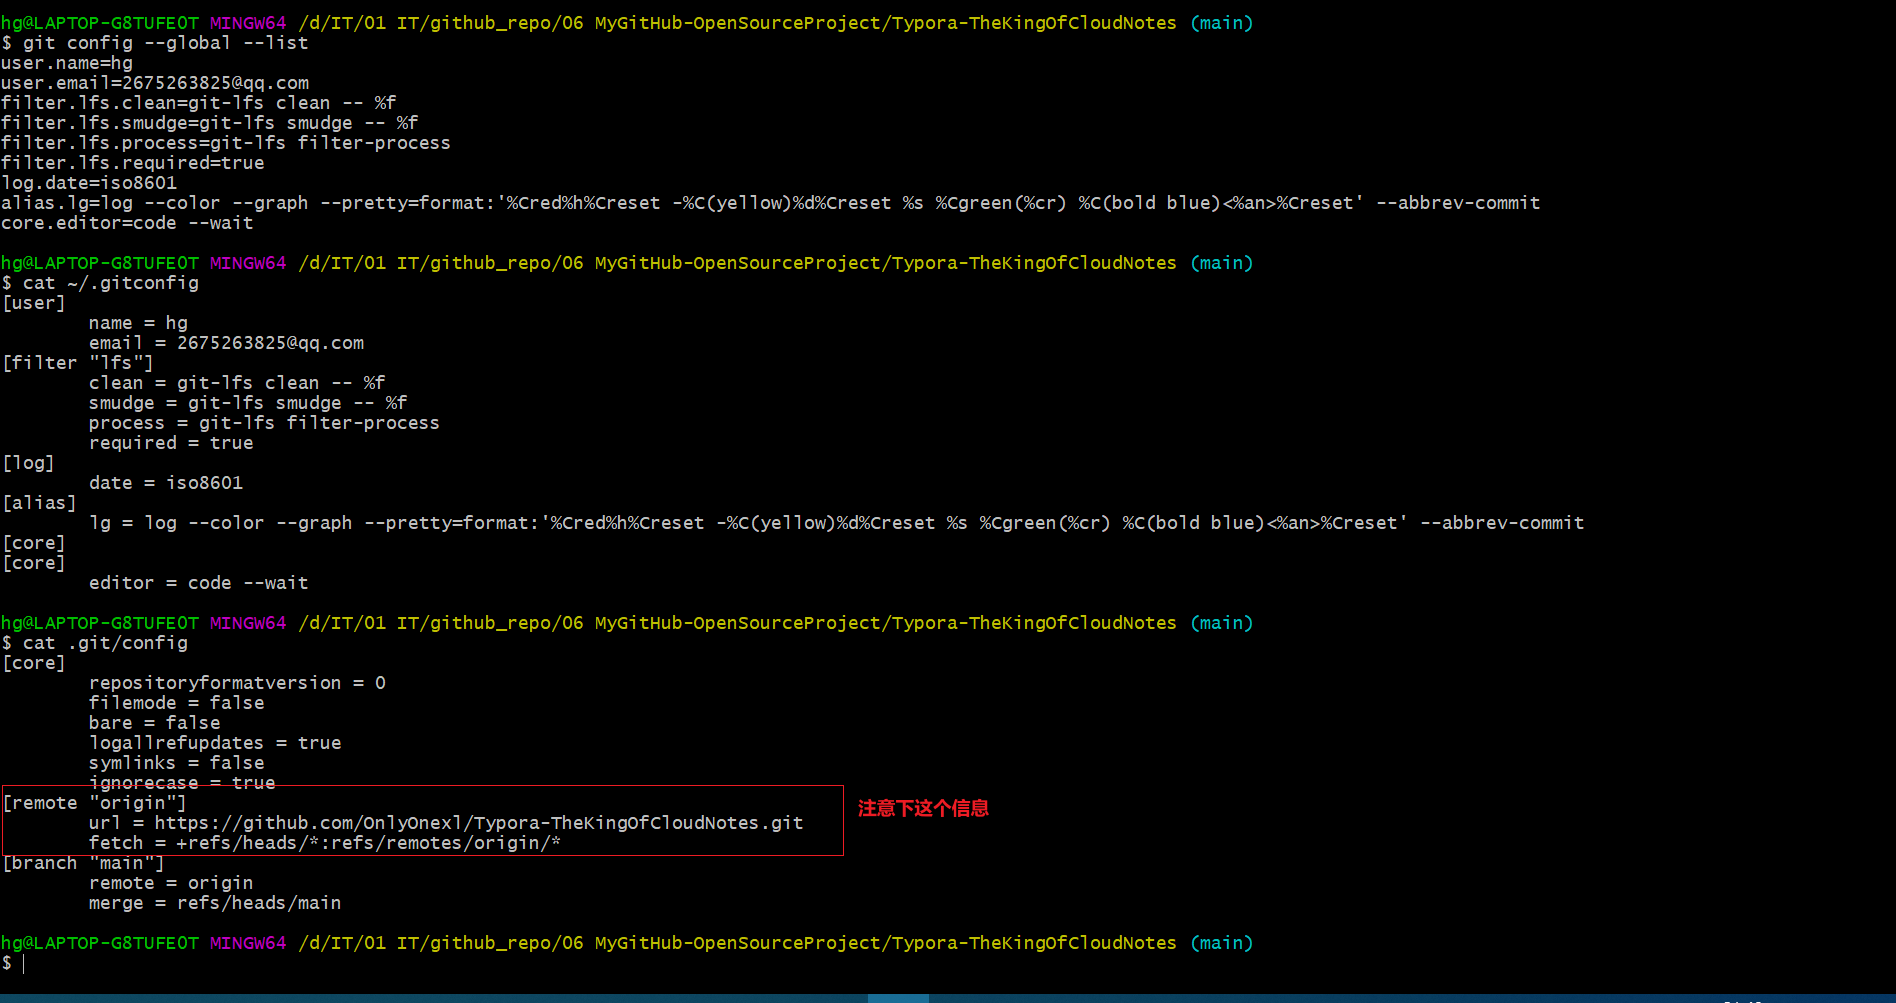
因为通过之前信息可以看到,我们仓库的主机别名叫做origin,远程分支叫做main,本地分支也是main,因此后续在推送时该使用如下命令:
$ git push origin main🍀 再推送之前,我们先来把本次更新内容做一次commit:
$ git add .
$ git commit -m"The first commit: Create file Readme-Typora-TheKingOfCloudNotes-2021.12.03.md"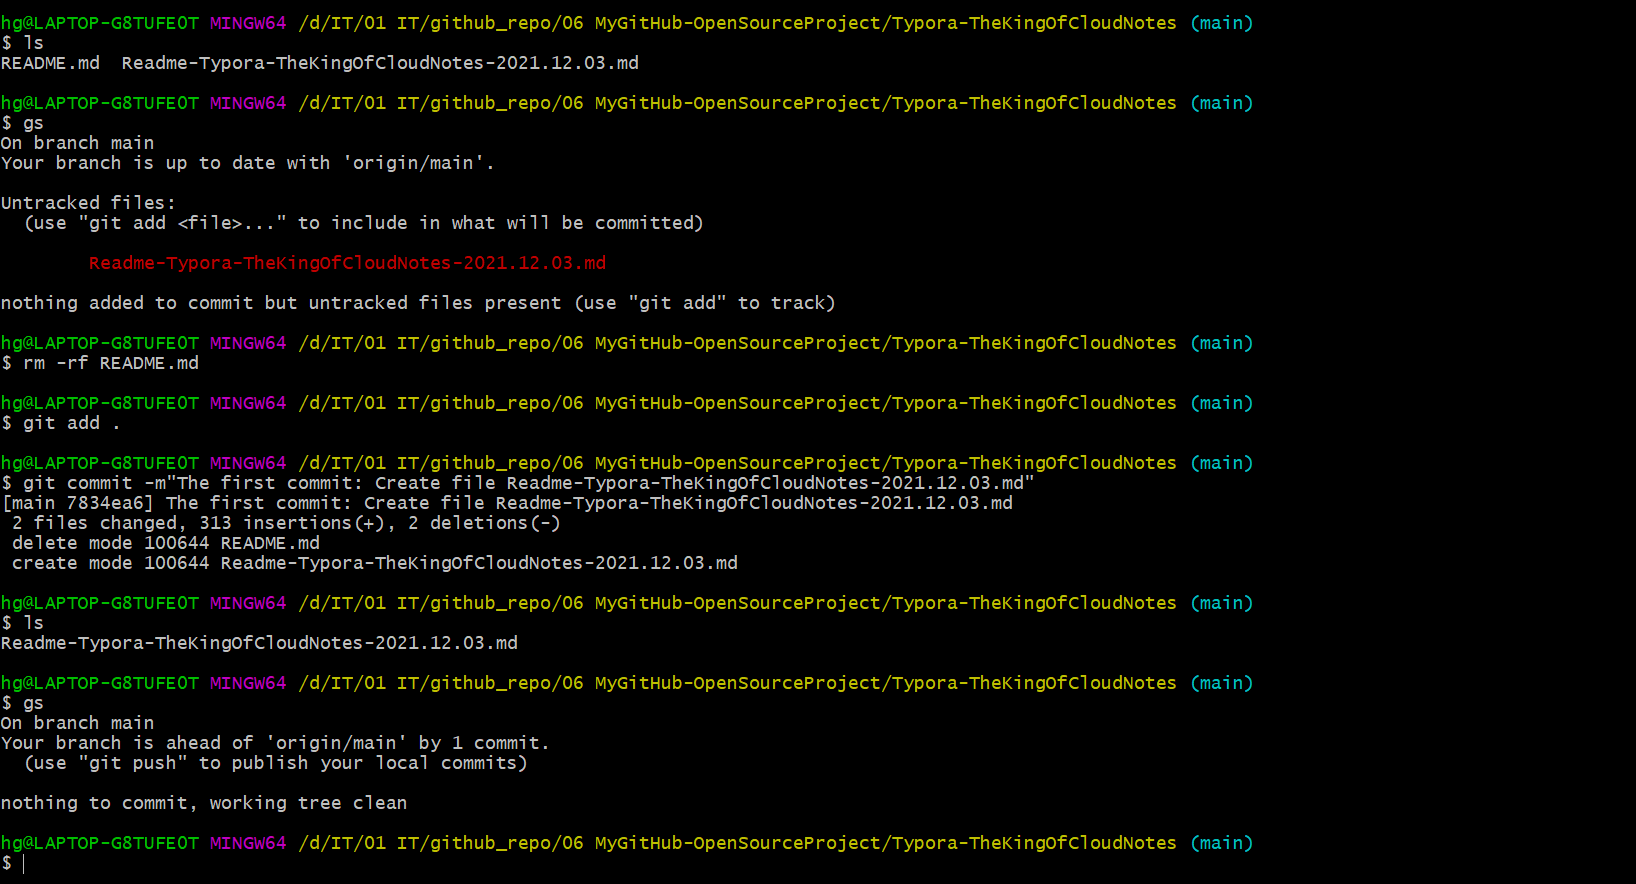
🍀 开始推送:
淦,怎么还有验证呢。。。。。

报错了:。。。
https://blog.csdn.net/weixin_41010198/article/details/119698015
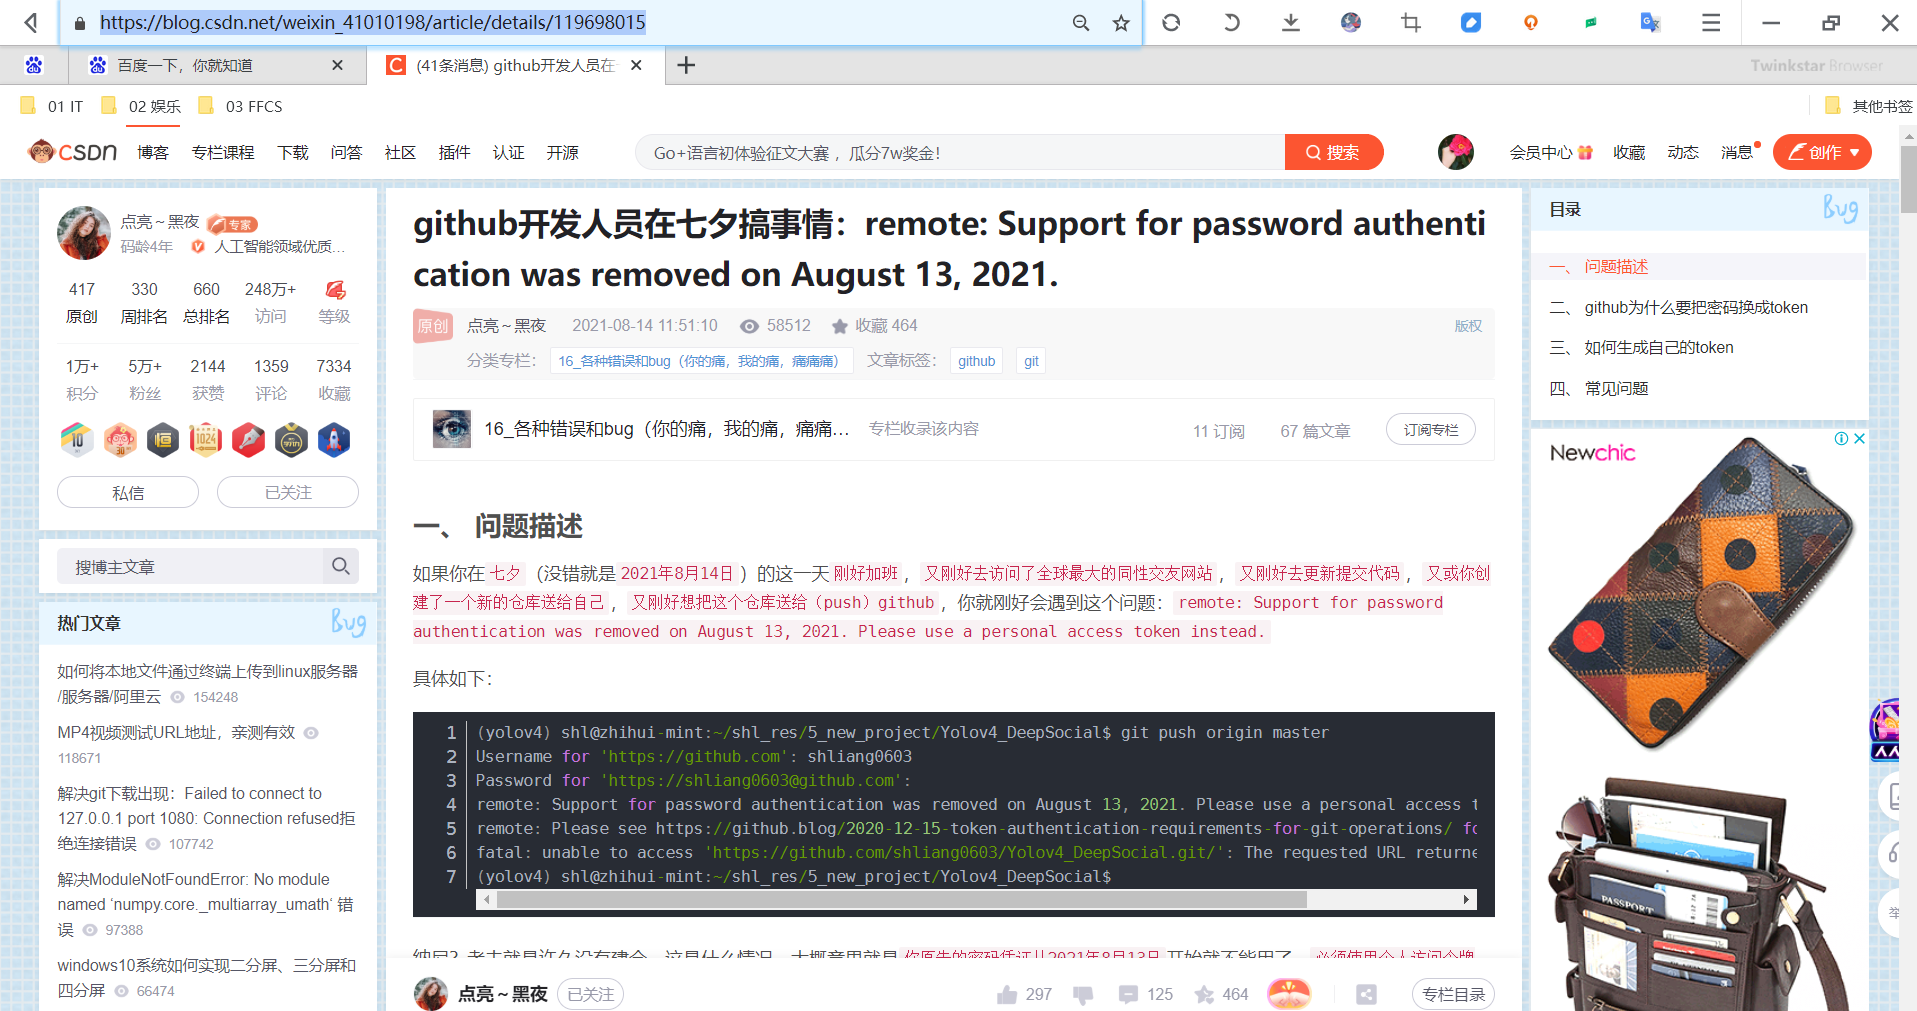

hg@LAPTOP-G8TUFE0T MINGW64 /d/IT/01 IT/github_repo/06 MyGitHub-OpenSourceProject/Typora-TheKingOfCloudNotes (main)
$ git push origin main
Username for 'https://github.com': 2675263825@qq.com
remote: Support for password authentication was removed on August 13, 2021. Please use a personal access token instead.
remote: Please see https://github.blog/2020-12-15-token-authentication-requirements-for-git-operations/ for more information.
fatal: Authentication failed for 'https://github.com/OnlyOnexl/Typora-TheKingOfCloudNotes.git/'

hg@LAPTOP-G8TUFE0T MINGW64 /d/IT/01 IT/github_repo/06 MyGitHub-OpenSourceProject/Typora-TheKingOfCloudNotes (main)按照楼上这位博主的方法修改下就好了,点个赞💖。
🍀 奇怪:又遇到问题了。。。


hg@LAPTOP-G8TUFE0T MINGW64 /d/IT/01 IT/github_repo/06 MyGitHub-OpenSourceProject/Typora-TheKingOfCloudNotes (main)
$ git push origin main
fatal: unable to access 'https://github.com/OnlyOnexl/Typora-TheKingOfCloudNotes.git/': Empty reply from server

hg@LAPTOP-G8TUFE0T MINGW64 /d/IT/01 IT/github_repo/06 MyGitHub-OpenSourceProject/Typora-TheKingOfCloudNotes (main)解决办法:
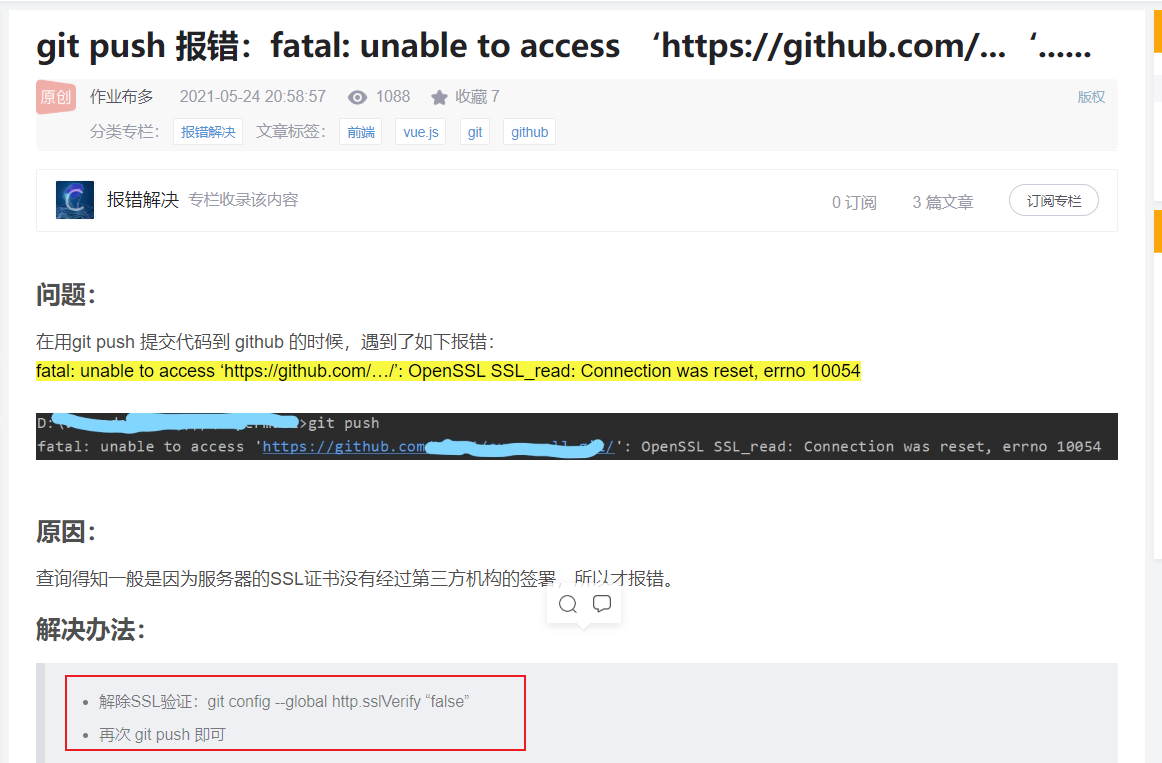

配置后,终于提交成功了,666:
$ git config --global http.sslVerify false
$ git push origin main
完成。
出现这个问题最大可能是因为,我本地开了shadowflay,需要专门配置下代理才可以,否则会一直卡主的,后面的那个(git pull/git push一直卡主)问题现象也是一样的。
⚠️ o,shift,这个git pull,git push怎么这么慢呢,也连着vpn啊。。。。

https://blog.csdn.net/dashi_lu/article/details/89641778
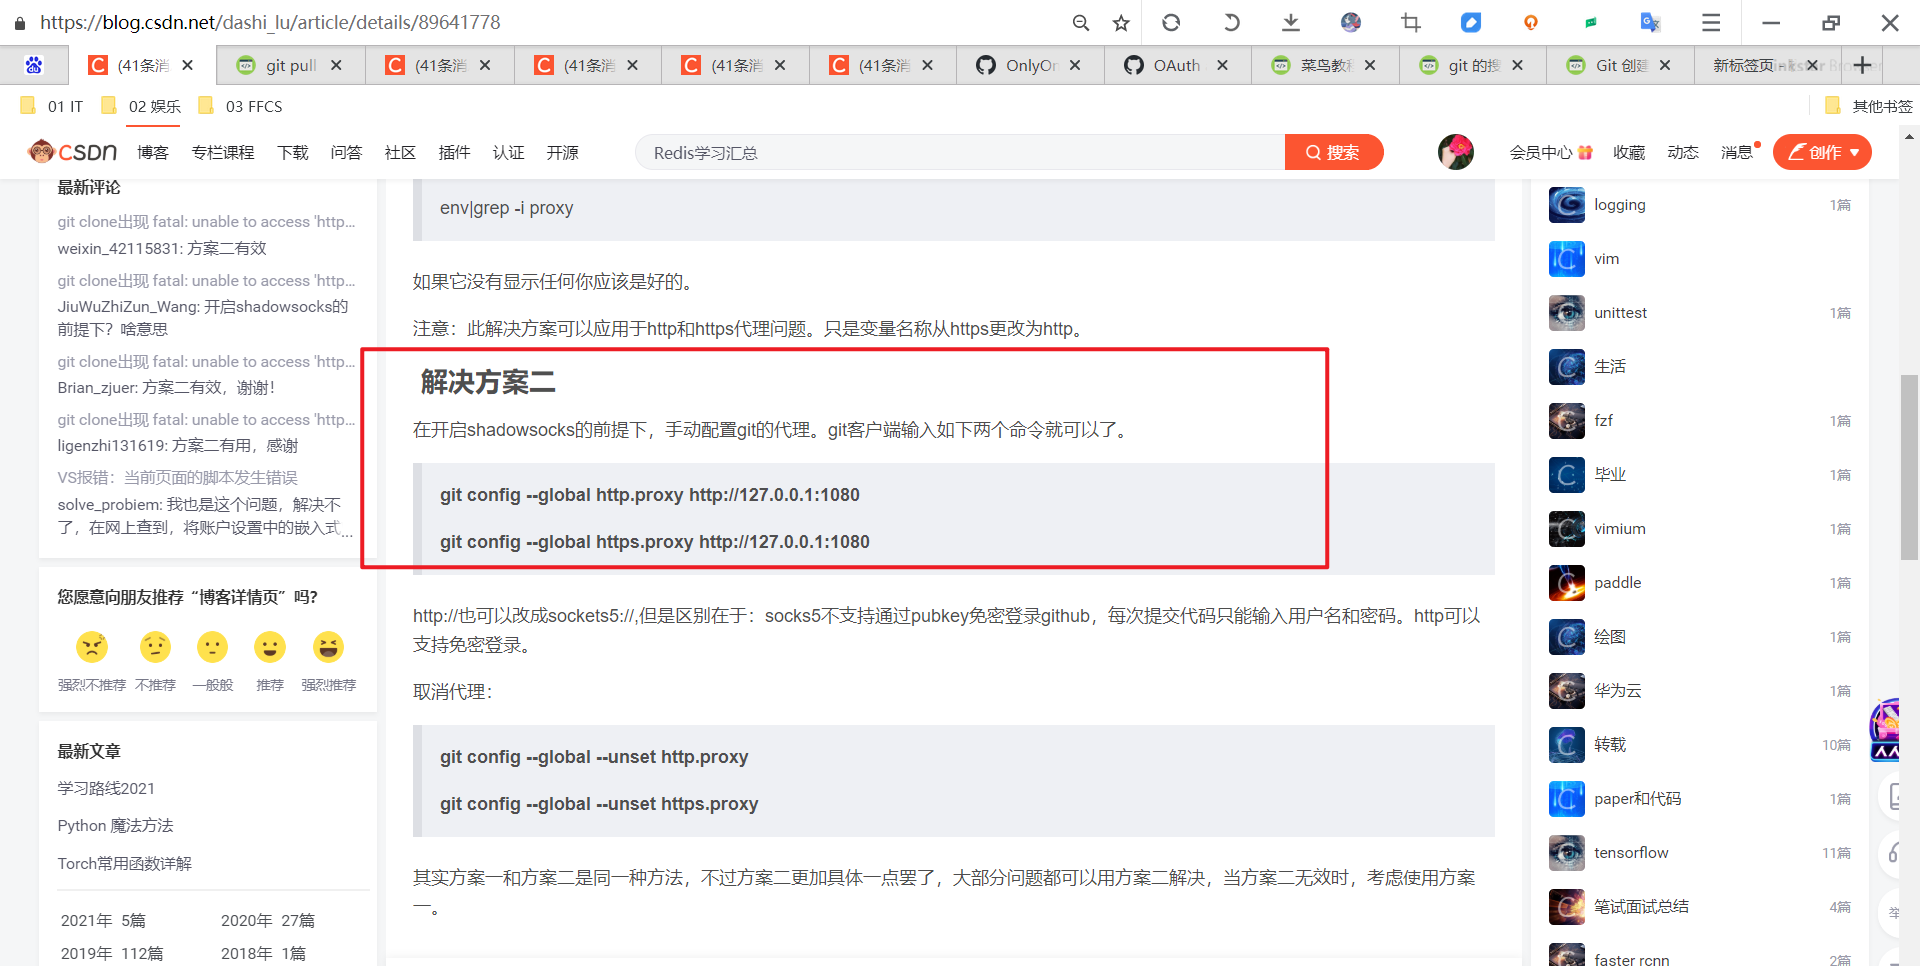
这里我再次整理下笔记。
git config --global http.proxy http://127.0.0.1:7890
git config --global https.proxy http://127.0.0.1:7890🍀 我们再查看下当前环境:
$ git log --all --graph
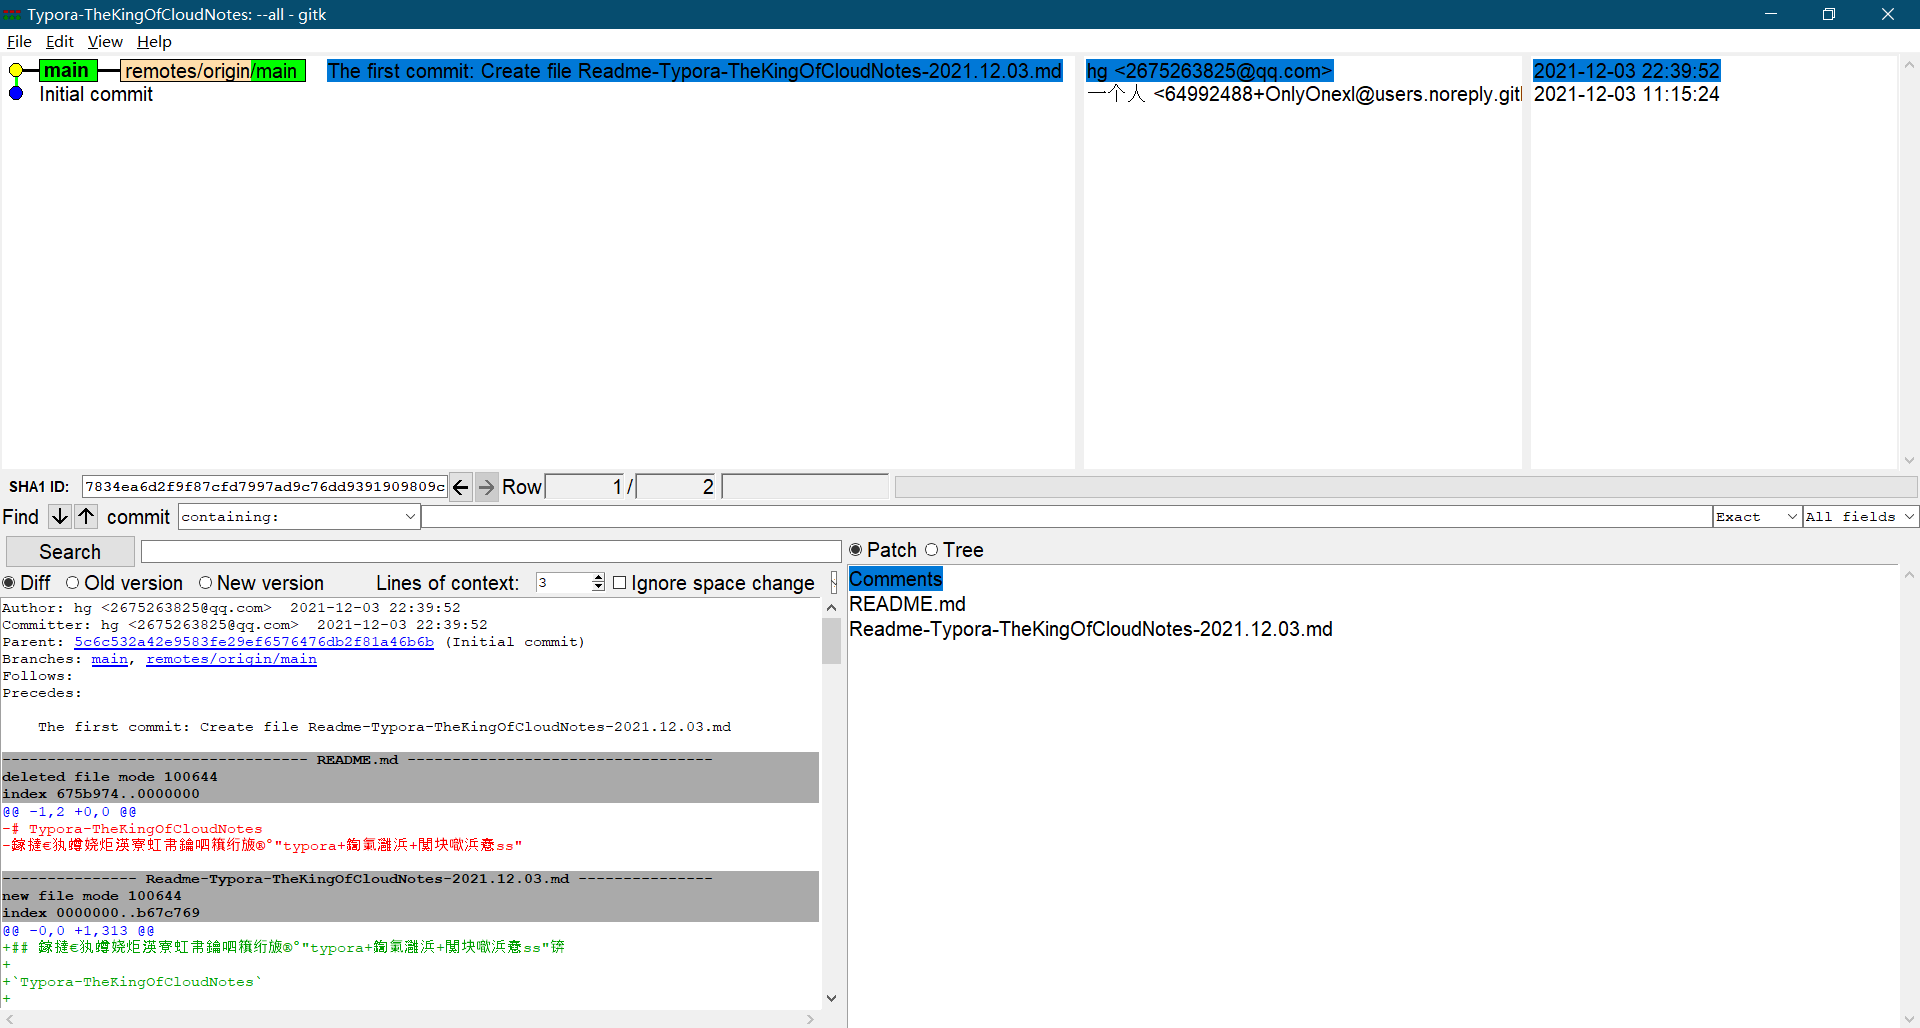
🍀 我们再到github上查看我们的仓库信息:
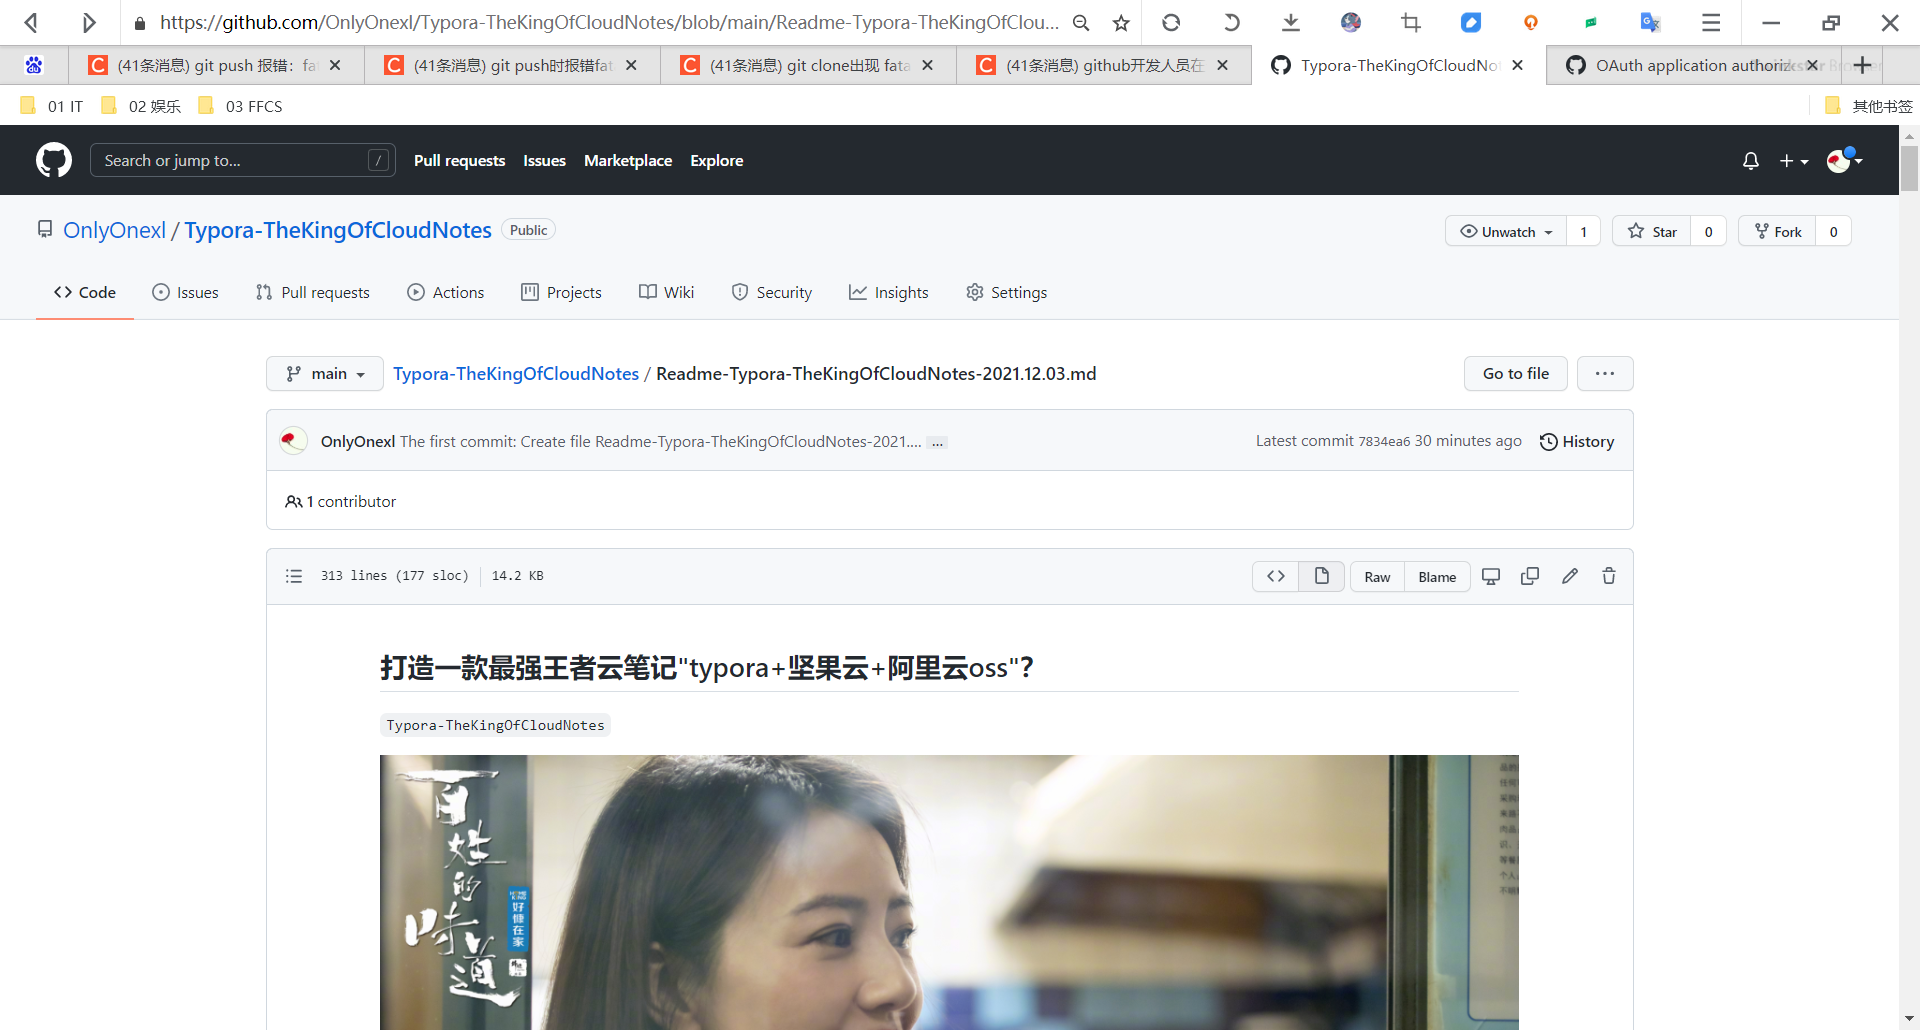
https://github.com/OnlyOnexl/Typora-TheKingOfCloudNotes
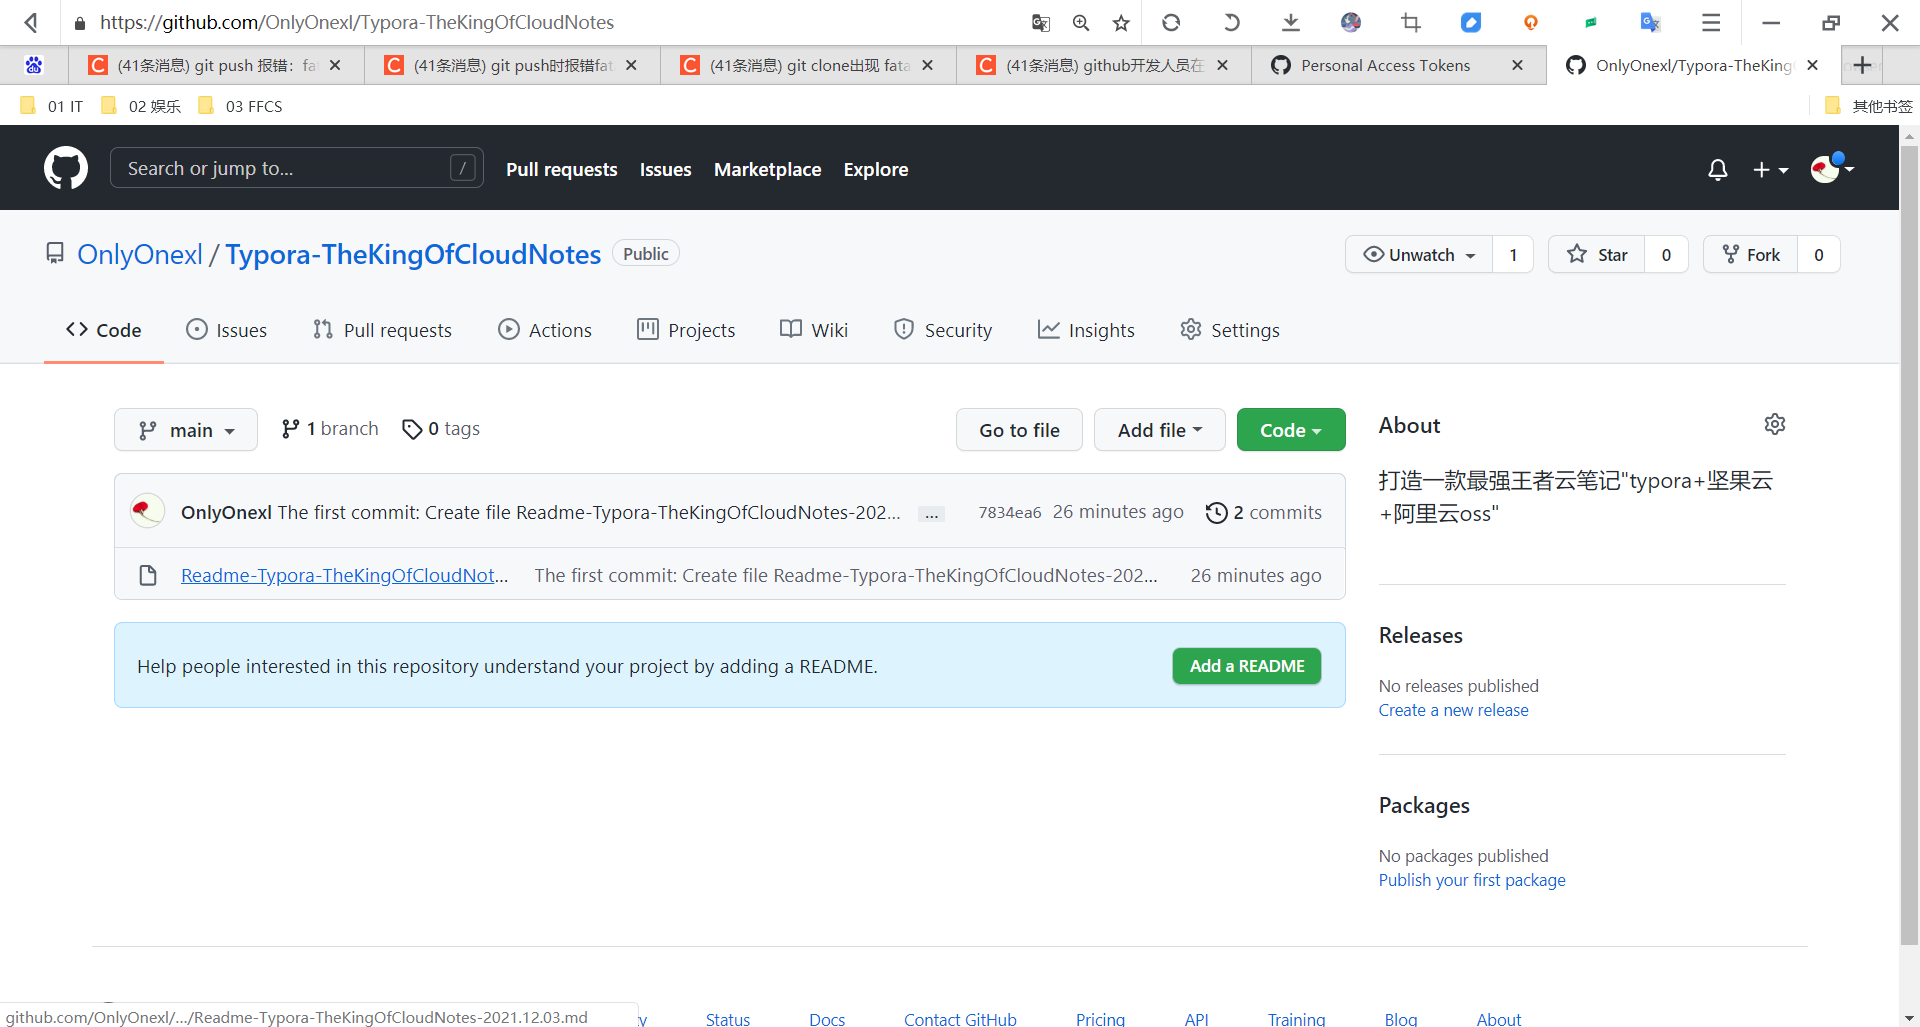
这个github页面没有目录,阅读性还是非常差的。。。
🍀 现在就可以使用git push和git pull命令来使用git仓库了。
$ git pull
注意事项
命令汇总
无非就是以下几种情况:
clone一个远程库到本地;(可能是自己的,也可能是别人的)
    push
    pull

自己本地创建一个新仓库,然后推送到远程库;
    push
    pull

---
1、创建一个新仓库(从远程库直接clone到本地)
git clone http://172.29.9.10/root/xuegod-web.git

cd xuegod-web
touch README.md
git add README.md
git commit -m "add README"

git push -u origin master

2.推送现有文件夹
cd existing_folder
git init
git remote add origin http://172.29.9.10/root/xuegod-web.git #对远程库git地址做别名
git add .
git commit -m "Initial commit"
git push -u origin master
#注意:.git 目录中存放的是本地库相关的子目录和文件,不要删除,也不要胡乱修改。


3.推送现有的 Git 仓库
cd existing_repo
git remote rename origin old-origin
git remote add origin http://172.29.9.10/root/xuegod-web.git
git push -u origin --all
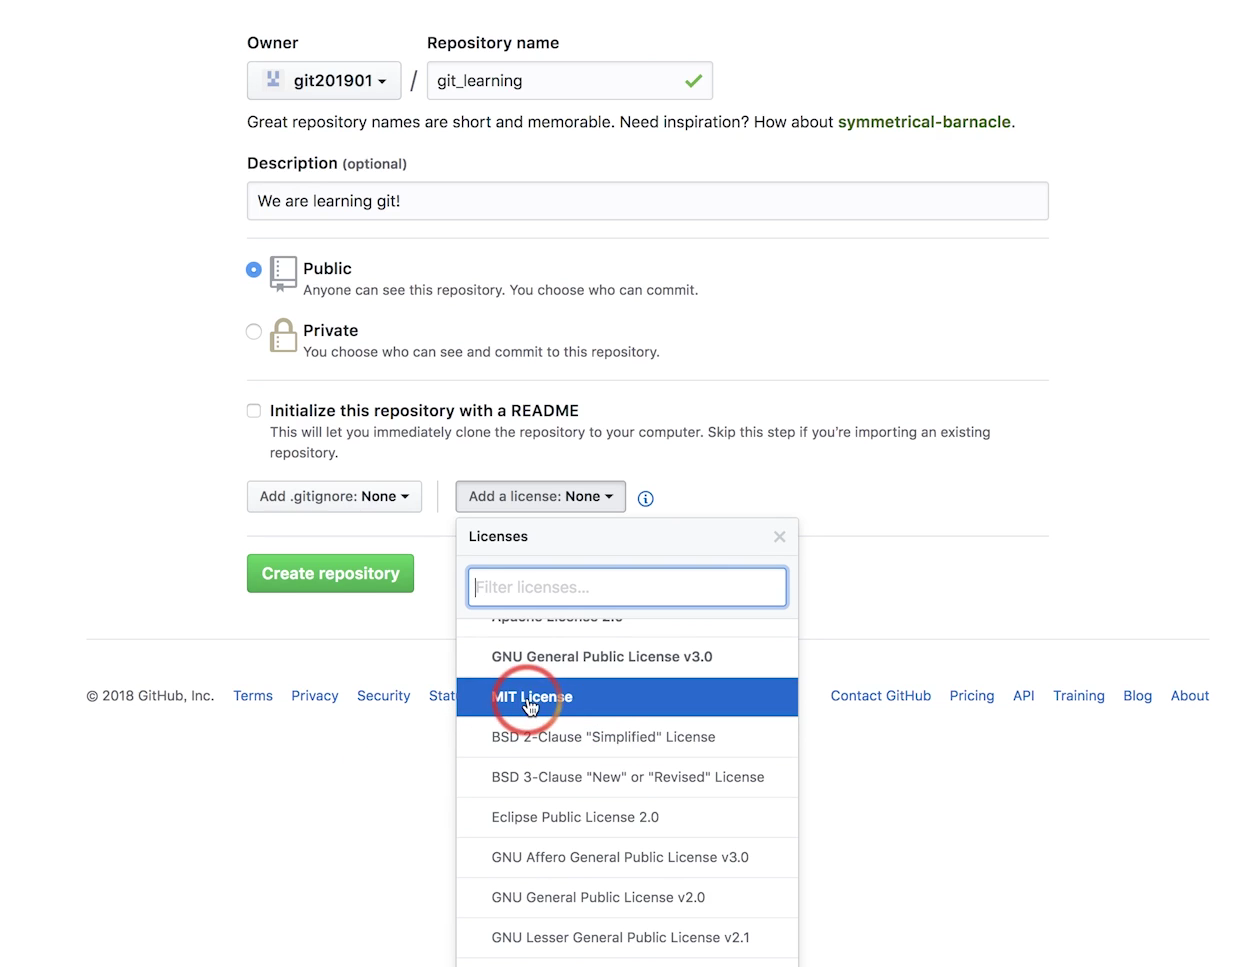
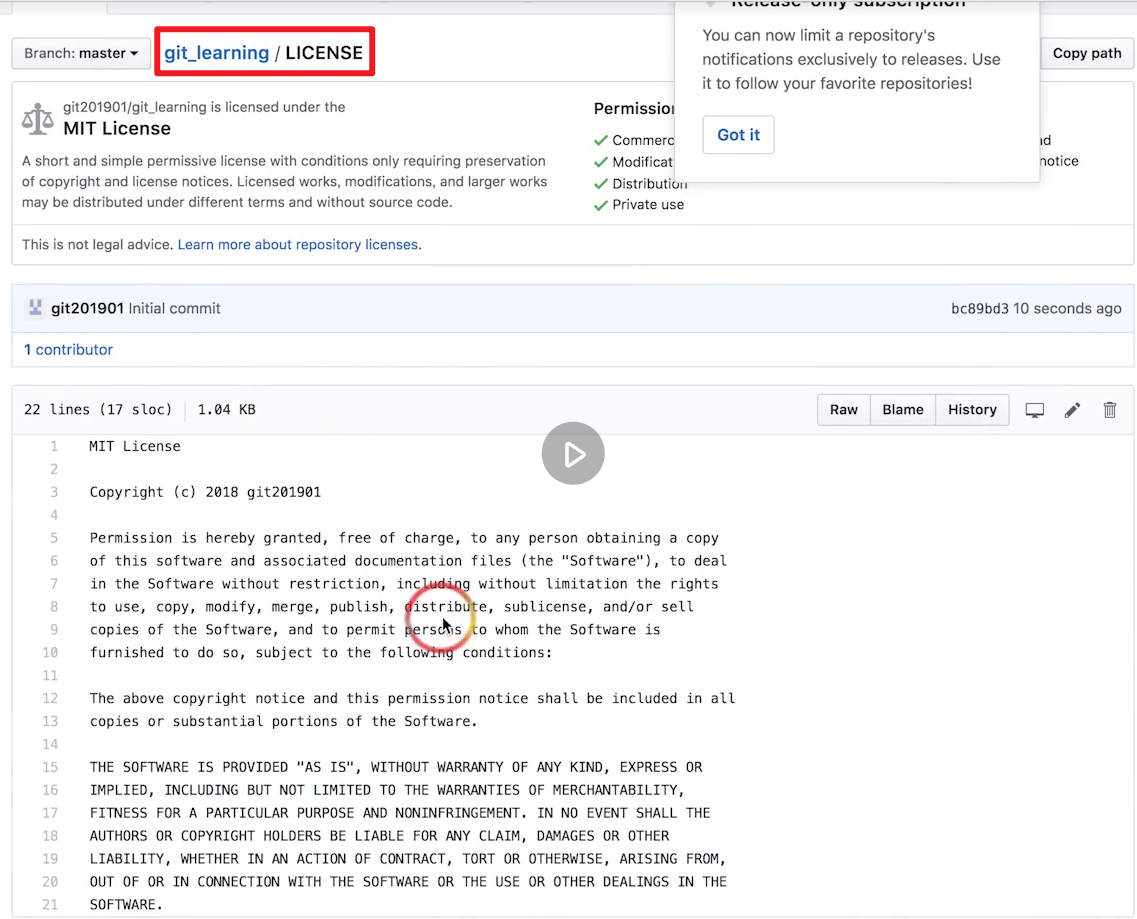
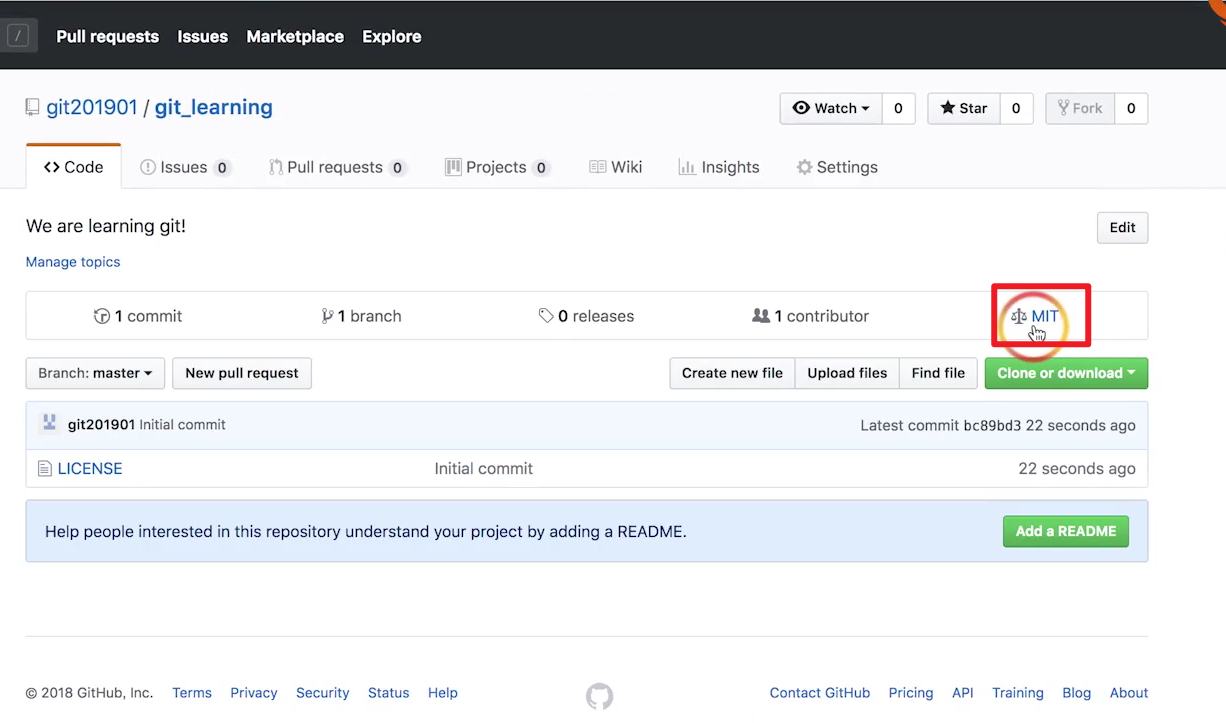
git push -u origin --tags注意:.gitignore和license
Github 中的 GPG keys 起什么作用
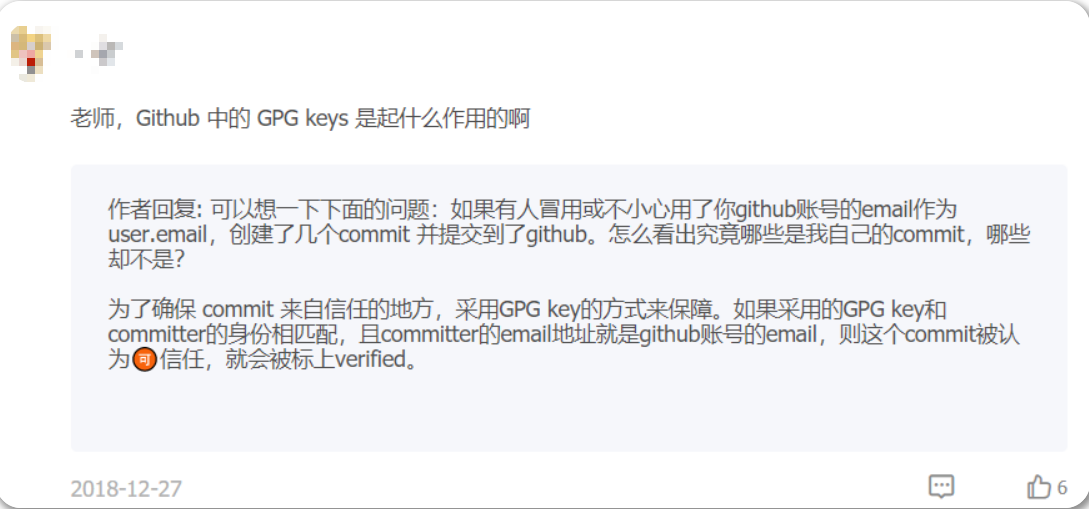
🍀 我们需不需要再进一步配置好GPG keys呢?

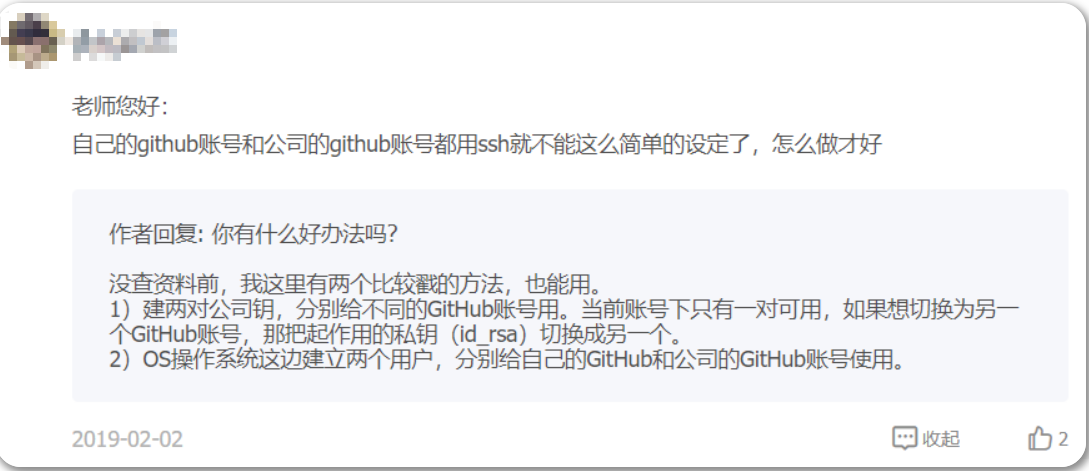
使用~/.ssh/config文件解决个人和公司ssh秘钥问题
🍀 注意:问题:自己的github账号和公司的github账号都用ssh就不能这么简单的设定了,怎么做才好?
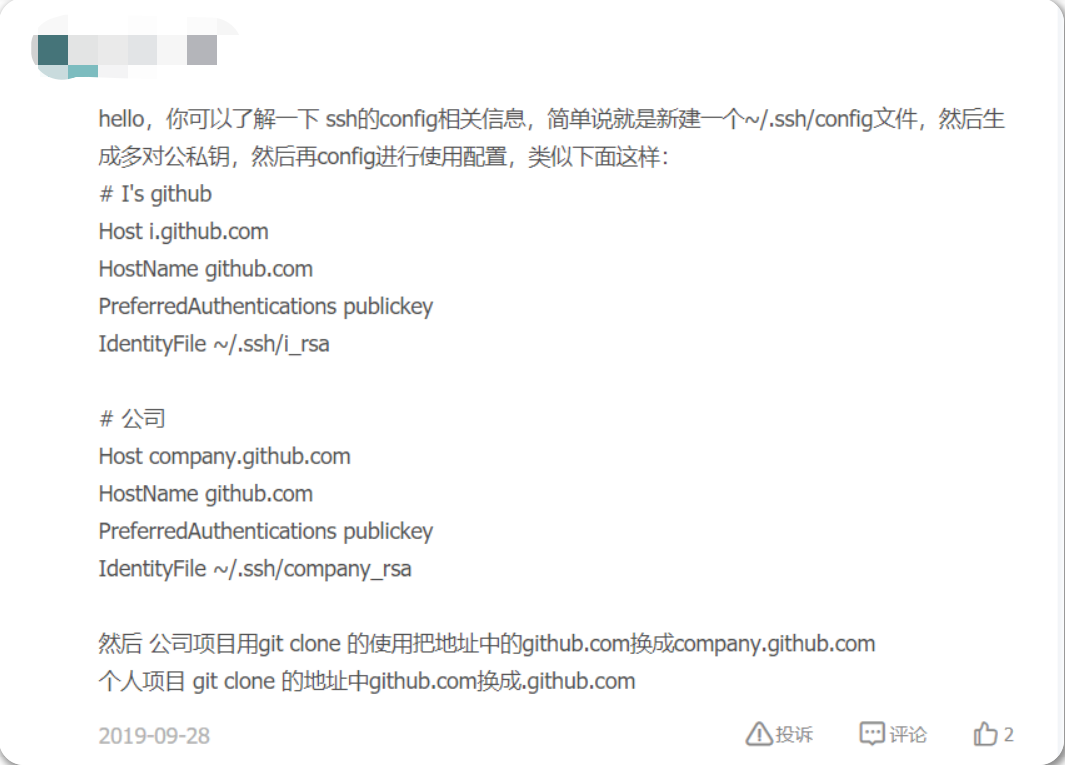
注意:
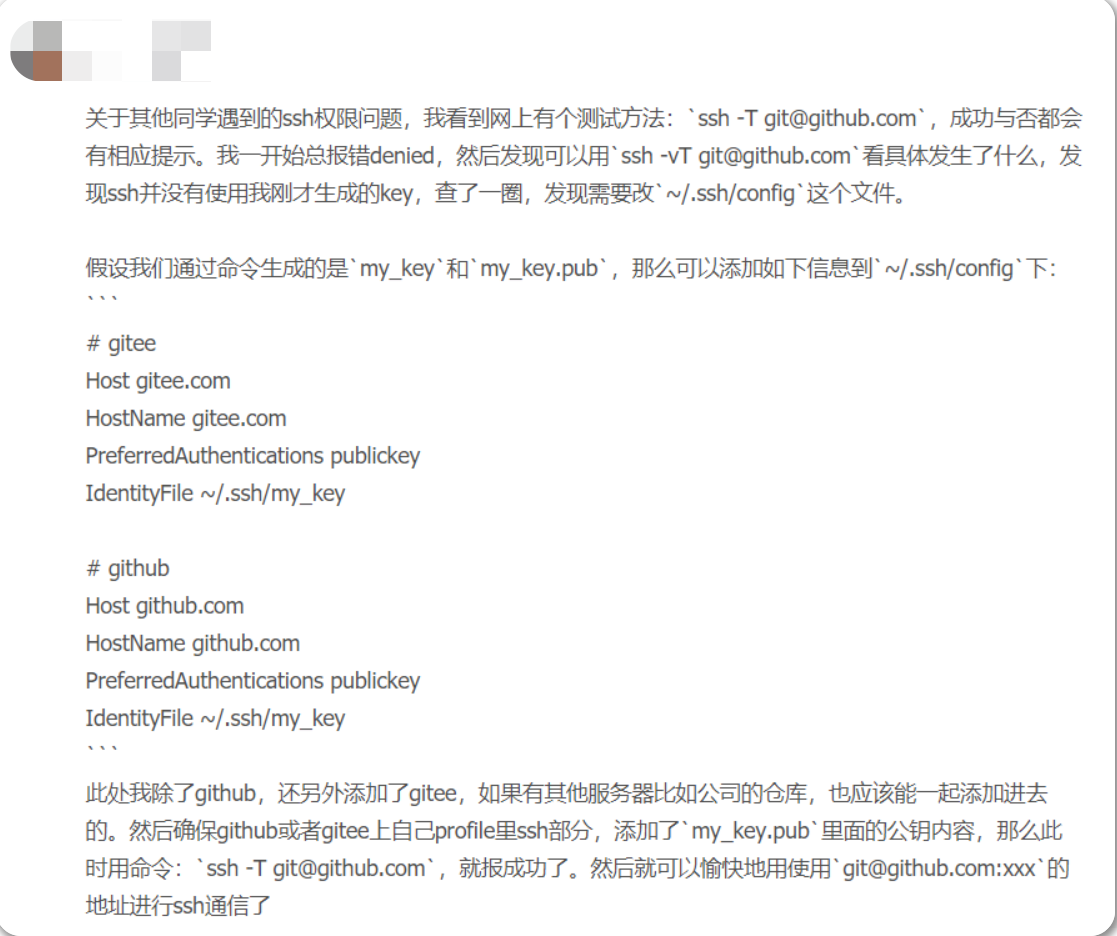
# gitee
Host gitee.com
HostName gitee.com
PreferredAuthentications publickey
IdentityFile ~/.ssh/my_key

# github
Host github.com
HostName github.com
PreferredAuthentications publickey
IdentityFile ~/.ssh/my_key
```

ssh -T git@github.com
ssh -vT git@github.com🍀 我这里报错了:……😥
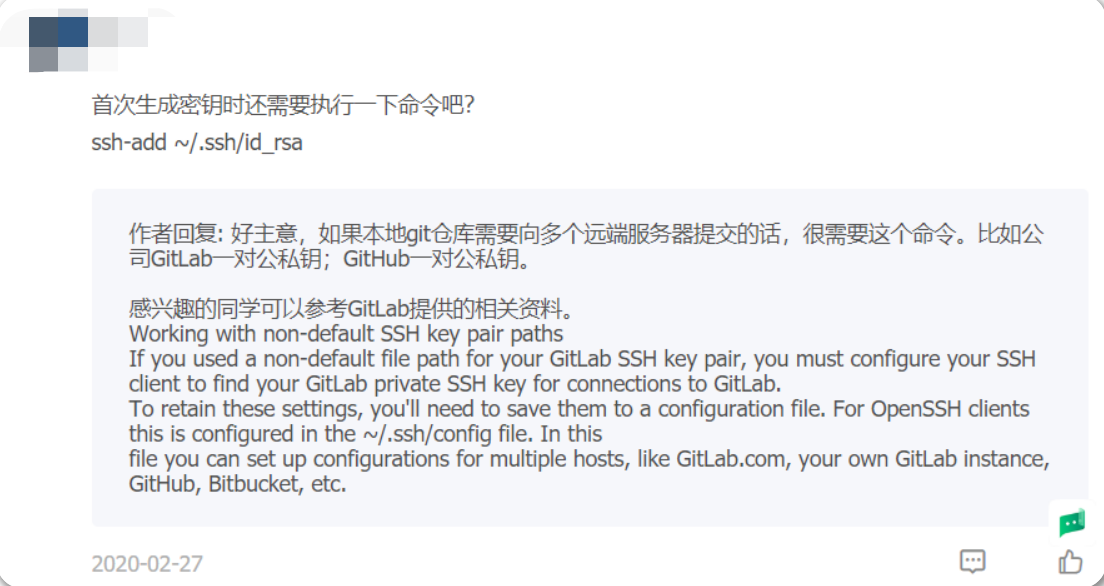
方法:配置多个ssh秘钥-2022.4.14(已解决)

1.创建的项目该如何命名
- 是用英文还是中文?
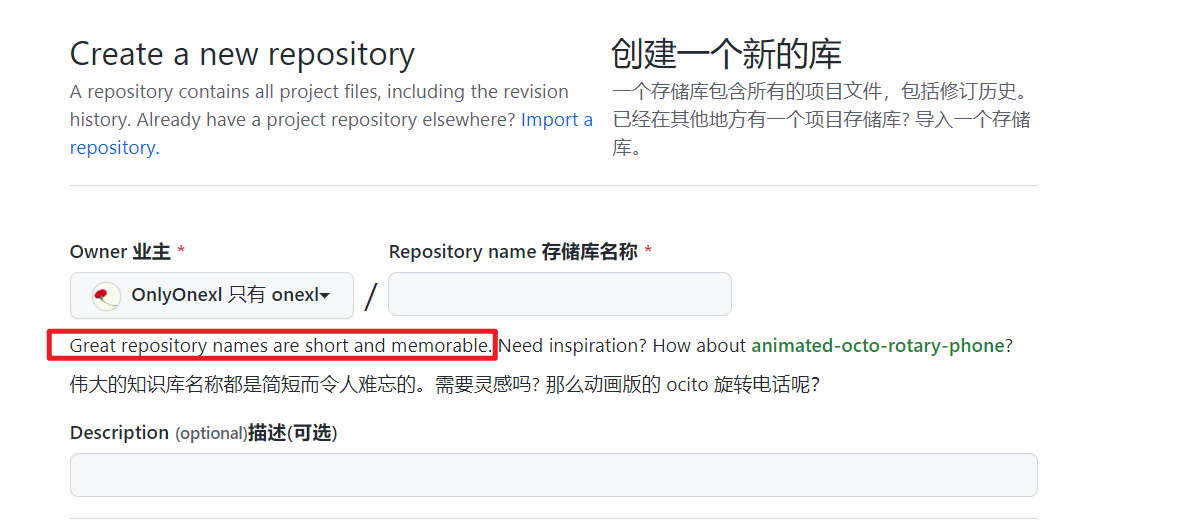
- 尽量使用简短而令人难忘的项目名,哈哈;
- 因为要考虑到这个项目是面向全球的,因此选择使用英文名;(⚠️注意:仓库名称里是包含中文名也是可以的!!!)
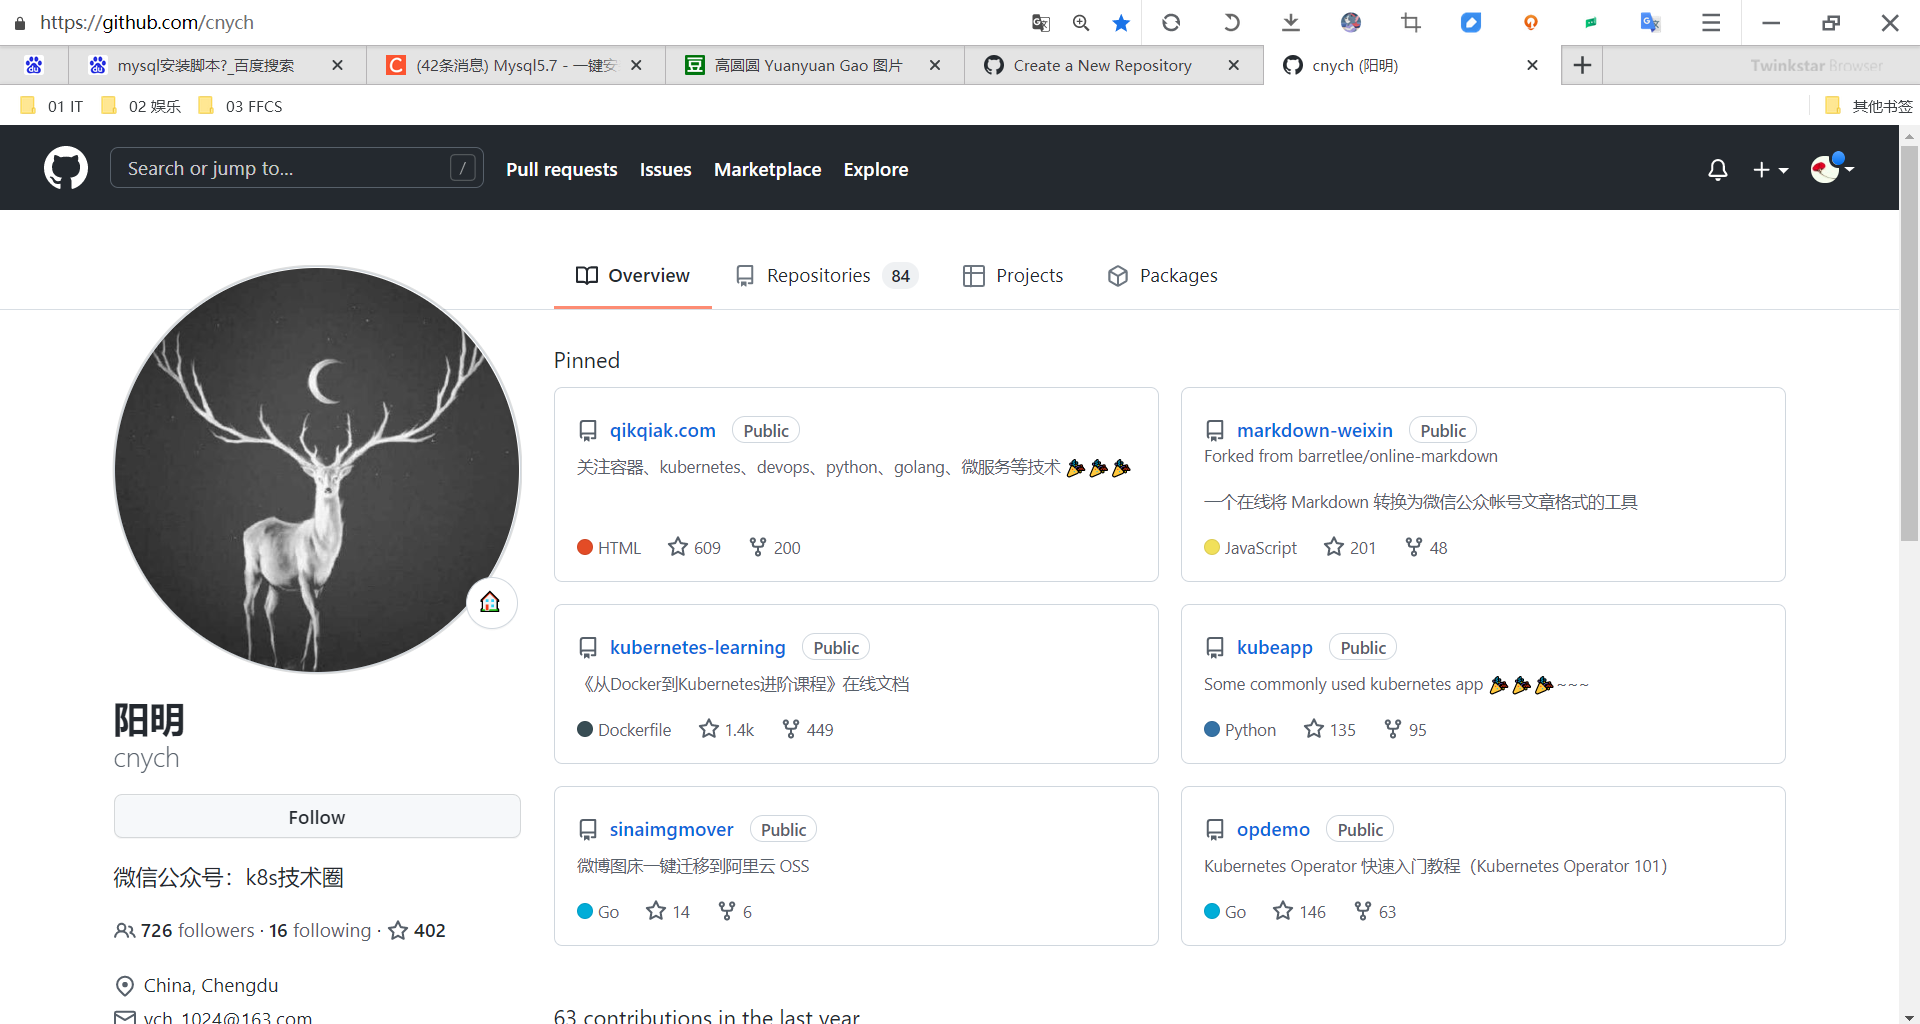
- 参考别人的命名规则:
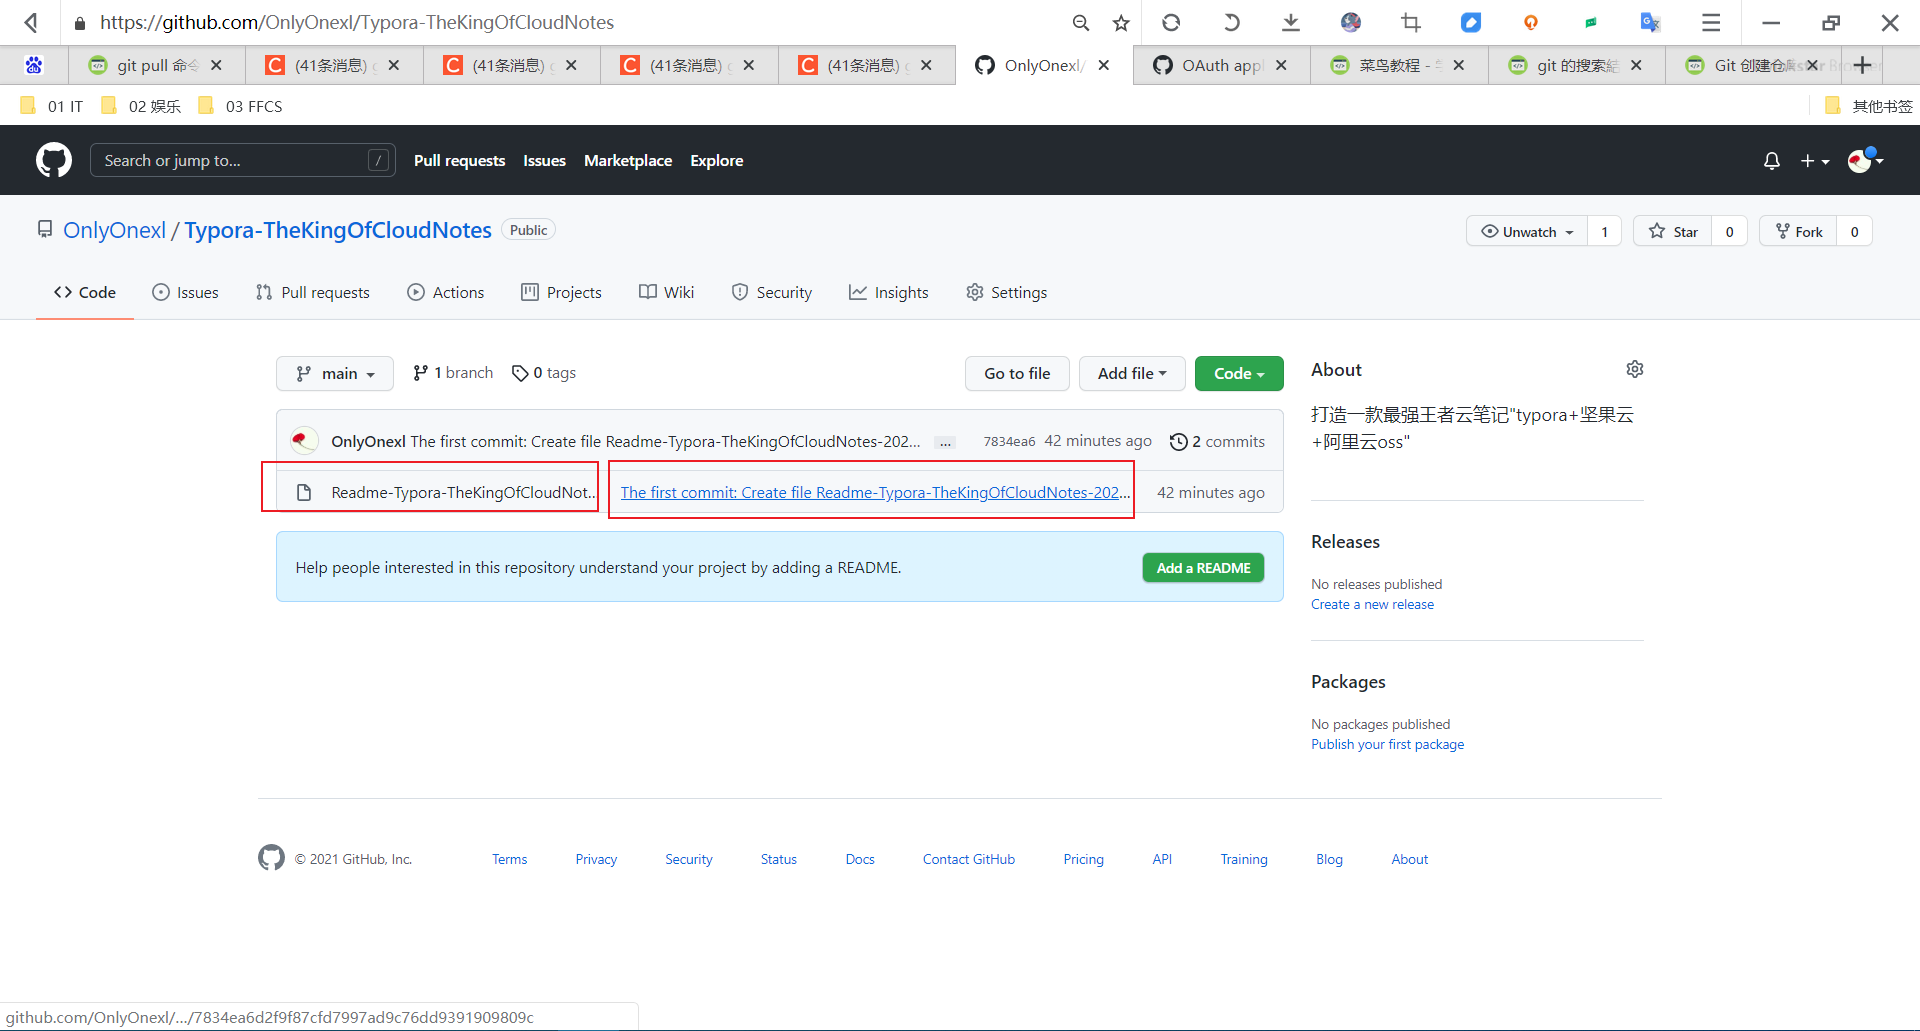
- 本次自己仓库命名如下:
Typora-TheKingOfCloudNotes
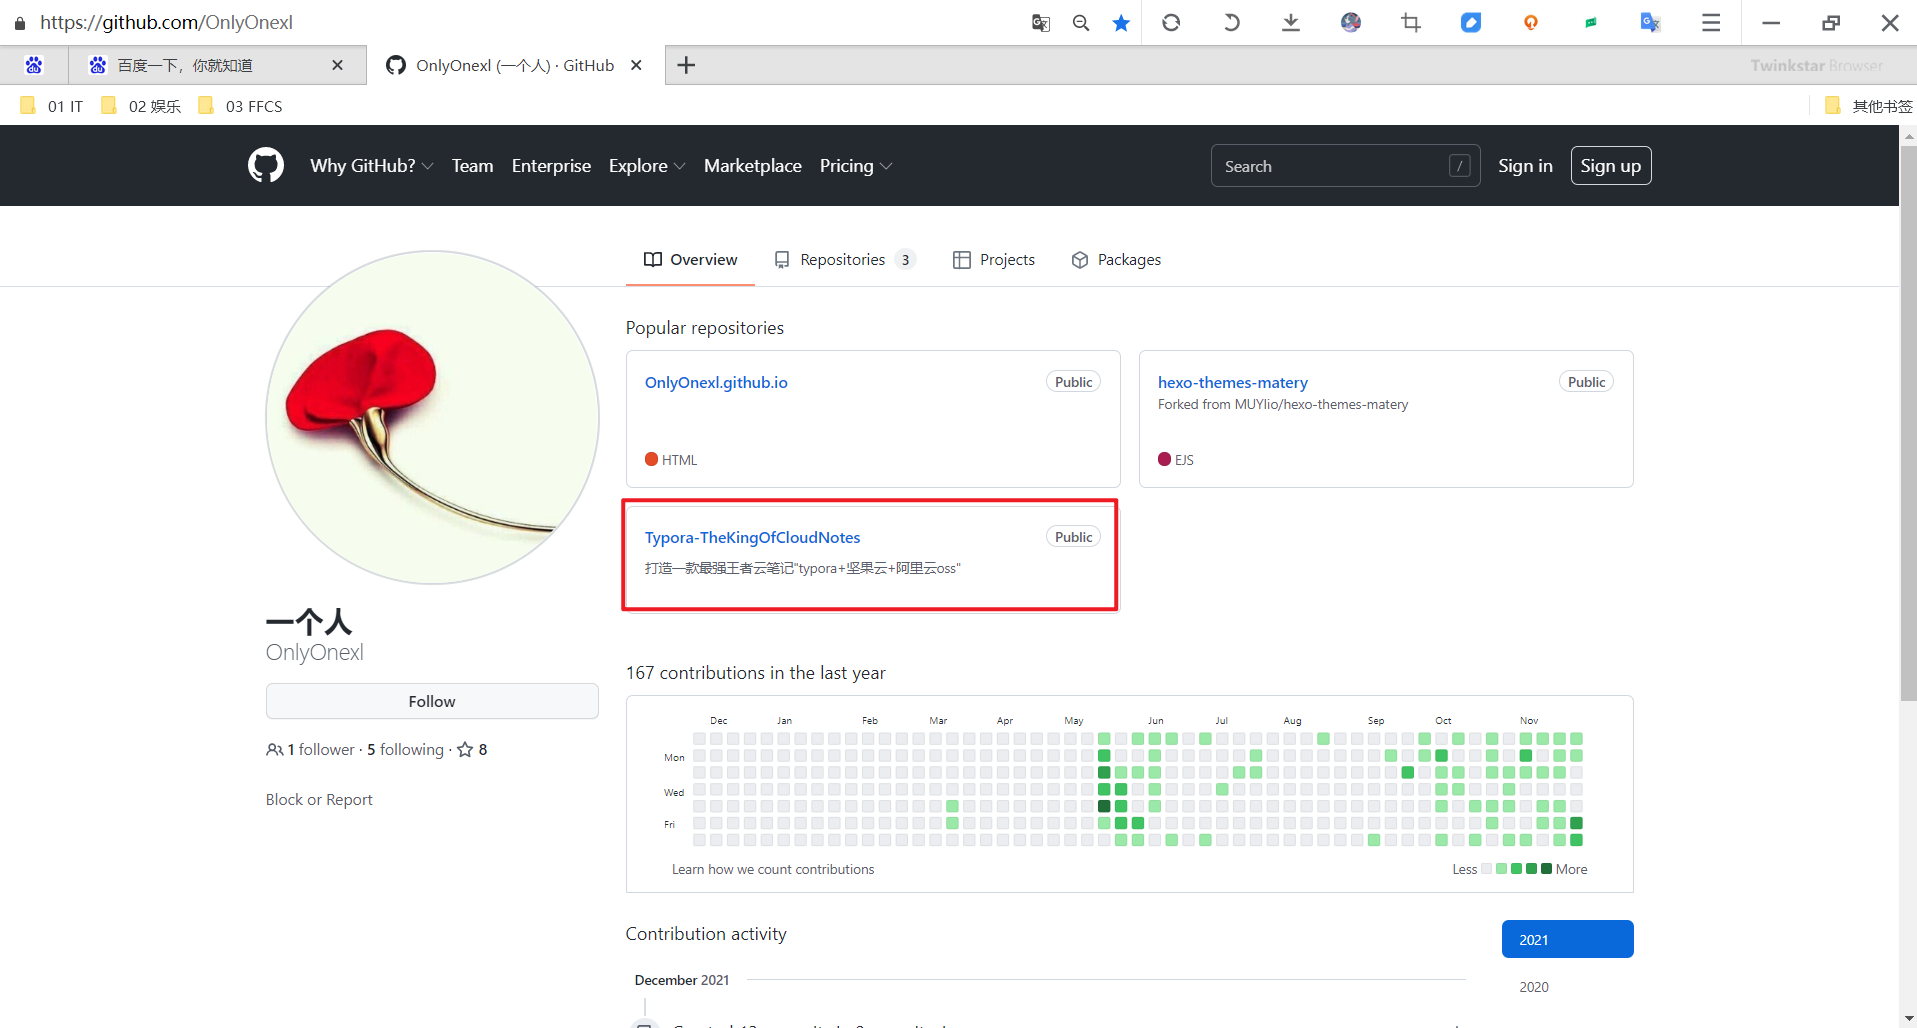
- ⚠️ 这个文件名和注释都要尽量短些才行。。。。
2.如何为自己的 Github 项目选择开源许可证?

Github 官方专门制作了一个网站 https://choosealicense.com/ 帮助大家选择合适的开源License。中文版也有 http://choosealicense.online/。这里我对这些如果选择 Github 项目的 License ,给出一些具体的操作建议。
1、可不可以不选择 License ?
没有 License 的内容是默认会被版权保护。所以如果你想要的是让大家都放心使用,就需要选择一个合适的 License ,只有这样才能赋予任何人使用,分享和修改这个软件的权力。
所以,如果你只是想奉献爱心,想让大家无限制的使用自己仓库的代码,选择 MIT 协议即可 https://choosealicense.com/licenses/mit/ 。MIT License 是一个宽松的 License ,允许别人用你的代码做任何事情,但必须保证你的所有权,并且你无须承担代码使用产生的风险。

2、具体选择标准
开源 License 很多,https://choosealicense.com/licenses/ ,具体的差别可以看一下下面这个图。
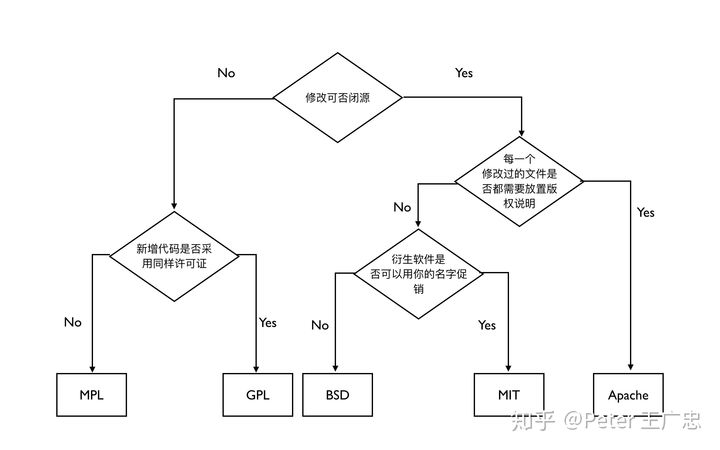
总结一下:
- MIT 最自由,简直就是没有任何限制,任何人都可以售卖我的软件,甚至可以用我的名字促销。
- BSD 和 Apache 协议也很自由,跟 MIT 的区别分别是不允许用作者本人名义促销和保护作者版权。
- GPL 可以说最霸道,对代码的修改部分也必须是 GPL 的,同时基于 GPL 代码而开发的代码也必须按照 GPL 发布。
- 而 MPL ,也就是 Mozilla Public License 就温和一些,如果后续开发的代码中添加了新文件,同时新文件中也没有用到原来的代码,那么新文件可以不必继续沿用 MPL 。
这就是几个常见 License 的核心差异了。
3、GPL 家族
GPL 是最著名的开源 License,没有之一。目前在 Github 创建项目的时候,一共有12个备选 License ,其中5个都是 GPL 家族的。
人们对 GPL 感情是复杂的。激进的人会比较喜欢 GPL ,因为它要求任何人修改了软件后,修改后的内容也必须开源。但是商业公司有时候会非常有顾虑,因为 GPL 有病毒性,一旦公司使用了 GPL 的代码,那么自己辛辛苦苦做出的修改内容也必须要通过 GPL 开源,让竞争对手也可以直接拿来用,很难形成竞争壁垒。
GPL 协议也发展出了很多分支,其中 GPL v3 是最为激进的,基本上跟原始代码沾点边的代码就必须也得是 GPL 的,例如,最极端的,如果我的代码调用了 GPL 的库,那么我的代码就必须是 GPL 的。这基本意味着如果我是一个商业软件系统,那么我就没有权利使用 GPL v3 的代码了。v3 的背后是 GPL 之父 Richard Stallman 不断在宣传推进,代表了开源激进派的最前沿。
而其他的 GPL 版本可以说都是略微温和版的 GPL ,例如 Linux 项目的 GPL v2 ,也是 Richard 自己写的,由于发布的早,所以很多问题他没有考虑都,所以让商业运用有了一些空间。
另外还有 GNU Lesser General Public License ,GNU较宽松通用公共许可证 ,看名字就知道是比较温和的了。
这就是 GPL 的基本情况了。关于 GPL 可以专门写一本《GPL 传奇》了,我们这里不展开,大家可以去 http://gnu.org 学习或者听一下 Richard Stallman 的演讲。
4、总结
关于,在 Github 使用开源 license ,还有其他一些要注意的地方,例如 license 要存放到哪个文件中,如果按照协议类似搜索项目等,这些内容可以参考官方文档 https://help.github.com/articles/licensing-a-repository/ 。
另外,如果项目内容不是代码,而是书稿或者其他作品,可以参考这里的说明 http://choosealicense.online/non-software/ 使用 CC License 。
参考:
- http://www.ruanyifeng.com/blog/2011/05/howtochoosefreesoftware_licenses.html
- https://help.github.com/article
- https://zhuanlan.zhihu.com/p/51331026
2、github Troubleshooting
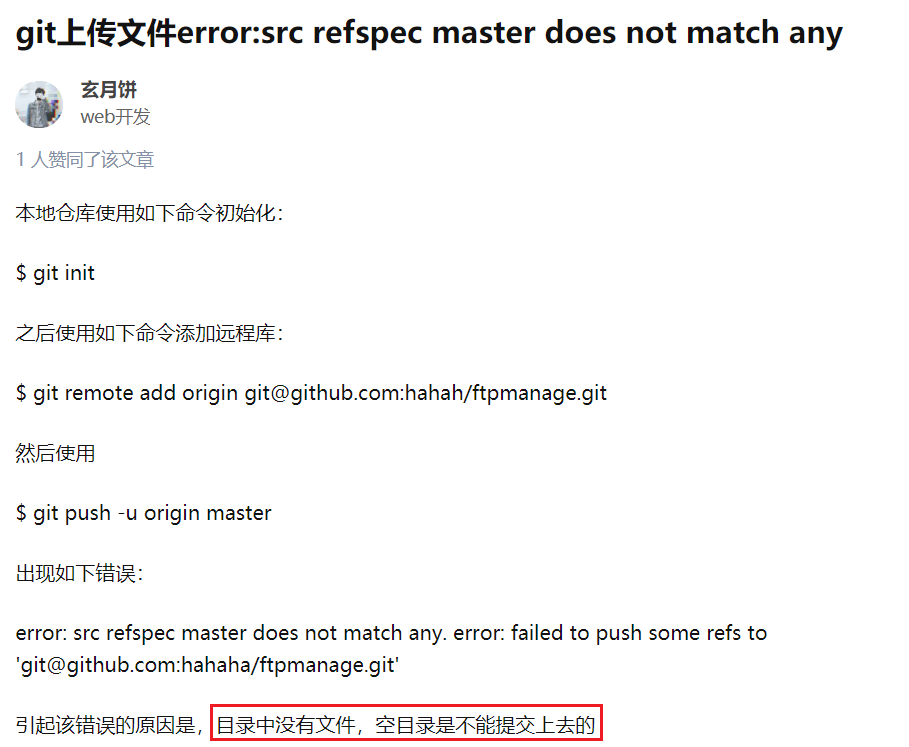
TS:git push时报错-空目录是不能提交的-2021.05.20(已解决)
- 现象:git push报错如下

- 百度答案:

- 本人测试过程

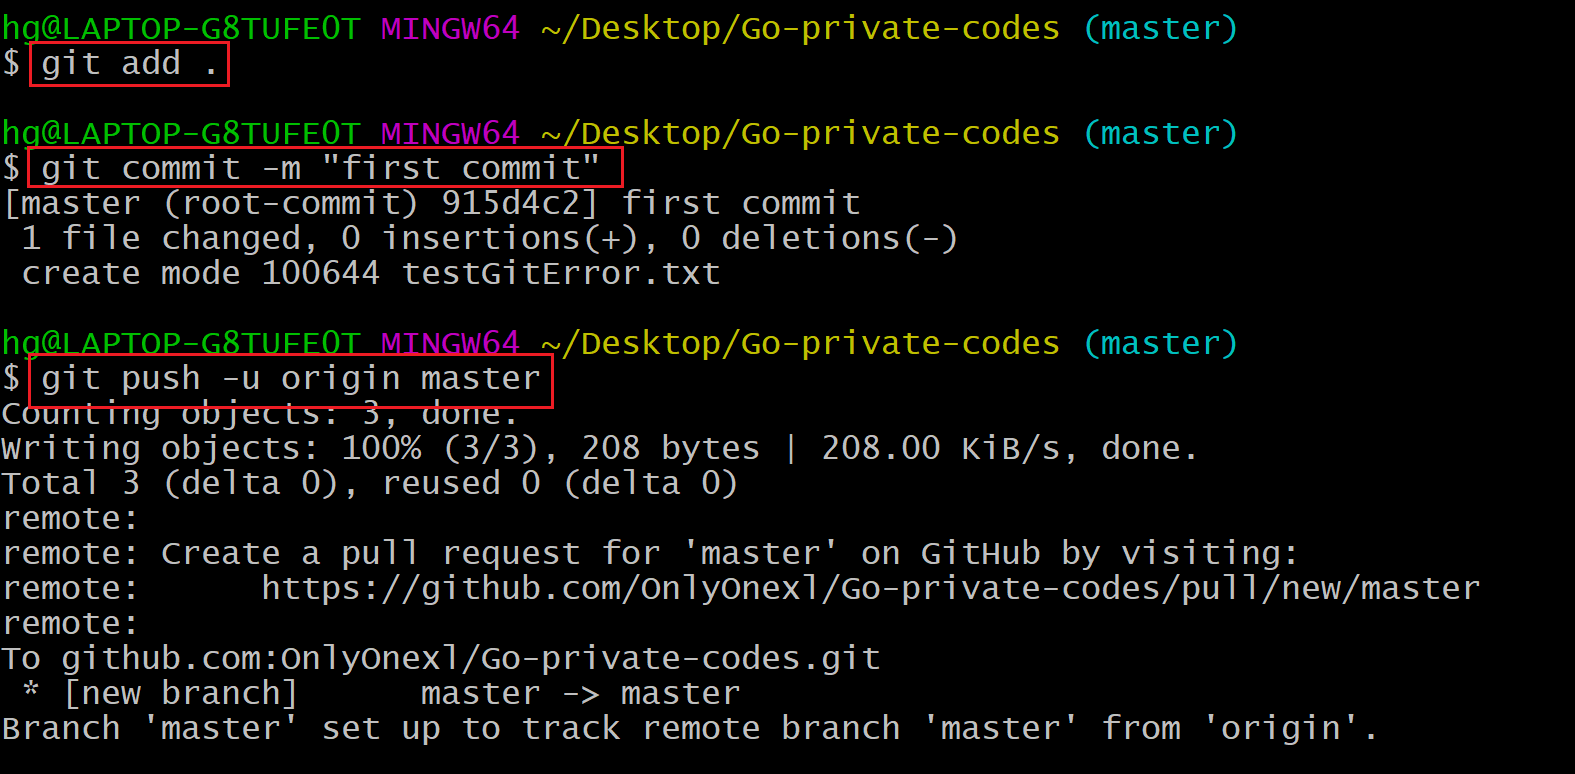

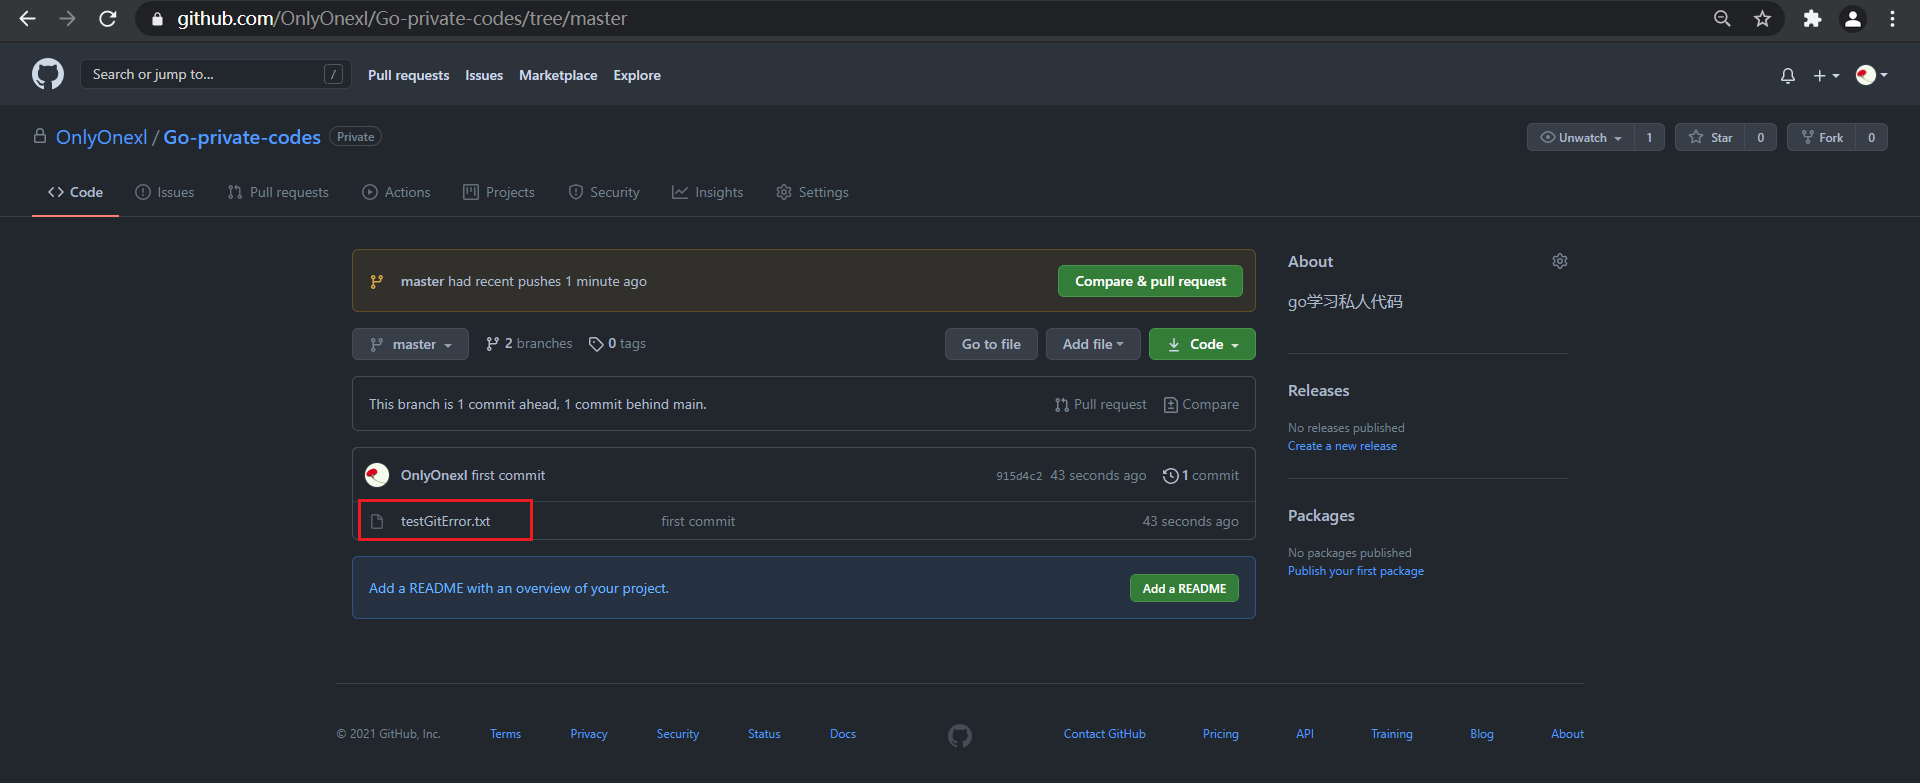
已完美解决!
TS:github推送时报错:原来是官方把密码换成token了哈哈-2021.12.04(已解决)
故障现象:github push时报错:remote: Support for password authentication was removed on August 13, 2021. Please use a personal access token instead.-2021.12.04(已解决)

实验环境
win10
git version 2.17.0.windows.1
github实验软件(无)
参考文章
https://blog.csdn.net/weixin_41010198/article/details/119698015
特此感谢博主文章分享:💖
版权声明:本文为CSDN博主「点亮~黑夜」的原创文章,遵循CC 4.0 BY-SA版权协议,转载请附上原文出处链接及本声明。 原文链接:https://blog.csdn.net/weixin_41010198/article/details/119698015
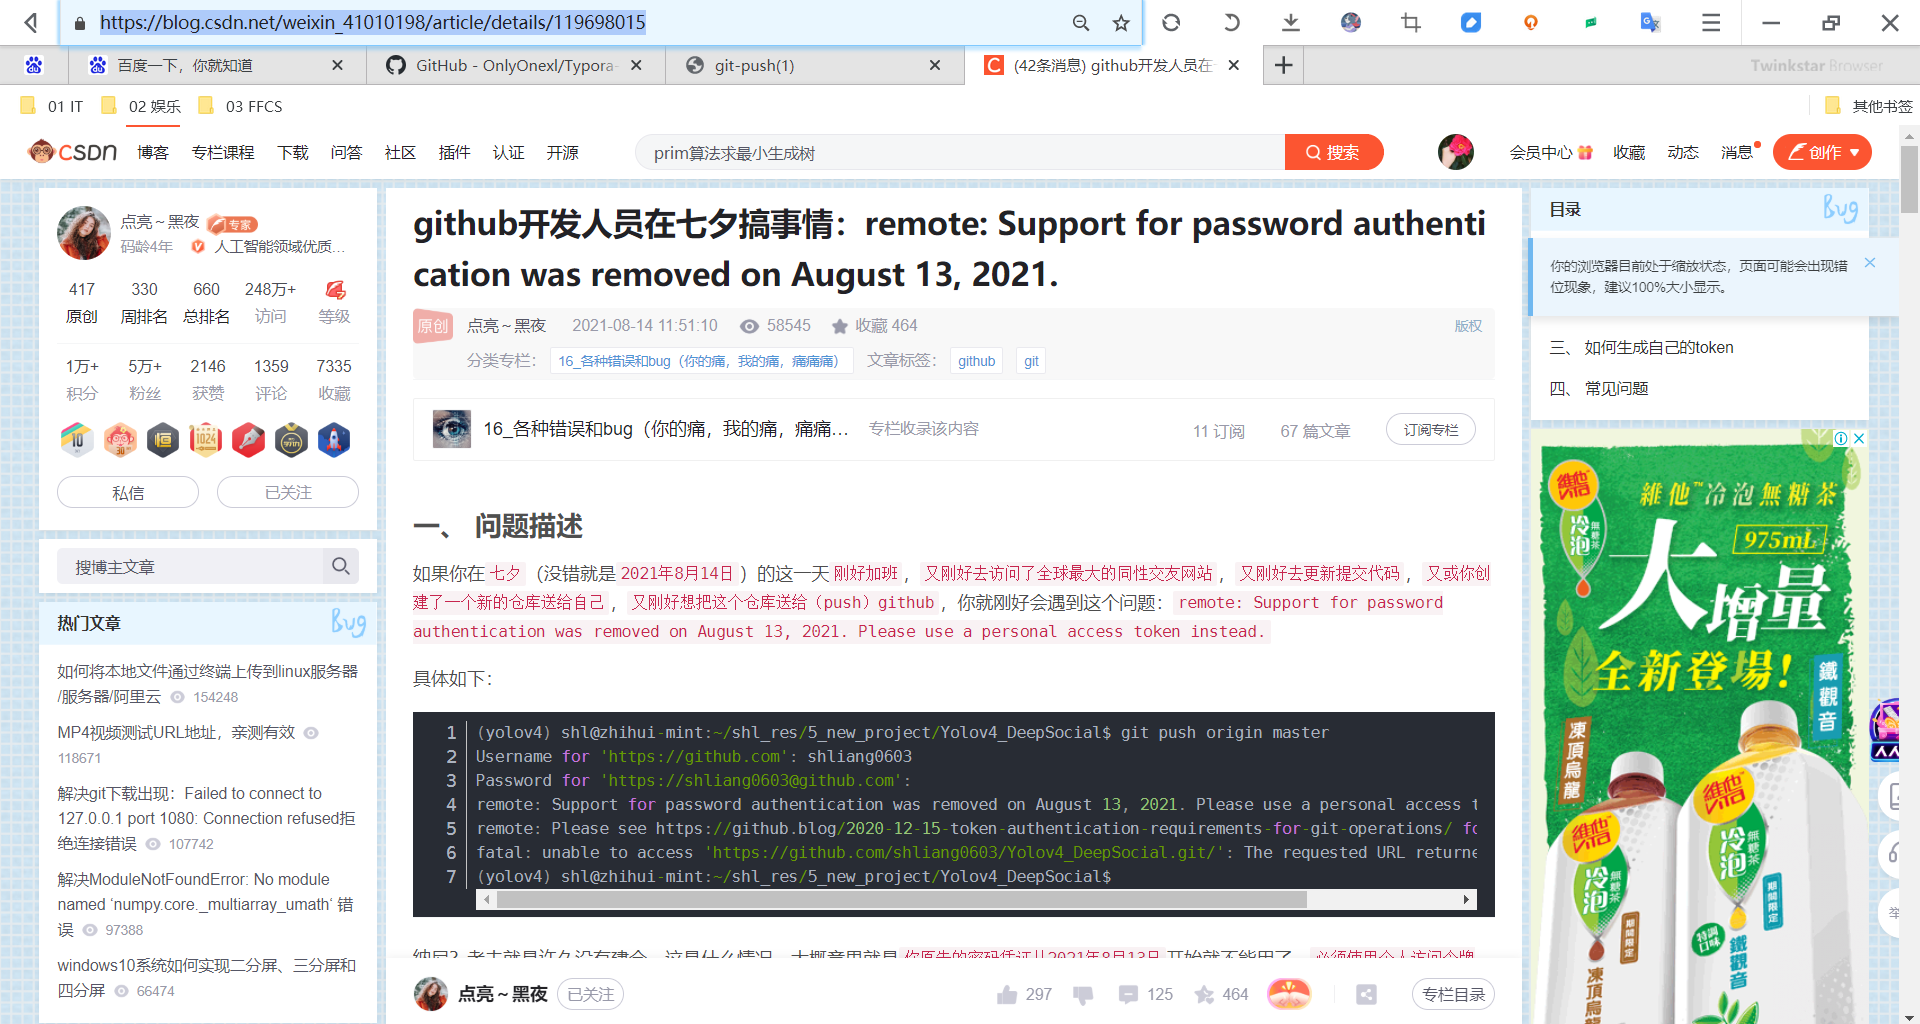
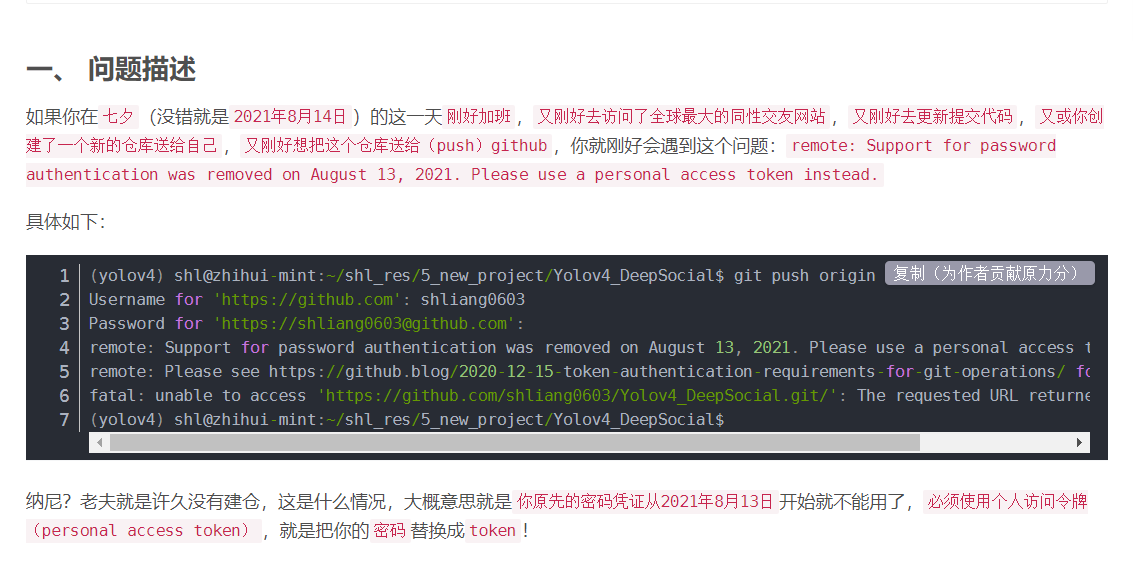
1、问题描述
自己同样也遇到了这个相同的报错:
hg@LAPTOP-G8TUFE0T MINGW64 /d/IT/01 IT/github_repo/06 MyGitHub-OpenSourceProject/Typora-TheKingOfCloudNotes (main)
$ git push origin main
Username for 'https://github.com': 2675263825@qq.com
remote: Support for password authentication was removed on August 13, 2021. Please use a personal access token instead.
remote: Please see https://github.blog/2020-12-15-token-authentication-requirements-for-git-operations/ for more information.
fatal: Authentication failed for 'https://github.com/OnlyOnexl/Typora-TheKingOfCloudNotes.git/'

hg@LAPTOP-G8TUFE0T MINGW64 /d/IT/01 IT/github_repo/06 MyGitHub-OpenSourceProject/Typora-TheKingOfCloudNotes (main)2、github为什么要把密码换成token
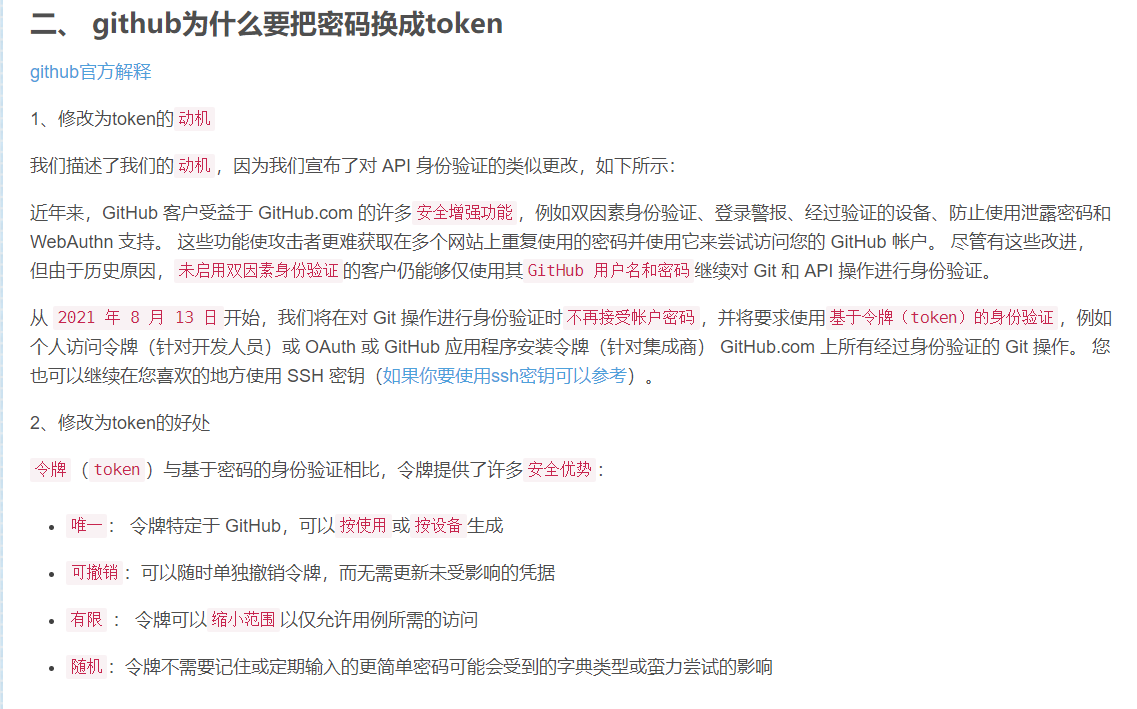
github官方解释

1、修改为token的动机

我们描述了我们的动机,因为我们宣布了对 API 身份验证的类似更改,如下所示:

近年来,GitHub 客户受益于 GitHub.com 的许多安全增强功能,例如双因素身份验证、登录警报、经过验证的设备、防止使用泄露密码和 WebAuthn 支持。 这些功能使攻击者更难获取在多个网站上重复使用的密码并使用它来尝试访问您的 GitHub 帐户。 尽管有这些改进,但由于历史原因,未启用双因素身份验证的客户仍能够仅使用其GitHub 用户名和密码继续对 Git 和 API 操作进行身份验证。

从 2021 年 8 月 13 日开始,我们将在对 Git 操作进行身份验证时不再接受帐户密码,并将要求使用基于令牌(token)的身份验证,例如个人访问令牌(针对开发人员)或 OAuth 或 GitHub 应用程序安装令牌(针对集成商) GitHub.com 上所有经过身份验证的 Git 操作。 您也可以继续在您喜欢的地方使用 SSH 密钥(如果你要使用ssh密钥可以参考)。

2、修改为token的好处

令牌(token)与基于密码的身份验证相比,令牌提供了许多安全优势:

唯一: 令牌特定于 GitHub,可以按使用或按设备生成

可撤销:可以随时单独撤销令牌,而无需更新未受影响的凭据

有限 : 令牌可以缩小范围以仅允许用例所需的访问

随机:令牌不需要记住或定期输入的更简单密码可能会受到的字典类型或蛮力尝试的影响3、如何生成自己的token
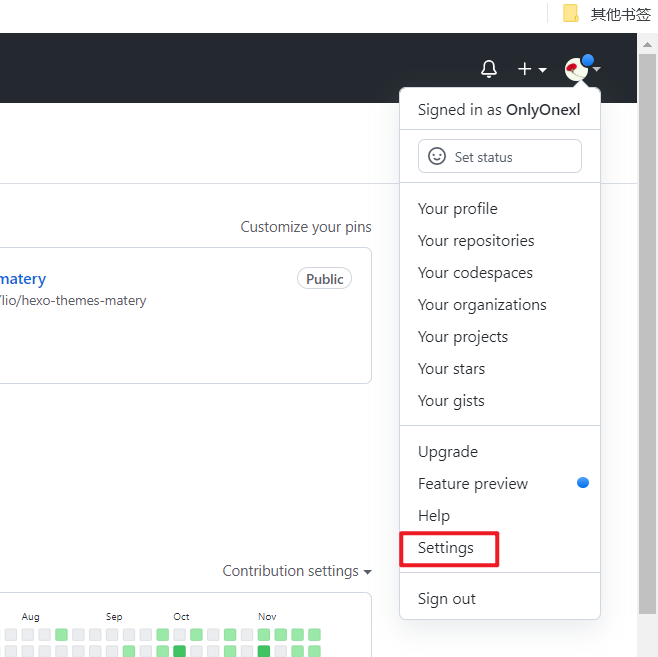
1、在个人设置页面,找到Setting(参考)
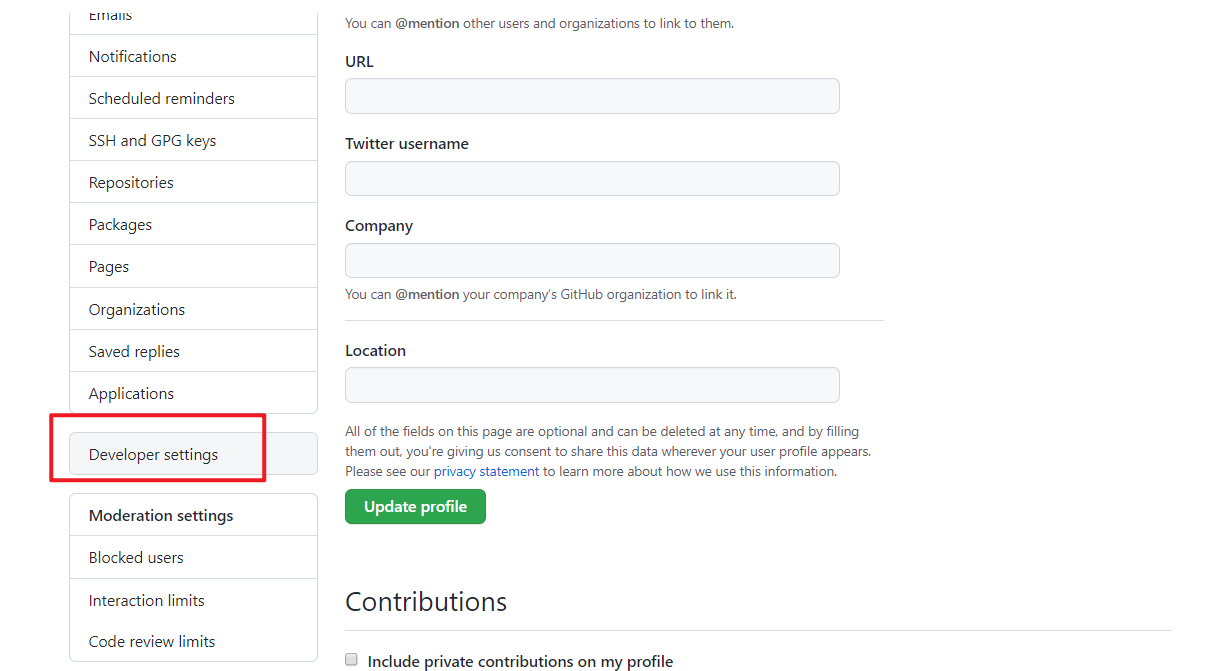
2、选择开发者设置Developer setting
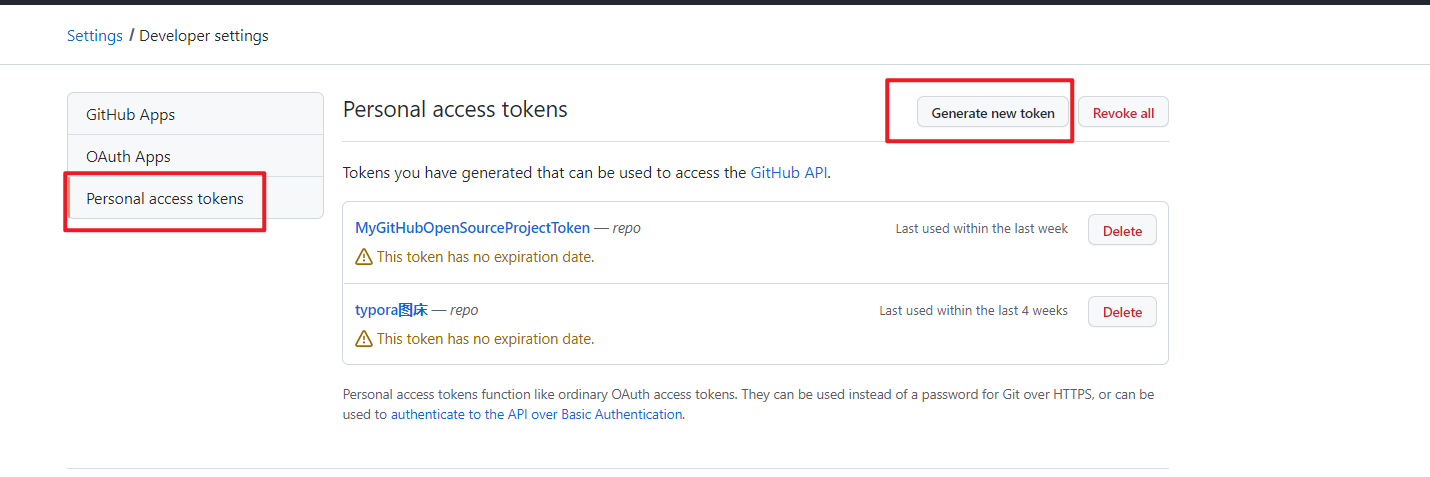
3、选择个人访问令牌Personal access tokens,然后选中生成令牌Generate new token
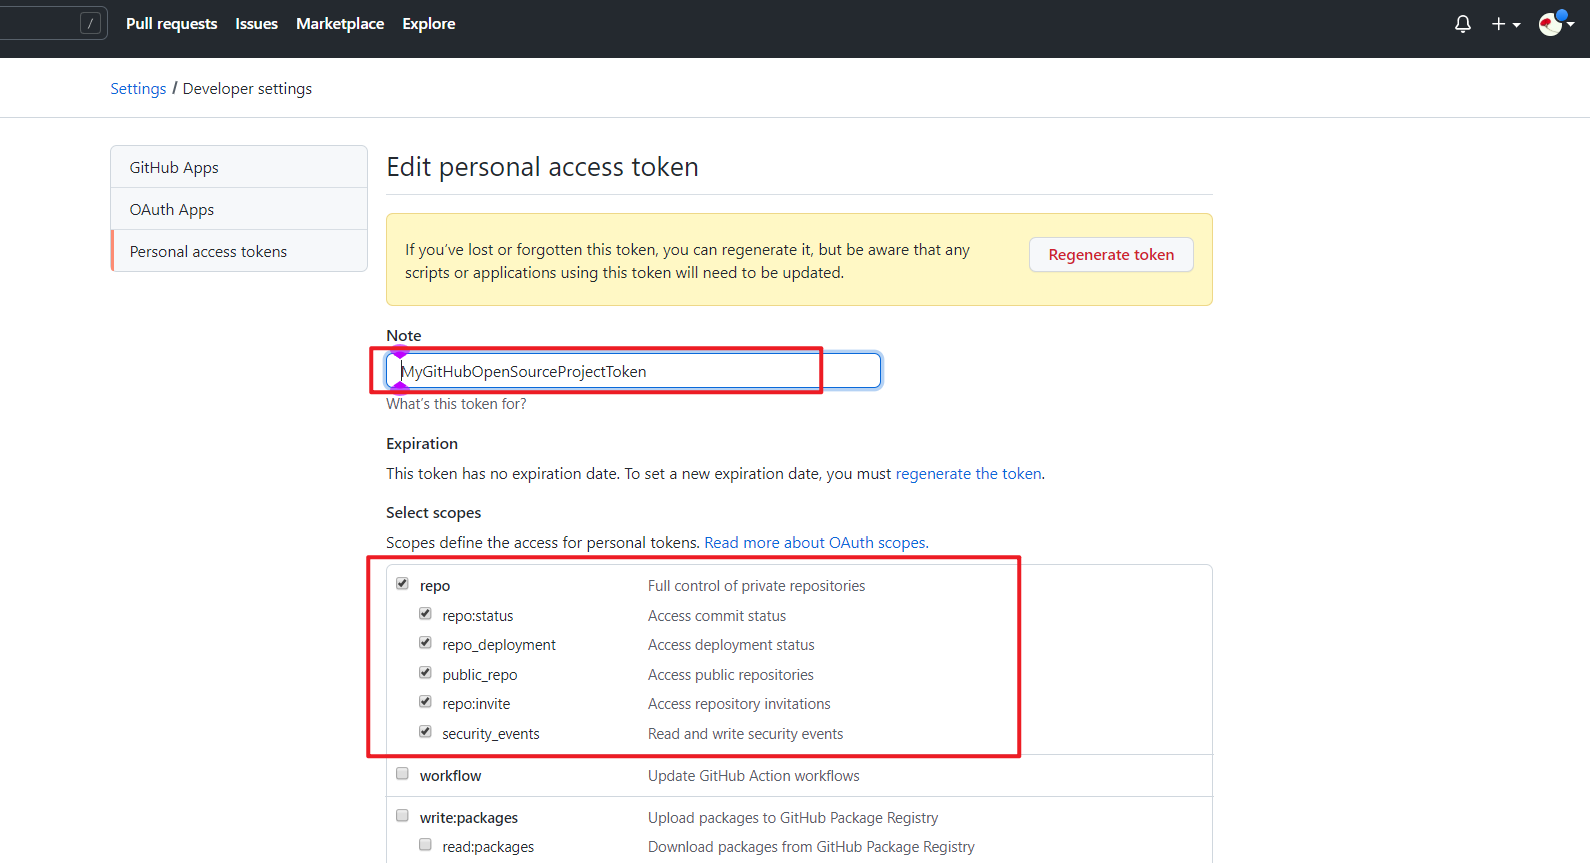
4、设置token的有效期,访问权限等
选择要授予此令牌token的范围或权限。
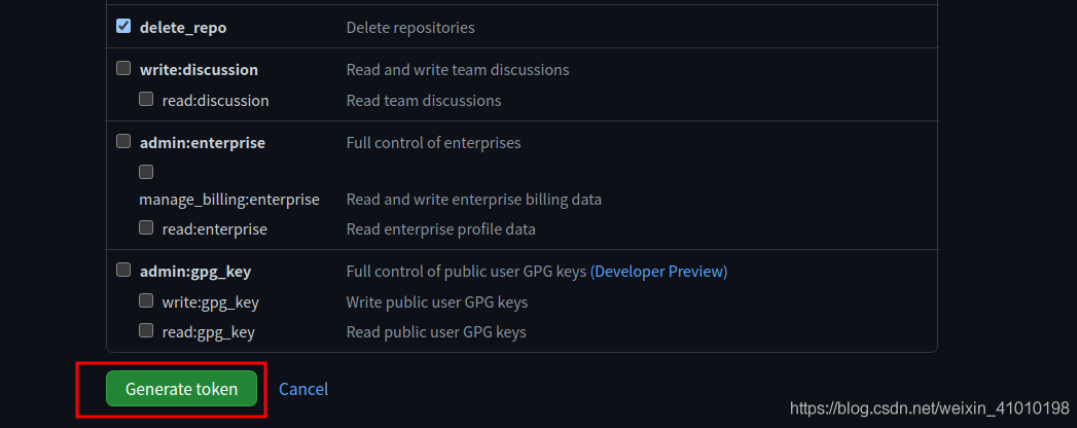
要使用token从命令行访问仓库,请选择repo。 要使用token从命令行删除仓库,请选择delete_repo 其他根据需要进行勾选
5、生成令牌Generate token
如下是生成的token
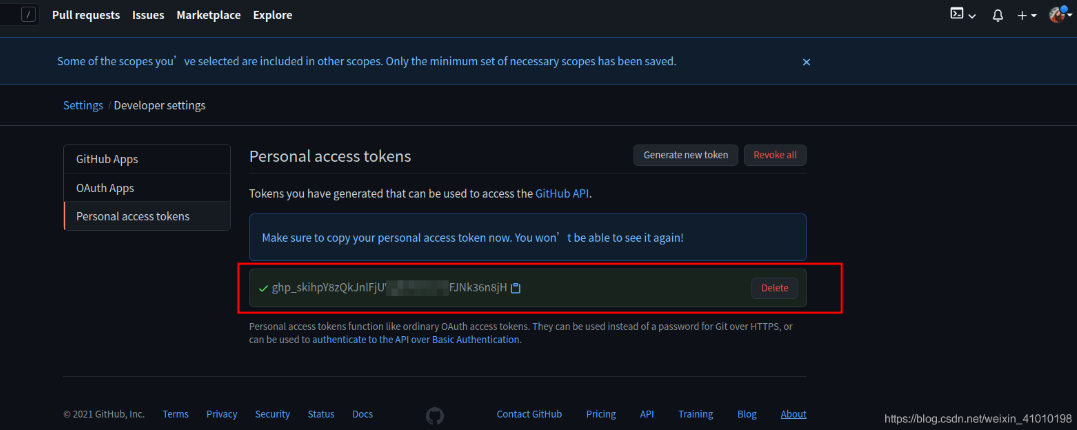
注意:
记得把你的token保存下来,因为你再次刷新网页的时候,你已经没有办法看到它了。
6、之后用自己生成的token登录,把上面生成的token粘贴到输入密码的位置,然后成功push代码!
💖(优秀,亲测有效)也可以 把token直接添加远程仓库链接中,这样就可以避免同一个仓库每次提交代码都要输入token了:
git remote set-url origin https://<your_token>@github.com/<USERNAME>/<REPO>.git

<your_token>:换成你自己得到的token
<USERNAME>:是你自己github的用户名
<REPO>:是你的仓库名称例如:
git remote set-url origin https://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@github.com/shliang0603/Yolov4_DeepSocial2.git/TS:git clone出现 fatal unable to access 'httpsgithub.com...'的解决办法-2021.12.04(已解决)

==参考文章==
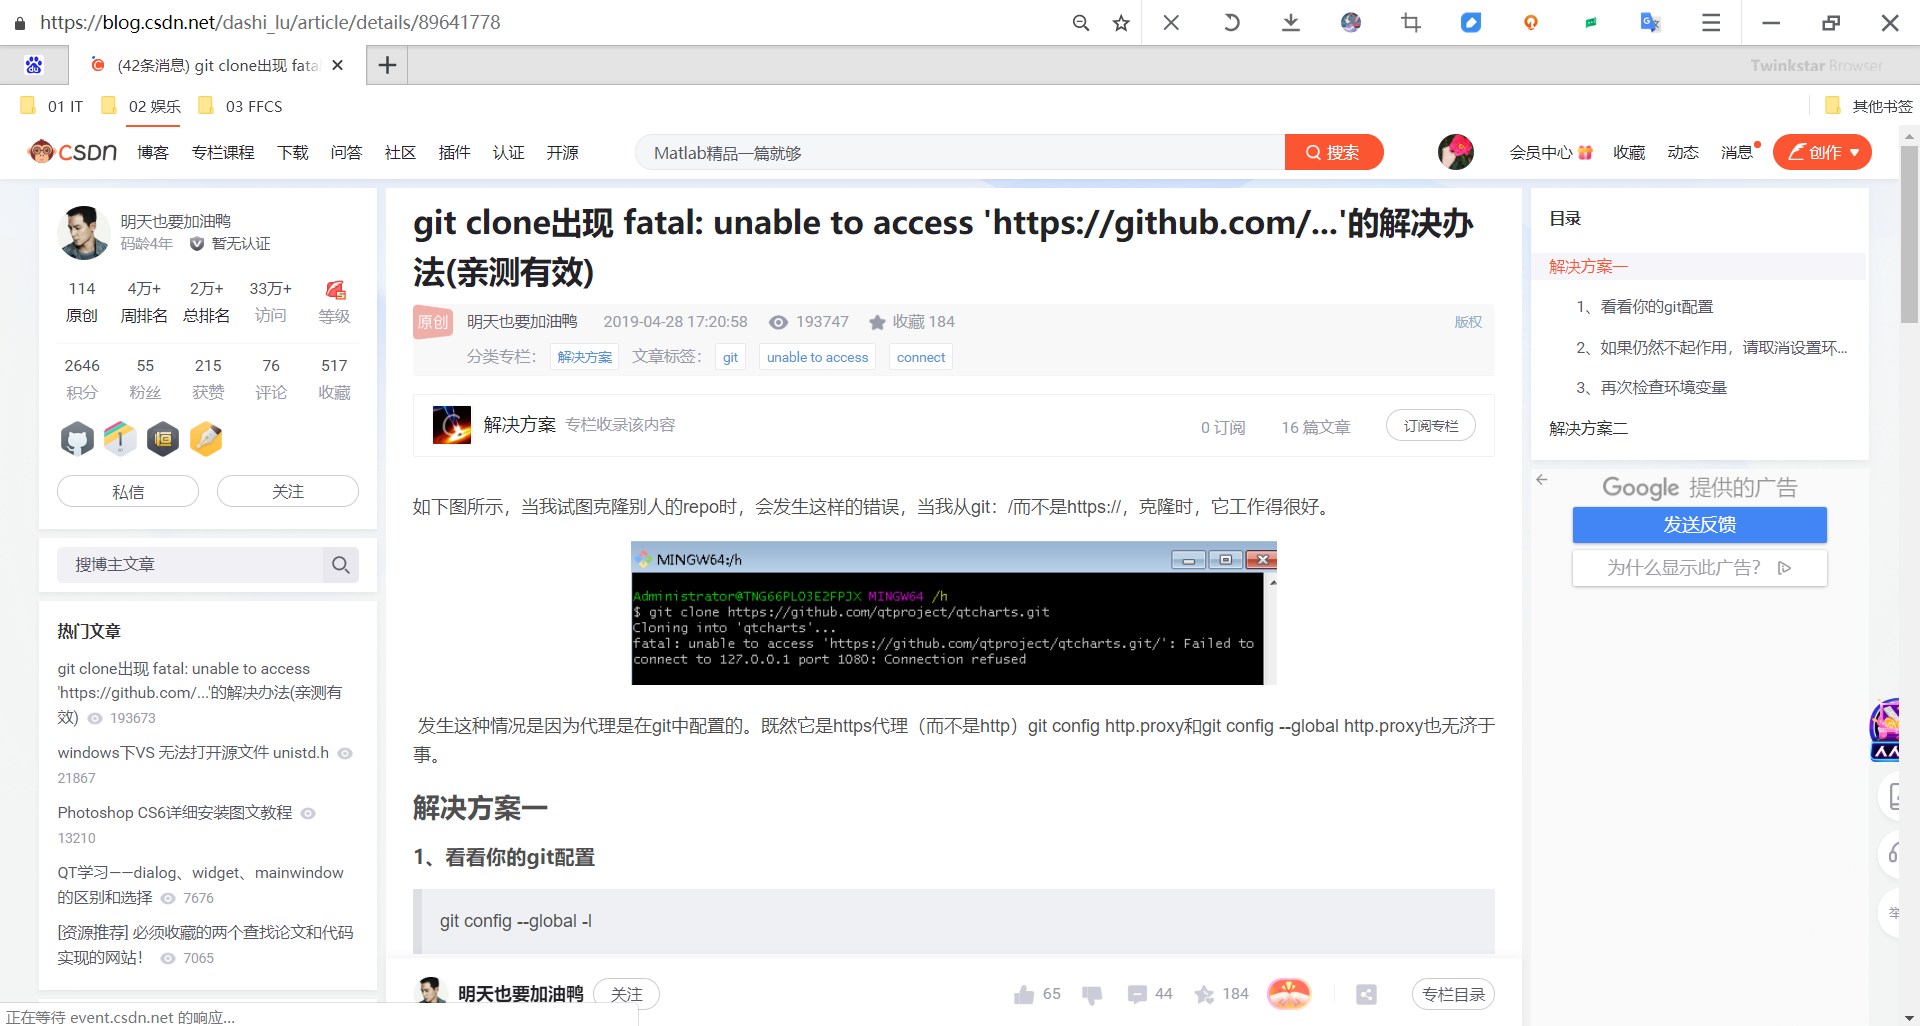
版权声明:本文为CSDN博主「明天也要加油鸭」的原创文章,遵循CC 4.0 BY-SA版权协议,转载请附上原文出处链接及本声明。 原文链接:https://blog.csdn.net/dashi_lu/article/details/89641778
实验环境
win10
git version 2.17.0.windows.1
github实验软件(无)
==1、问题现象==
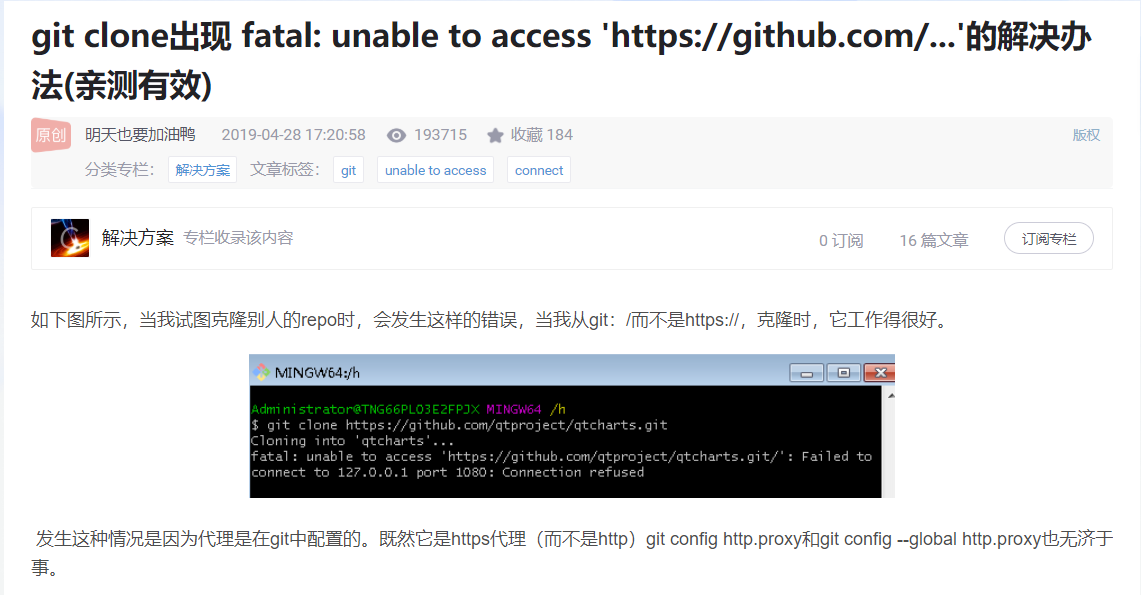
自己当时报错如下:连接github超时问题,一般可能都是网络问题导致的。
⚠️ o,shift,这个git pull,git push怎么这么慢呢,也连着vpn啊。。。。

==2、解决办法==
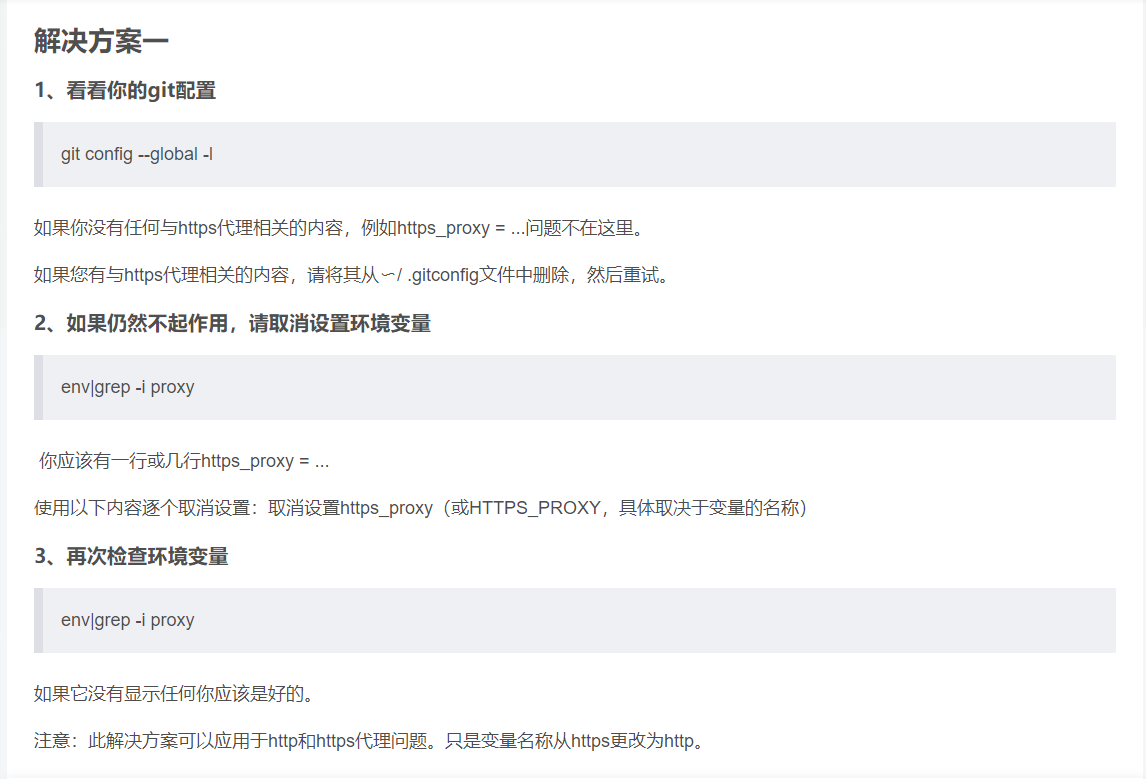
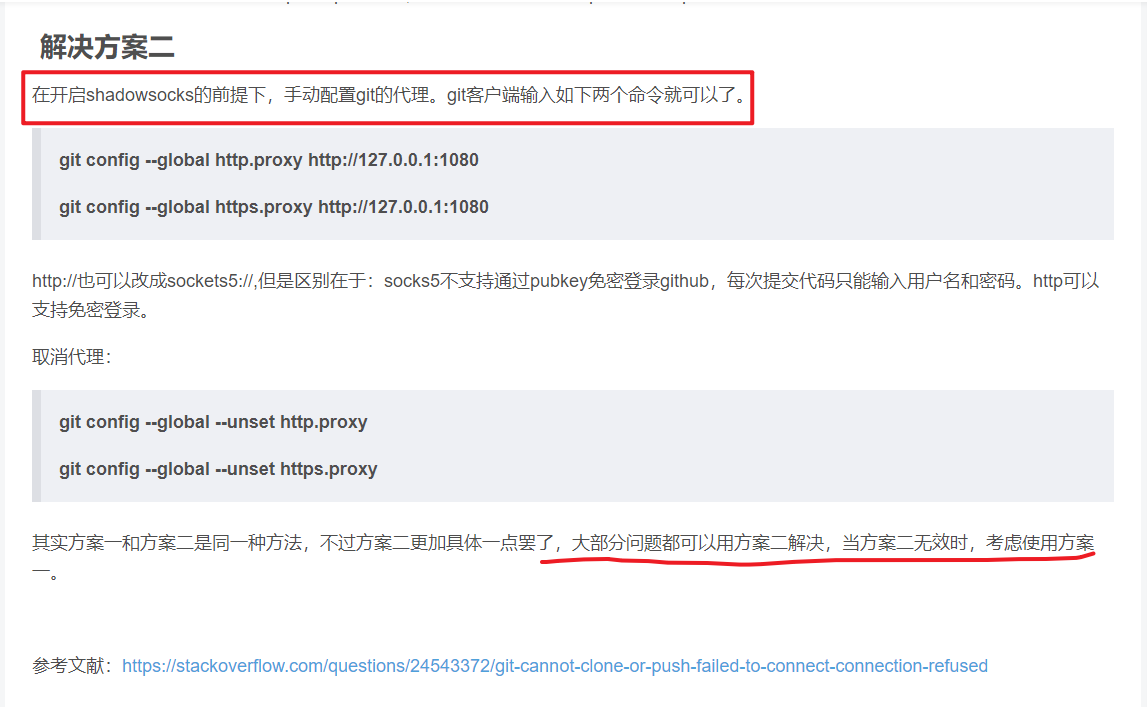
git config --global http.proxy http://127.0.0.1:1080
git config --global https.proxy http://127.0.0.1:1080

git config --global --unset http.proxy
git config --global --unset https.proxy⚠️注意:自己当时就是开着shadowfly的,所以才出现了好几次这样的问题。配置了这个代理后,就很舒服了,不会出现以上报错了,但是每次使用时都需要配置打开这个vpn软件的,否则会有问题的。

自己当前使用的是7890端口,因此命令需要修改下:
git config --global http.proxy http://127.0.0.1:7890
git config --global https.proxy http://127.0.0.1:7890
现在我们,再次测试git pull/git push命令就没什么问题了。
TS:如果 push 等操作没有出现输入密码选项,请先输入如下命令,之后就可以看到输入密码选项了
git config --system --unset credential.helper

注意:可以作为一种备用测试方法,自己当时测试了好像或者:
🍀 奇怪:又遇到问题了。。。⚠️自己当时是通过如下方法来解决的,多半都是网络问题影响的。


hg@LAPTOP-G8TUFE0T MINGW64 /d/IT/01 IT/github_repo/06 MyGitHub-OpenSourceProject/Typora-TheKingOfCloudNotes (main)
$ git push origin main
fatal: unable to access 'https://github.com/OnlyOnexl/Typora-TheKingOfCloudNotes.git/': Empty reply from server

hg@LAPTOP-G8TUFE0T MINGW64 /d/IT/01 IT/github_repo/06 MyGitHub-OpenSourceProject/Typora-TheKingOfCloudNotes (main)解决办法:


配置后,终于提交成功了,666:
$ git config --global http.sslVerify false
$ git push origin main
完成。
3、github常见操作
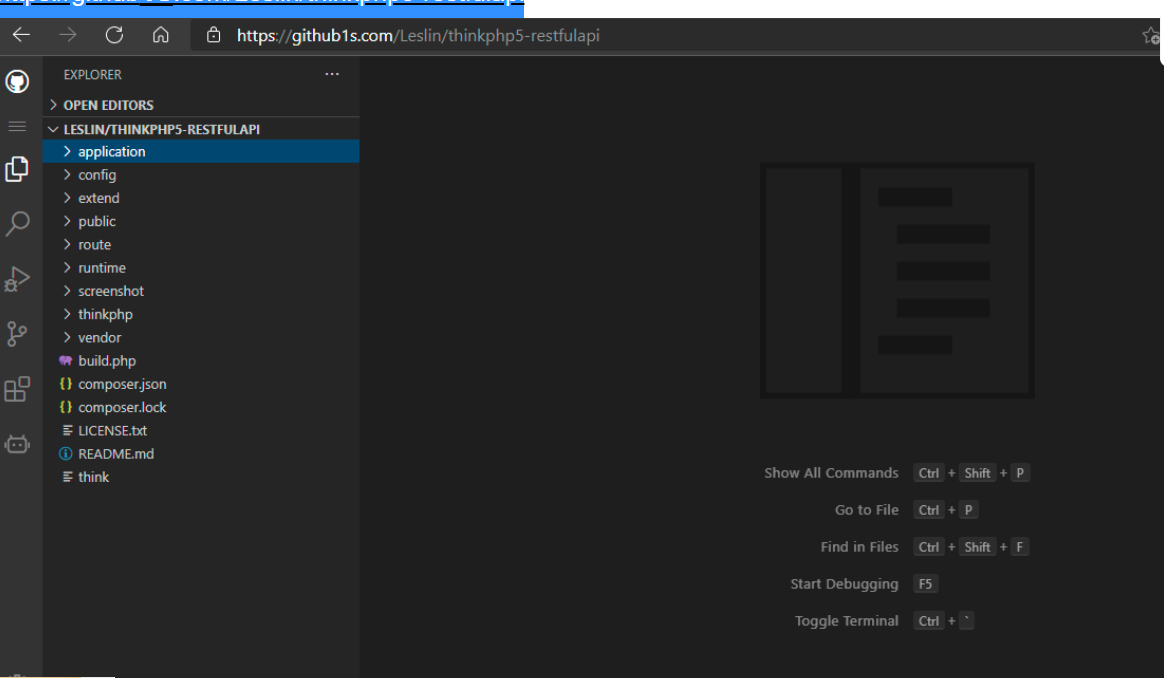
技巧:1s Github 代码在线在vscode中打开(测试成功)-2022.2.16
例如:
https://github.com/Leslin/thinkphp5-restfulapi
改为:
https://github1s.com/Leslin/thinkphp5-restfulapi
注意:github push操作是增量推送的,且使用vpn后,速度也是很快的,但还是推荐把软件上传到百度云盘(测试成功)-2021.12.11
上传带宽基本在1.5M左右:

⚠️ 注意:后面还是将软件及脚本直接保存在百度云盘把,github项目里只允许存放md文档,否则push很费时间的;(2021年12月11日22:45:45)

方法:如何修改GitHub用户名?-2021.05.16(已解决)
1.点击右上角的按钮,并点击设置
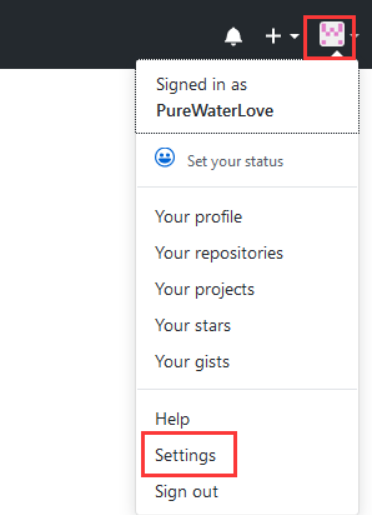
2.点击account修改
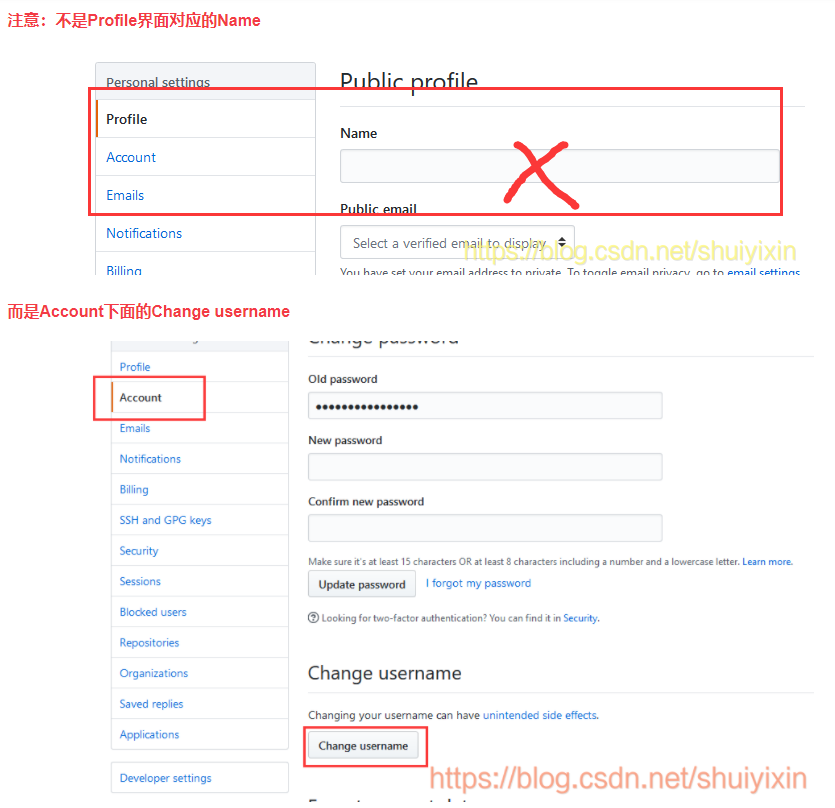
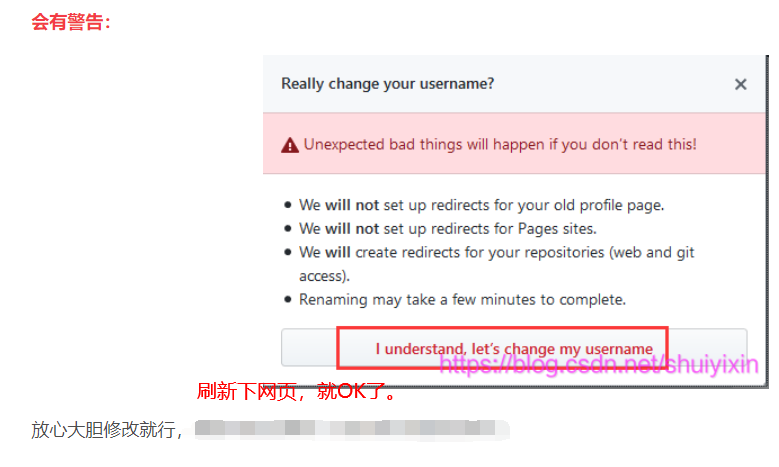
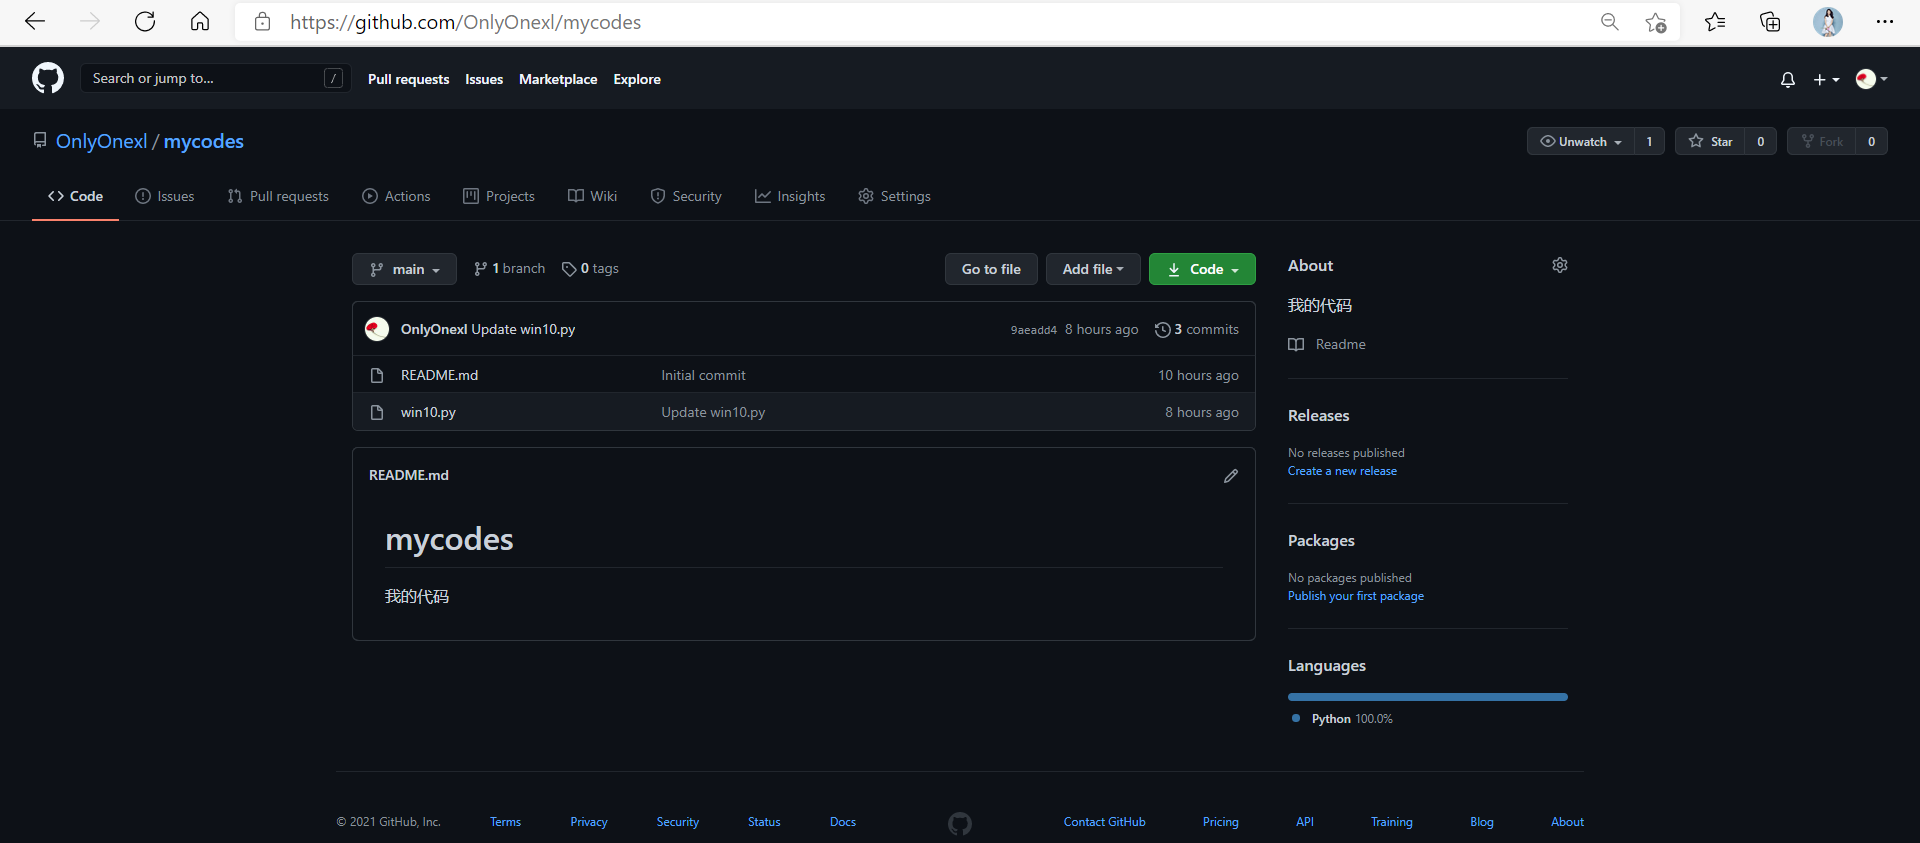
方法:如何删除GitHub上的项目仓库?-2021.05.16(已解决)
1.点击进入你的项目中,然后找到settings,这里以test项目为实例

2.点击settings后拉到最底部,有一个Delete this rerepository(删除这个仓库)
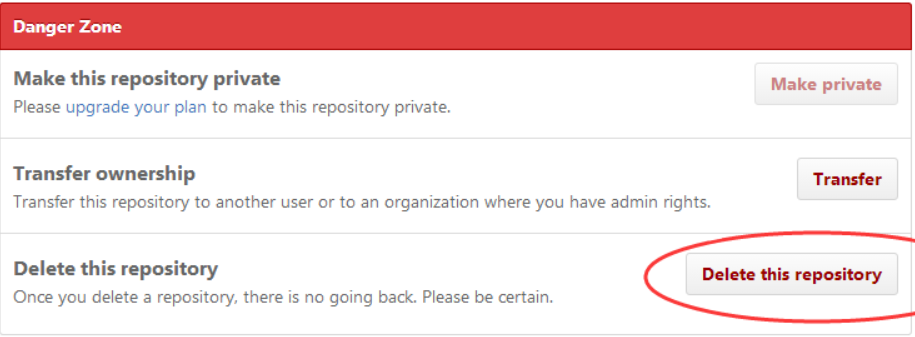
3.重写输入你当前确定的仓库名称 文本中大概的意思 这个动作无法回复。这将会永久删除9 /test库,维基,问题,和评论,并删除所有合作者关联。 请输入仓库确认的名称。
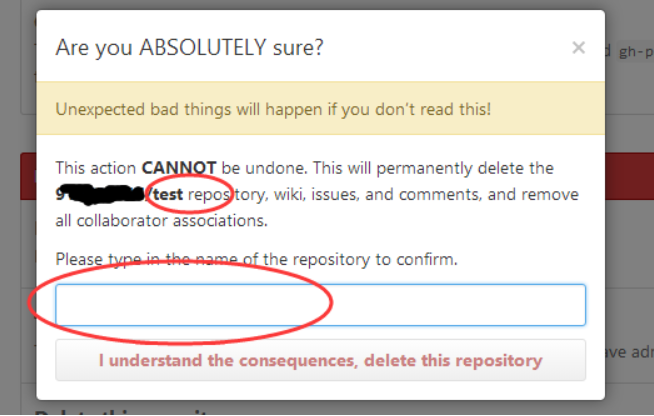
注意,这里需要完整填上一个项目名称:例如 下图,否则,无法进行下一步。
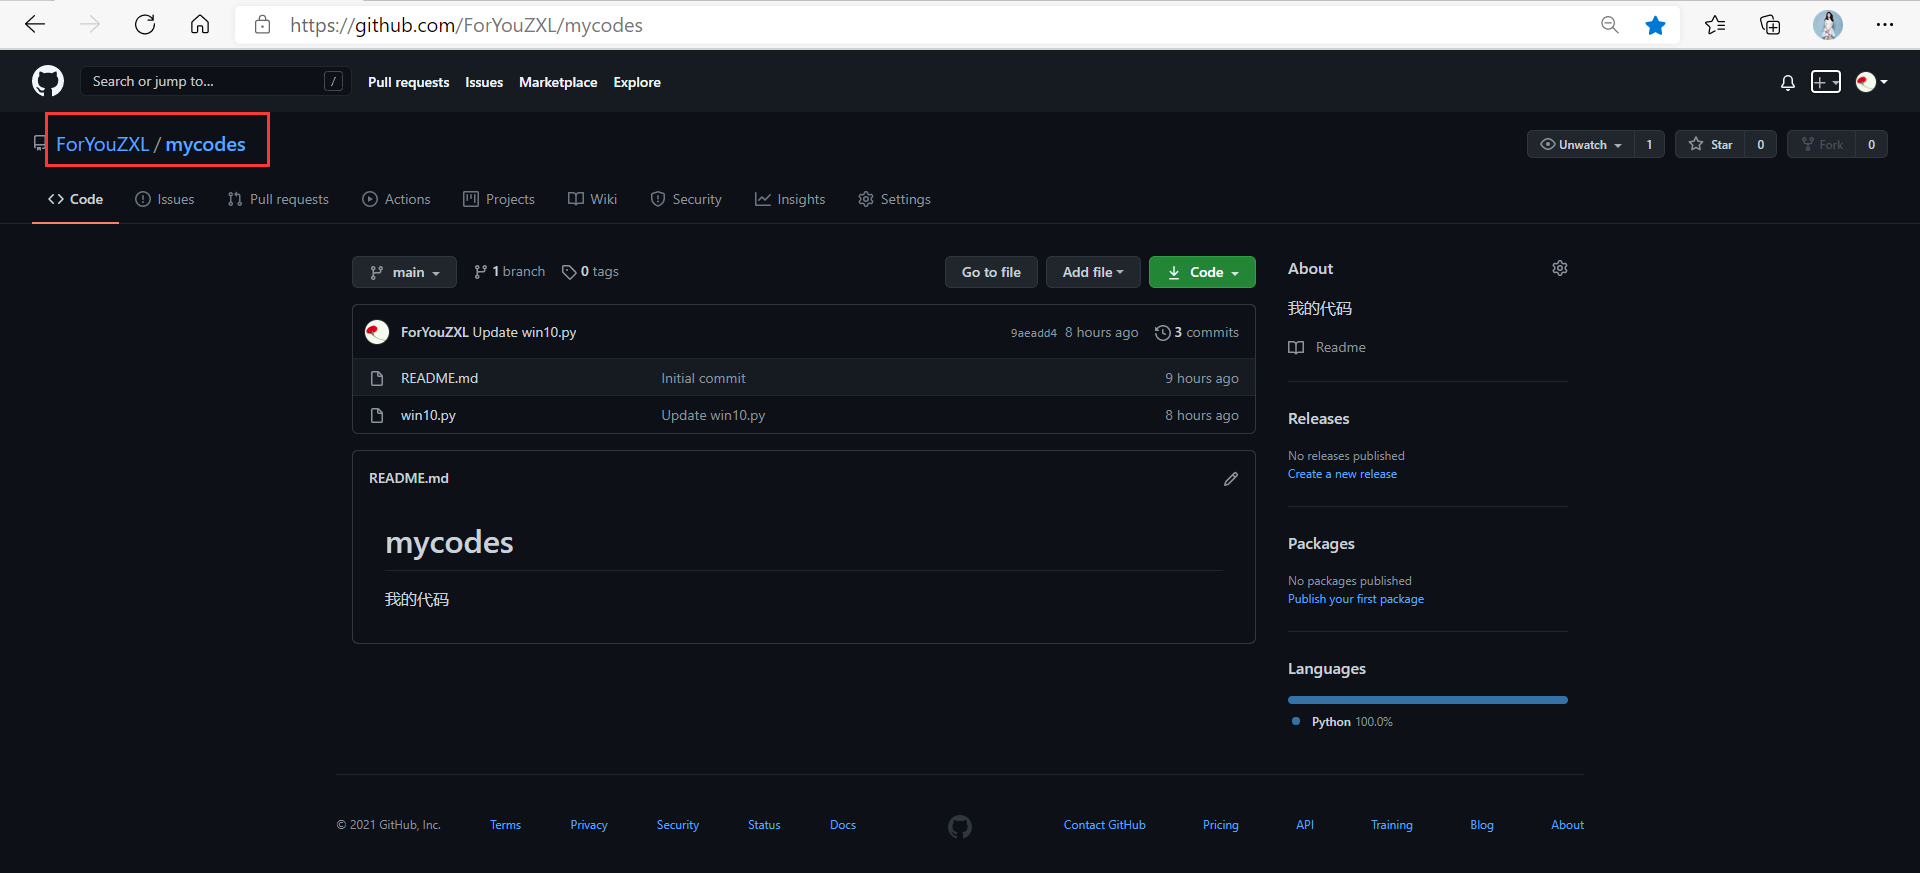
4.重写仓库名称后,下面的按钮按钮就会变亮,然后就可以删除了。
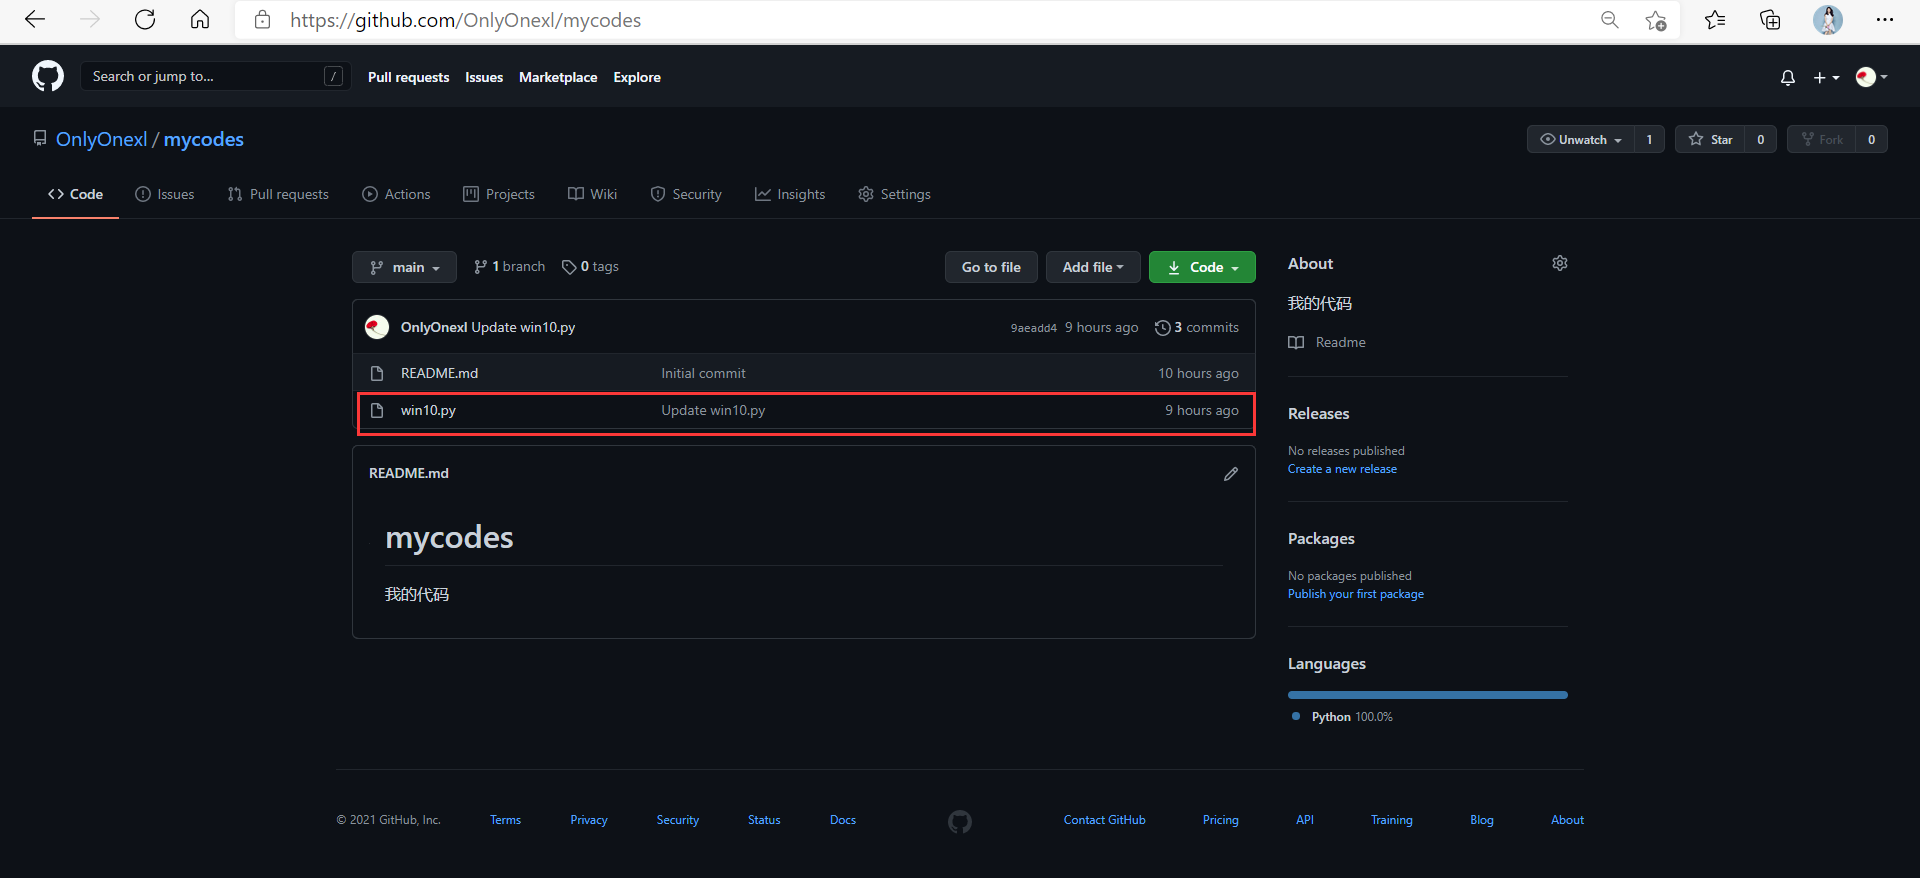
方法:如何删除GitHub项目中的文件?-疑问??-2021.05.16
貌似这里没有删除按钮,难道一定要用命令行才行吗?
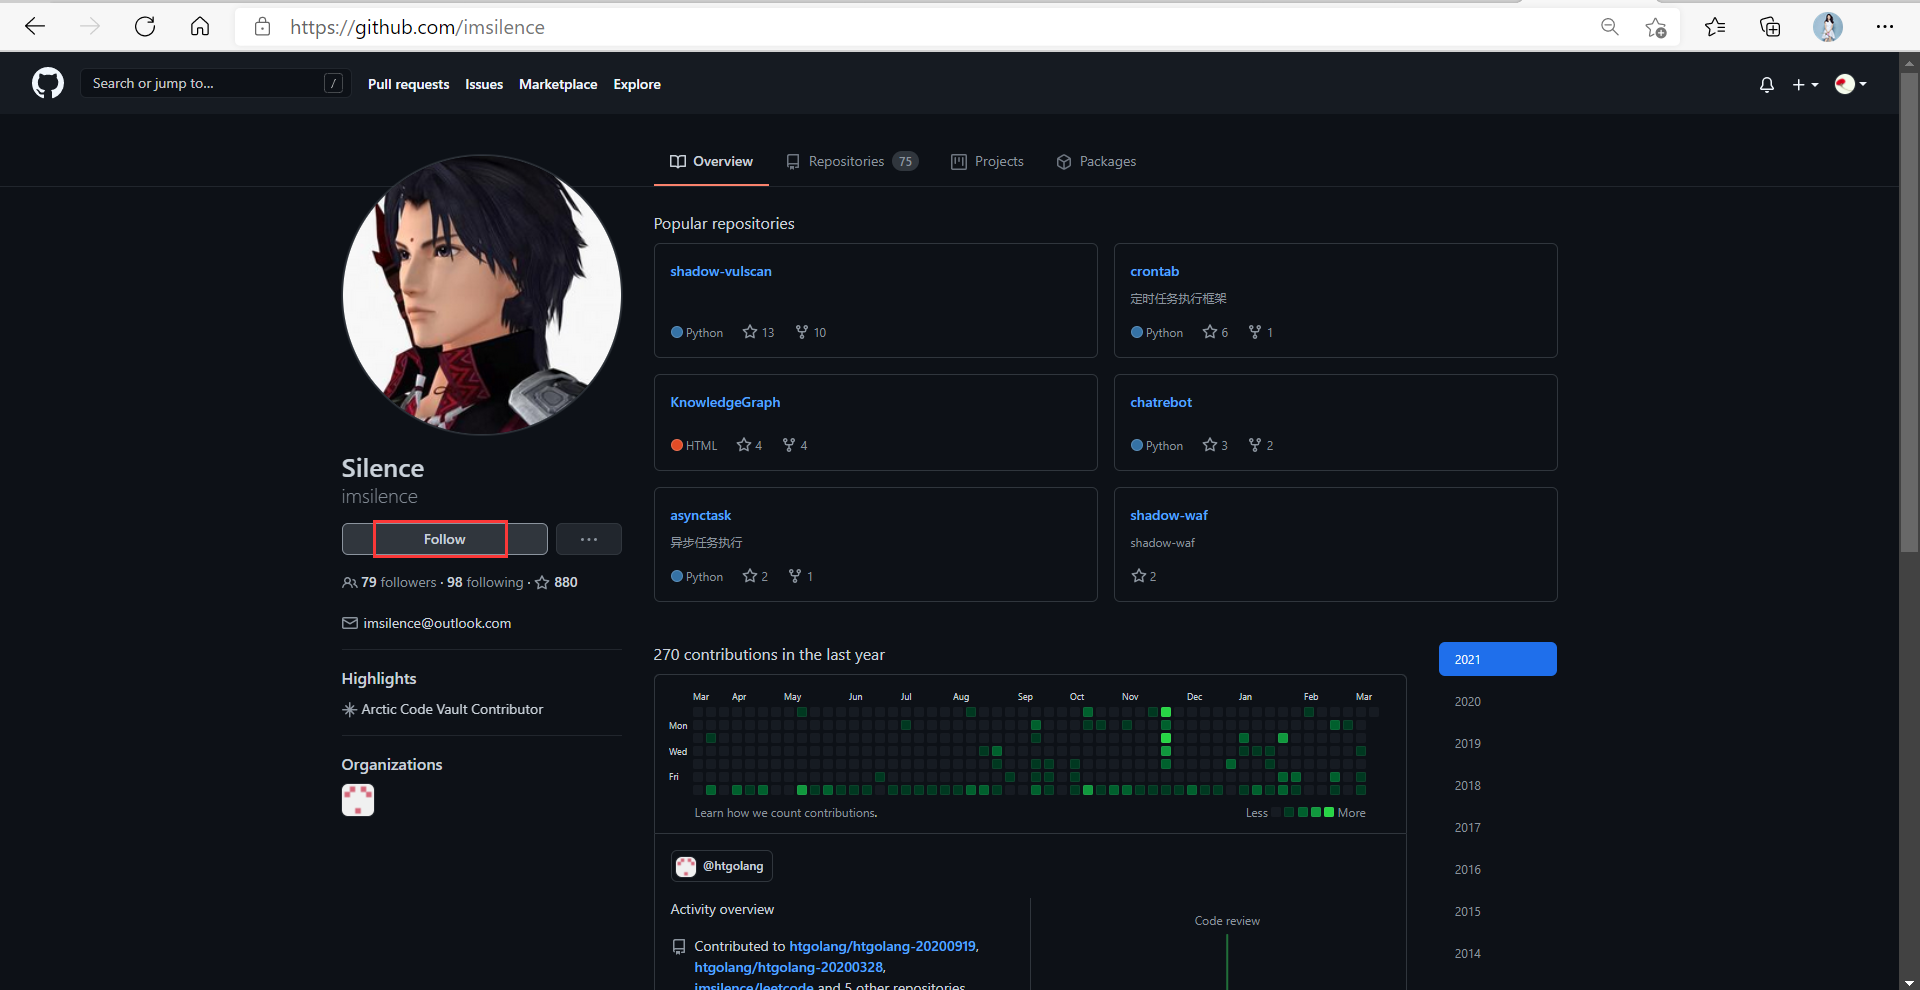
方法:如何关注某个up主?-2021.05.16(已解决)
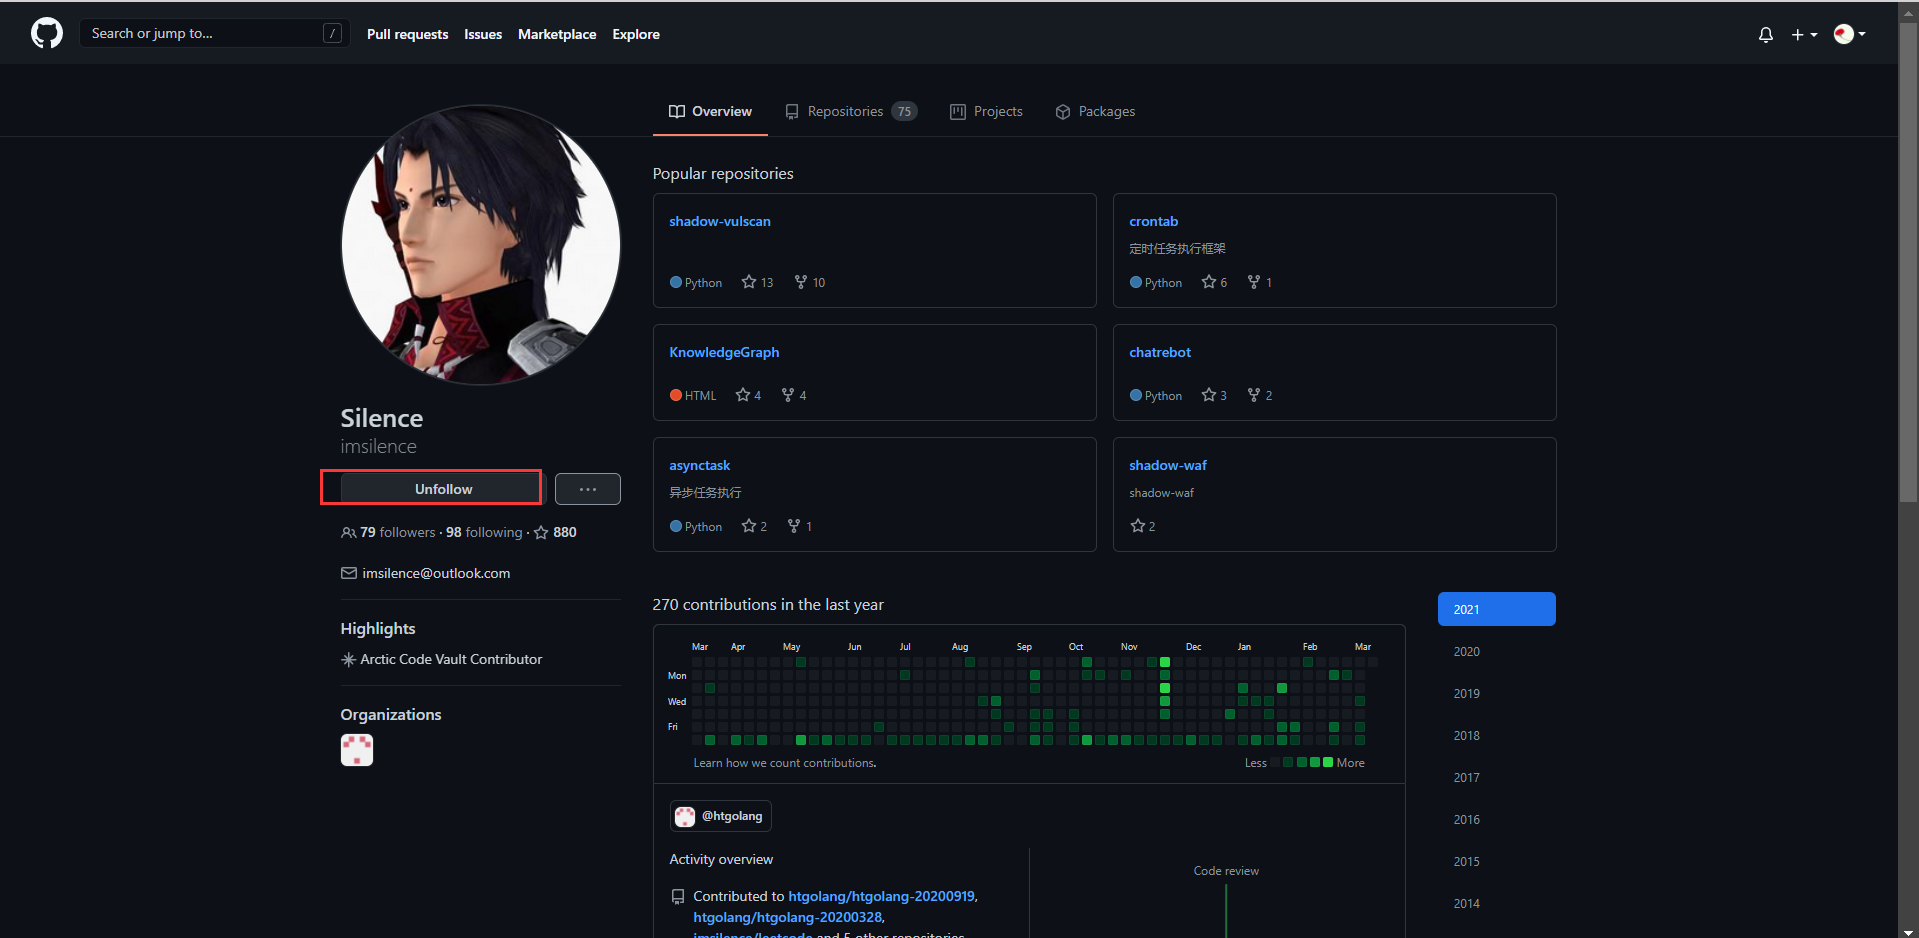
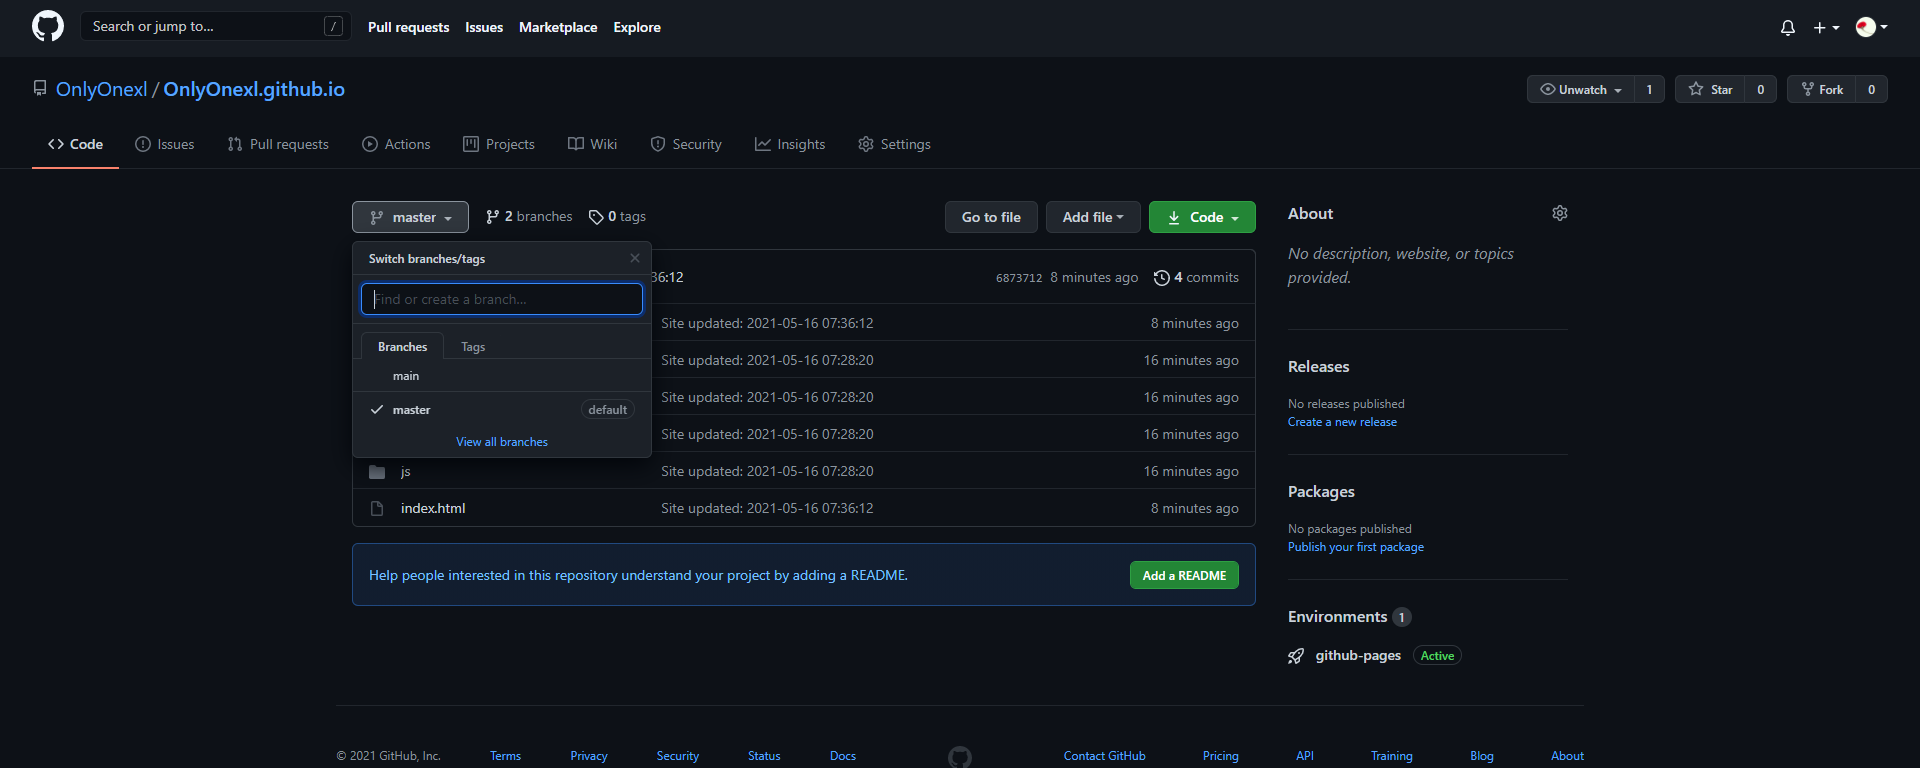
方法:如何更改github上的默认分支?-2021.05.16(已解决)
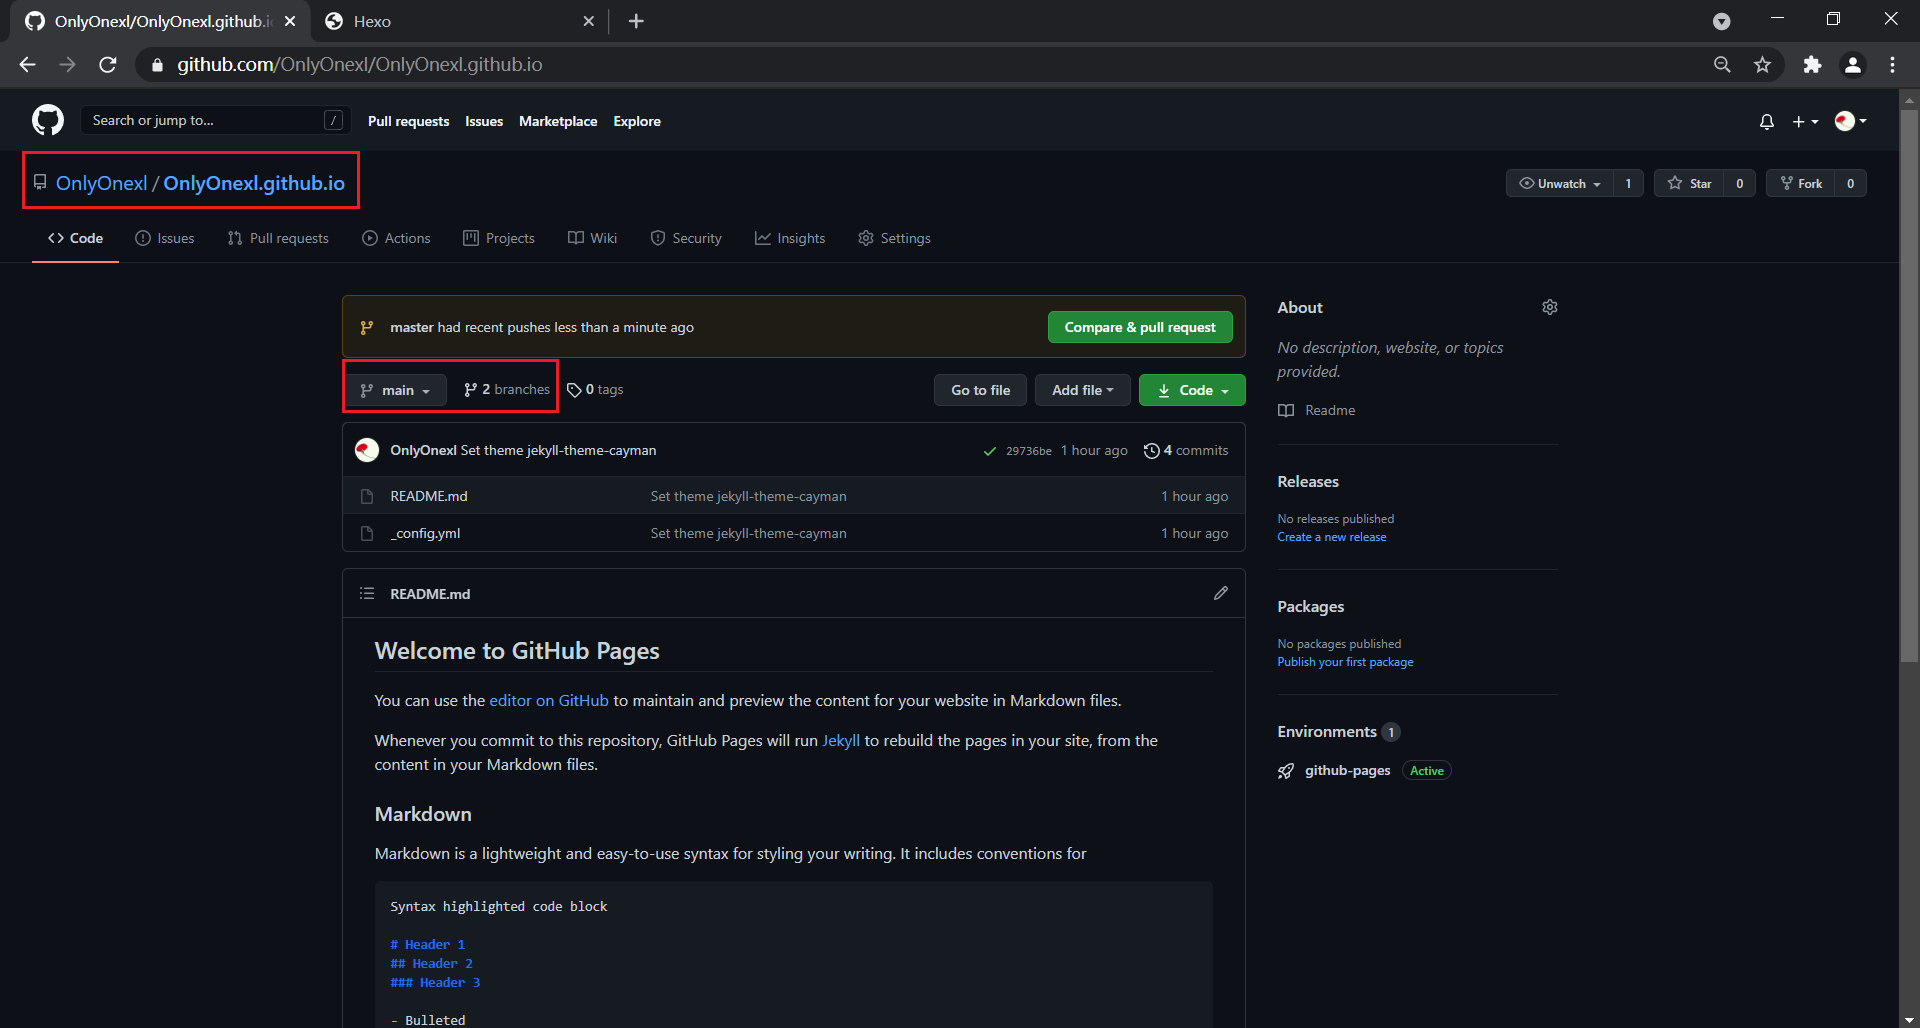
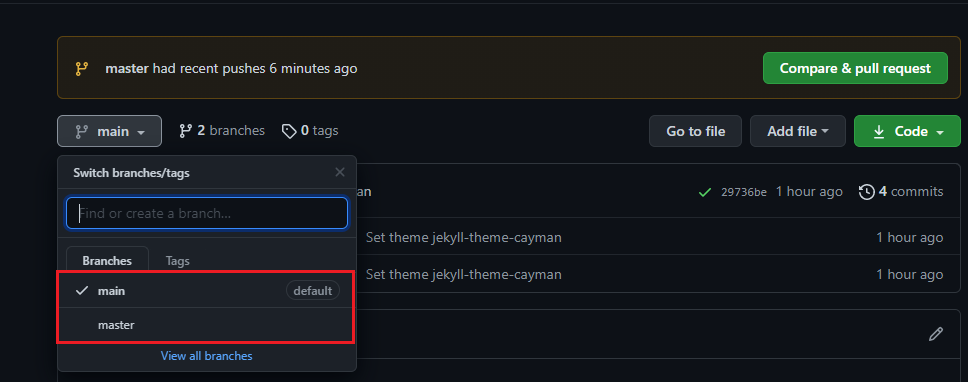
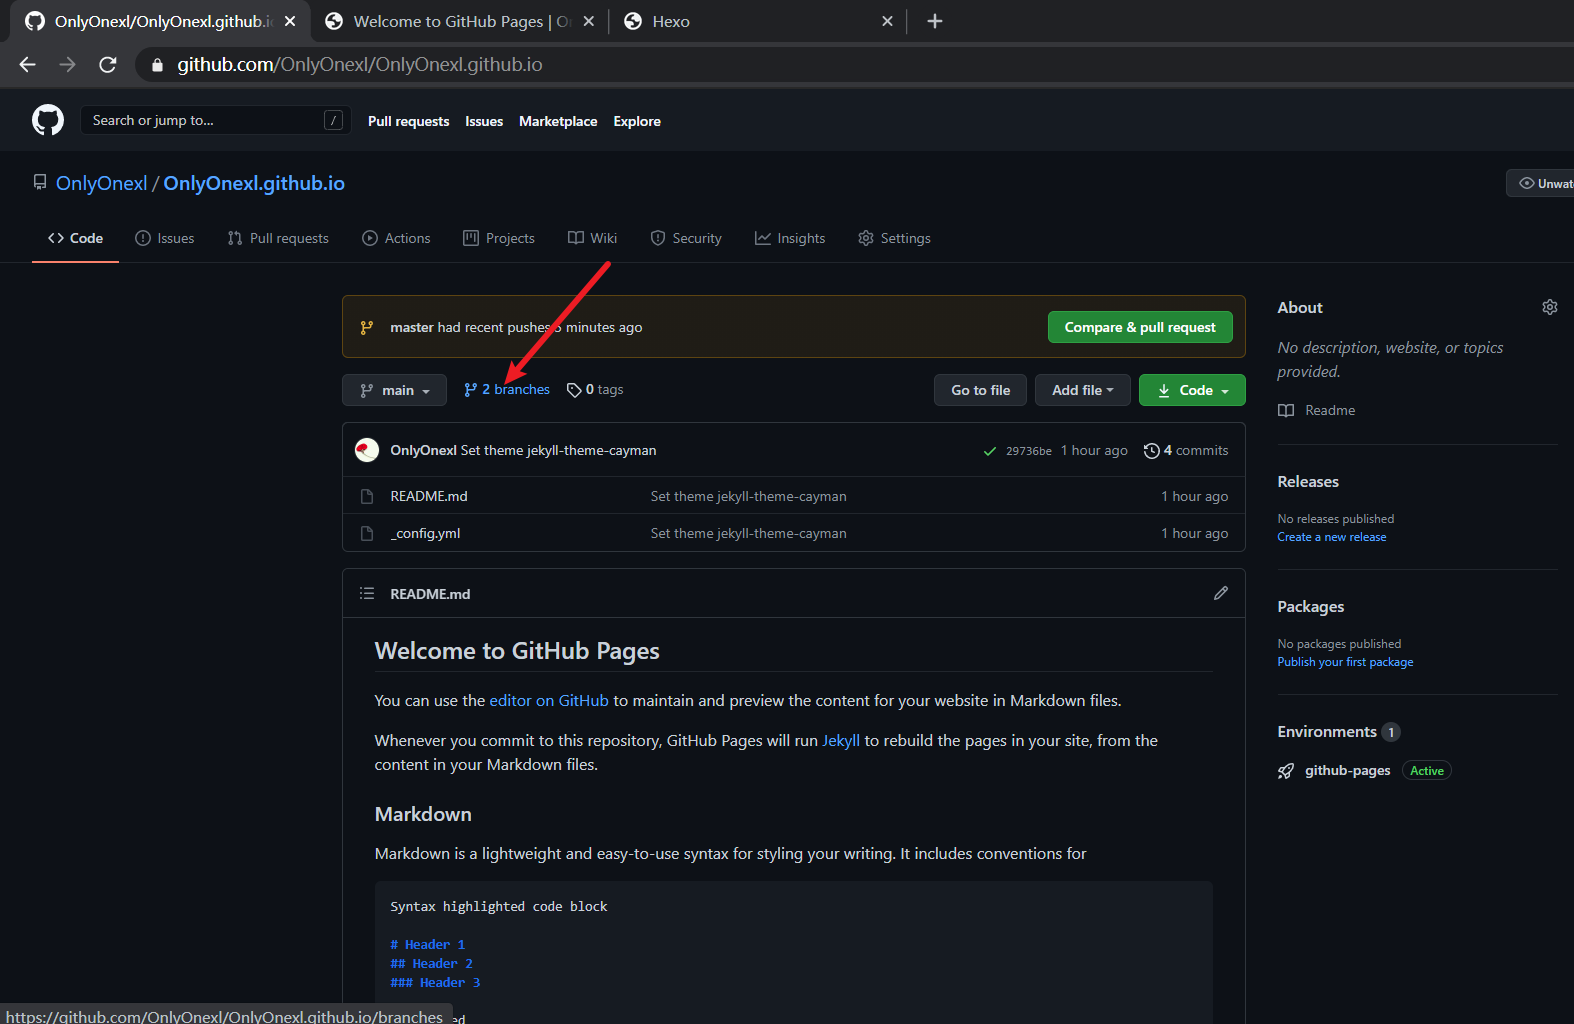
如何更改github默认分支main为其他分支?
打开项目的github地址:
https://github.com/OnlyOnexl/OnlyOnexl.github.io
刷新一下,可看到当前有2个分支,默认分支是main:
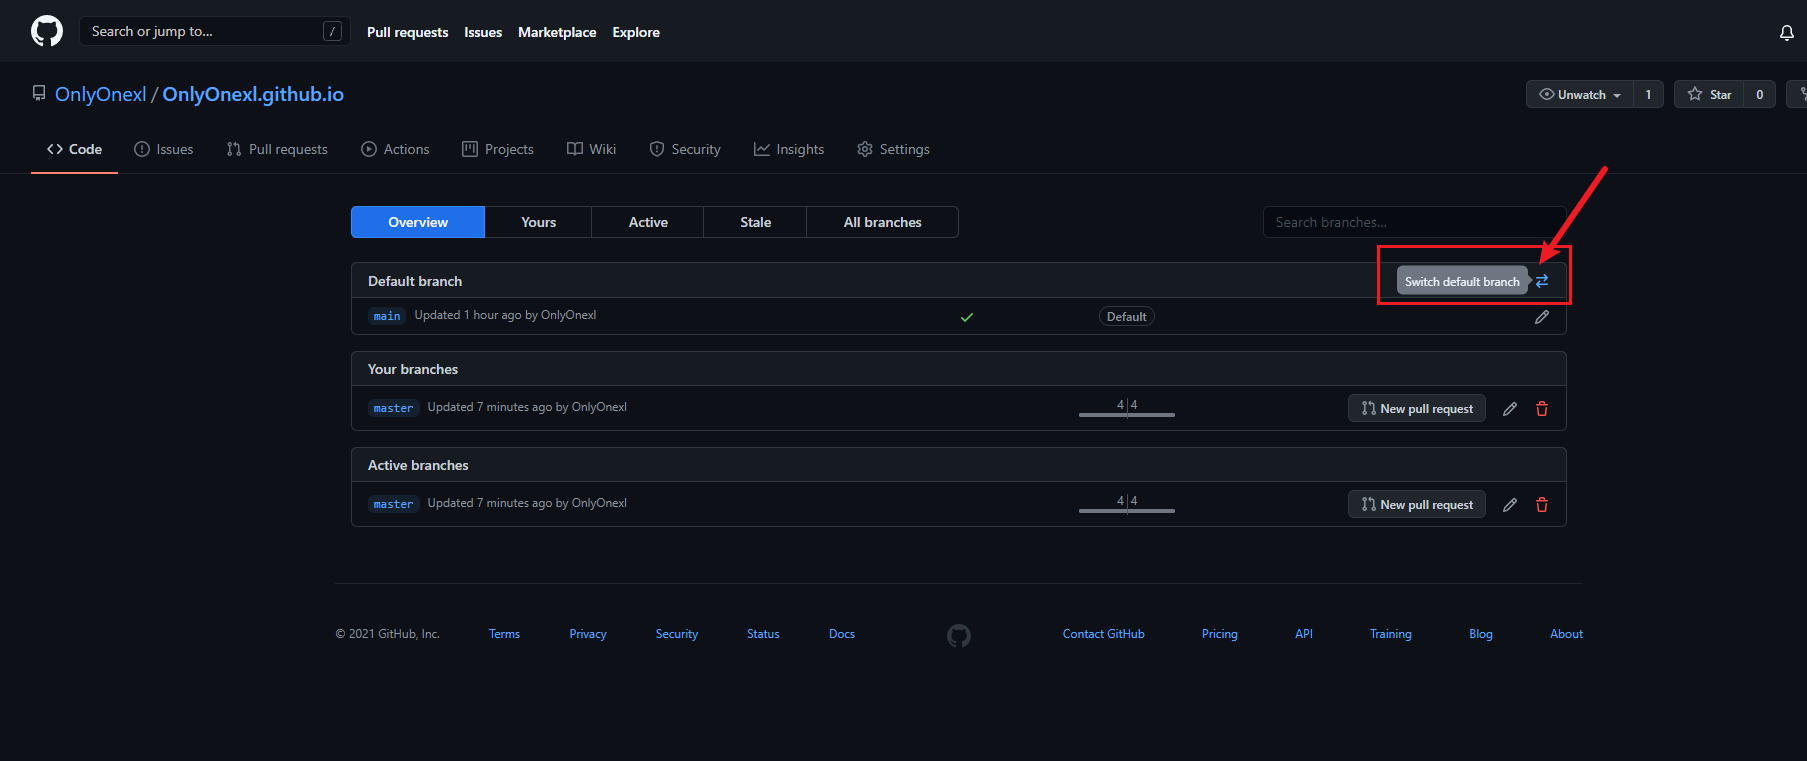
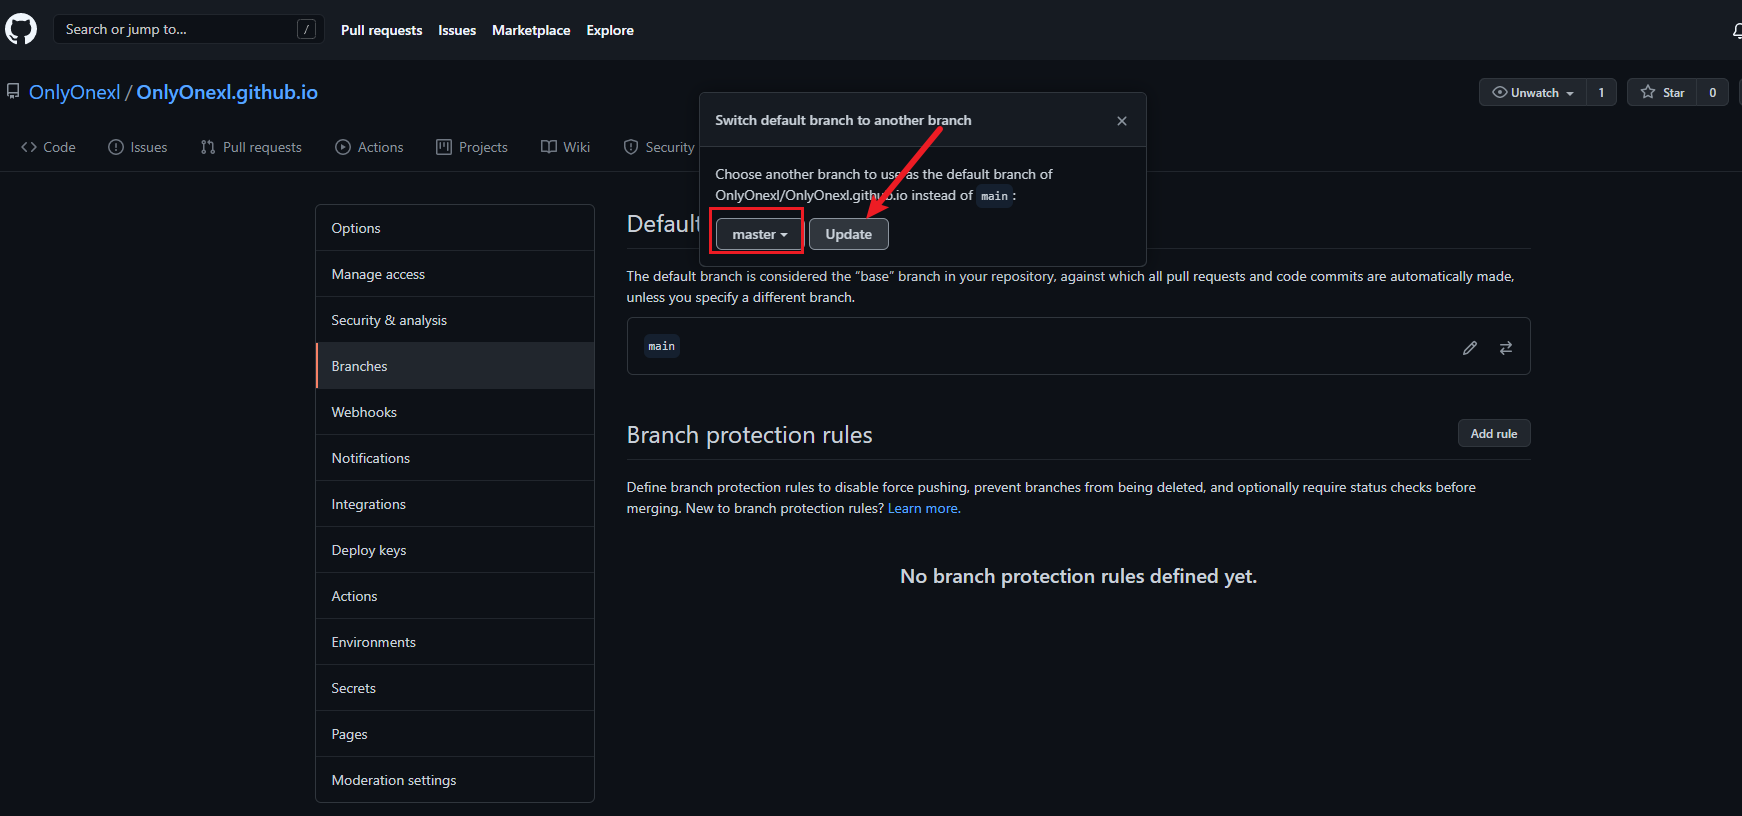
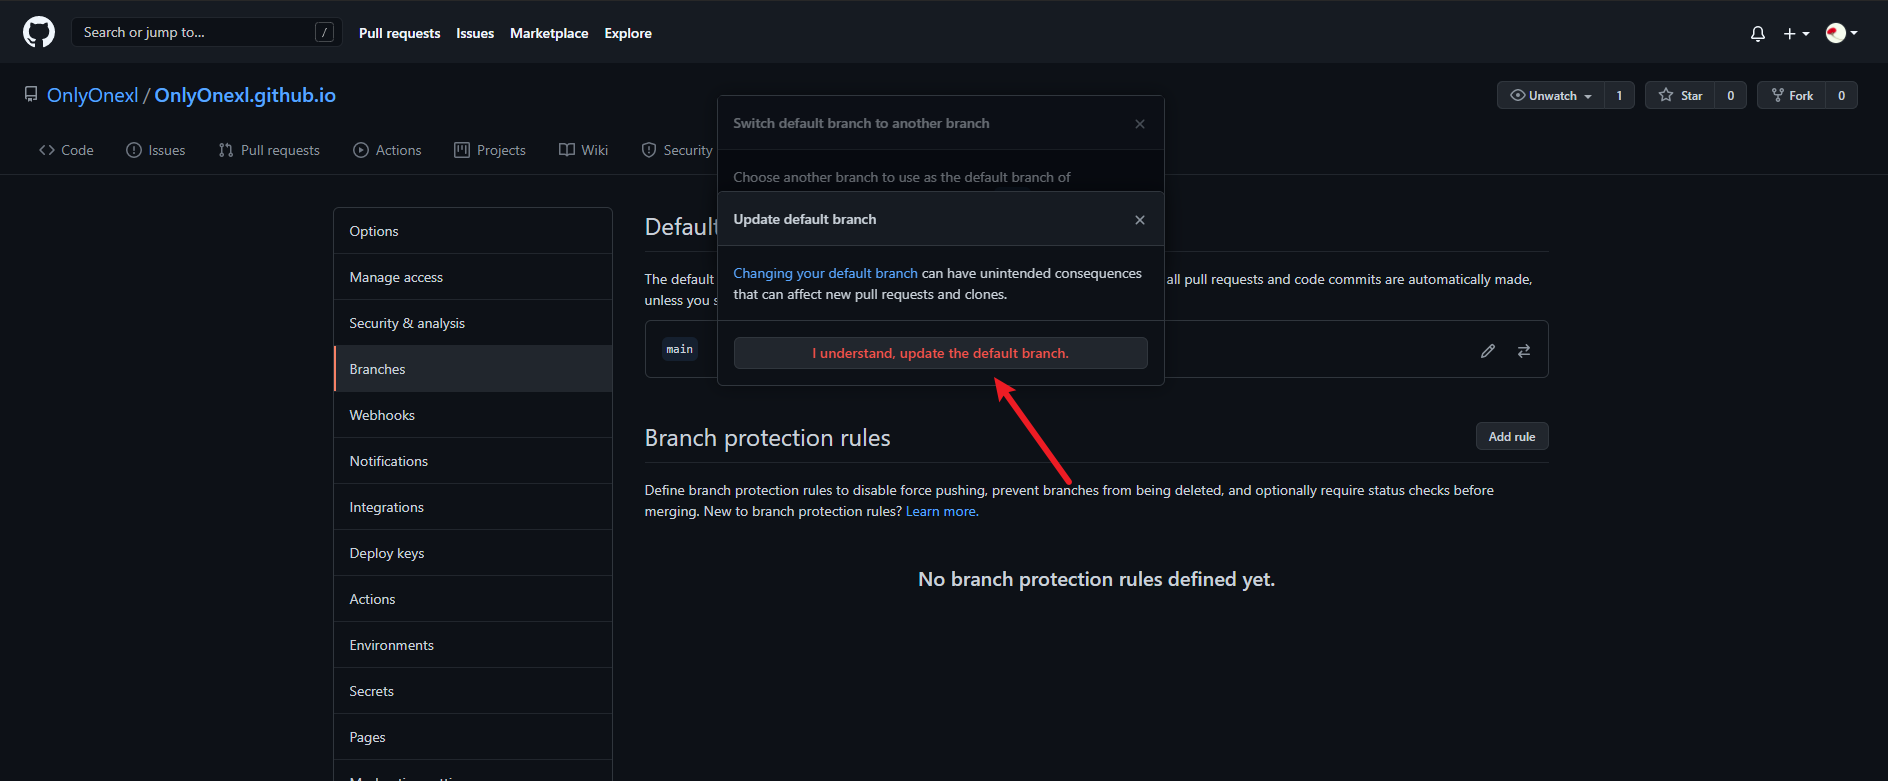
更换默认分支成功:
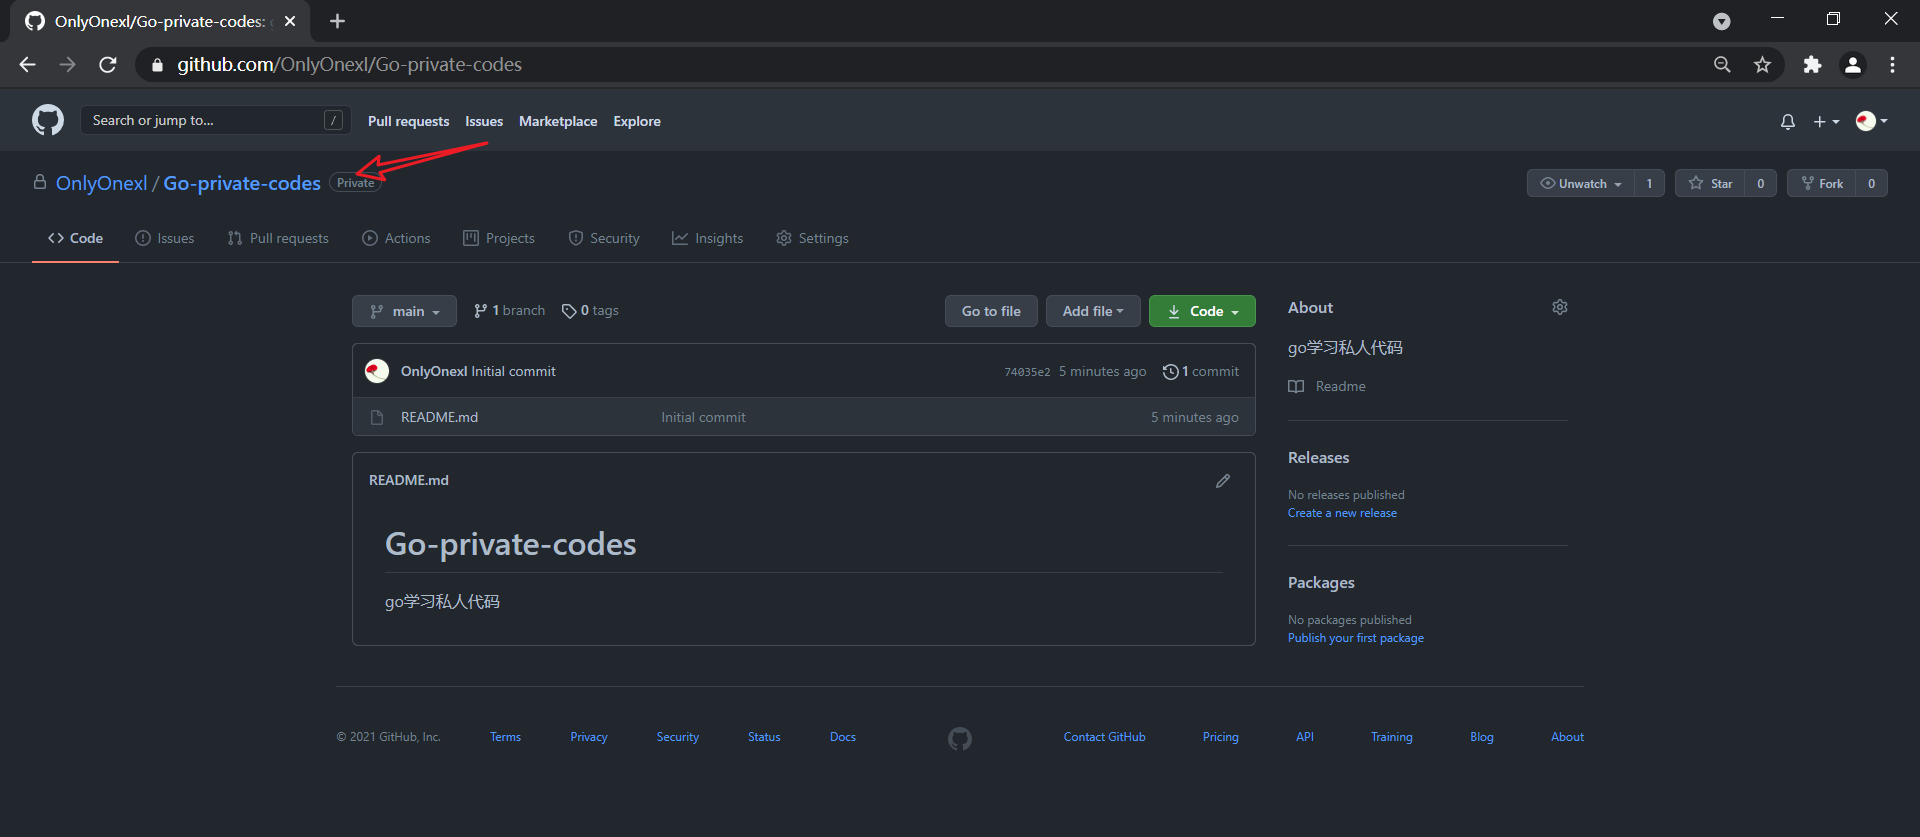
方法:github是可以创建自己的私人仓库的-2021.05.20(已解决)
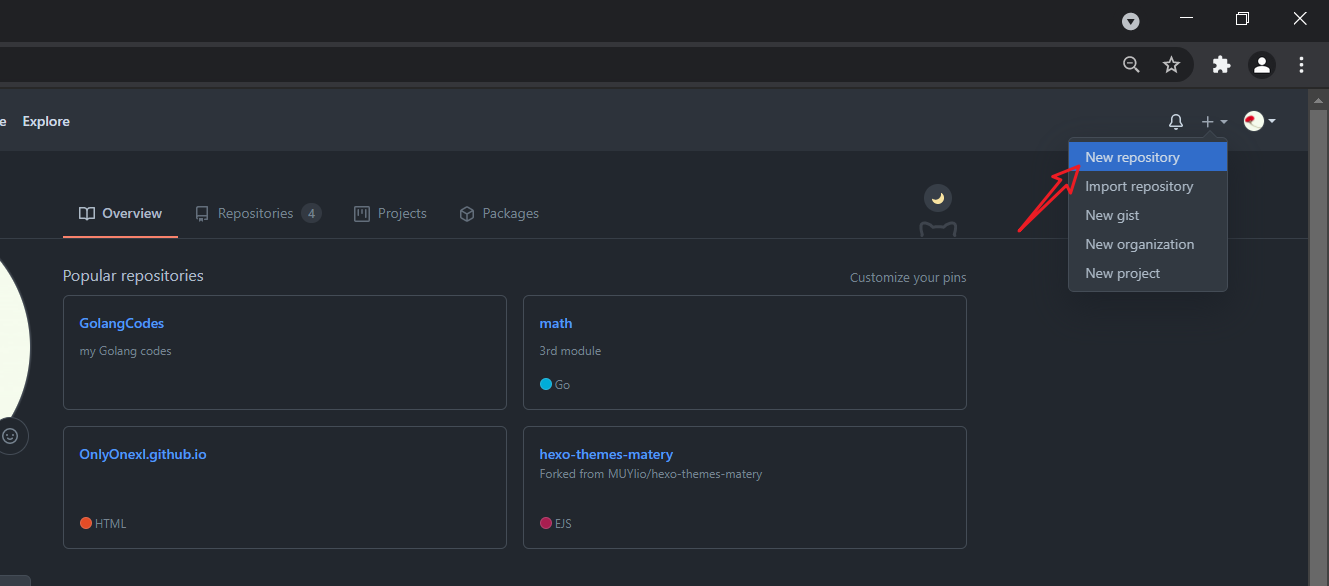
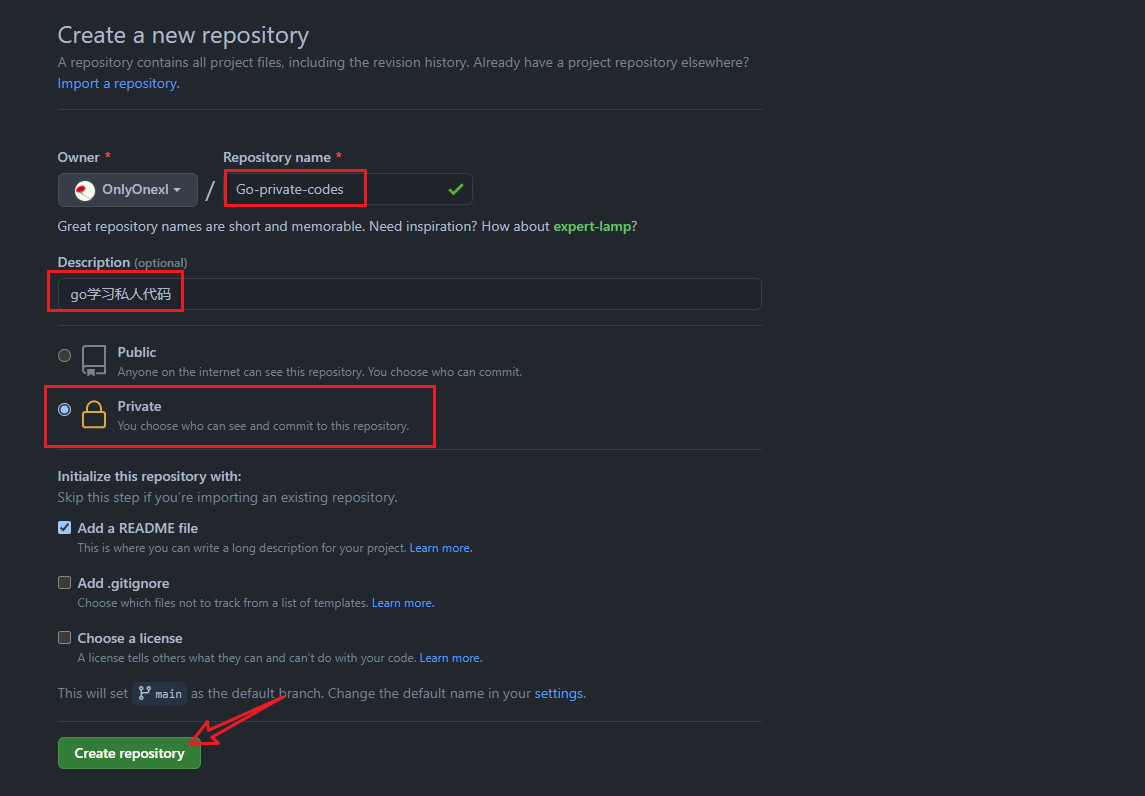
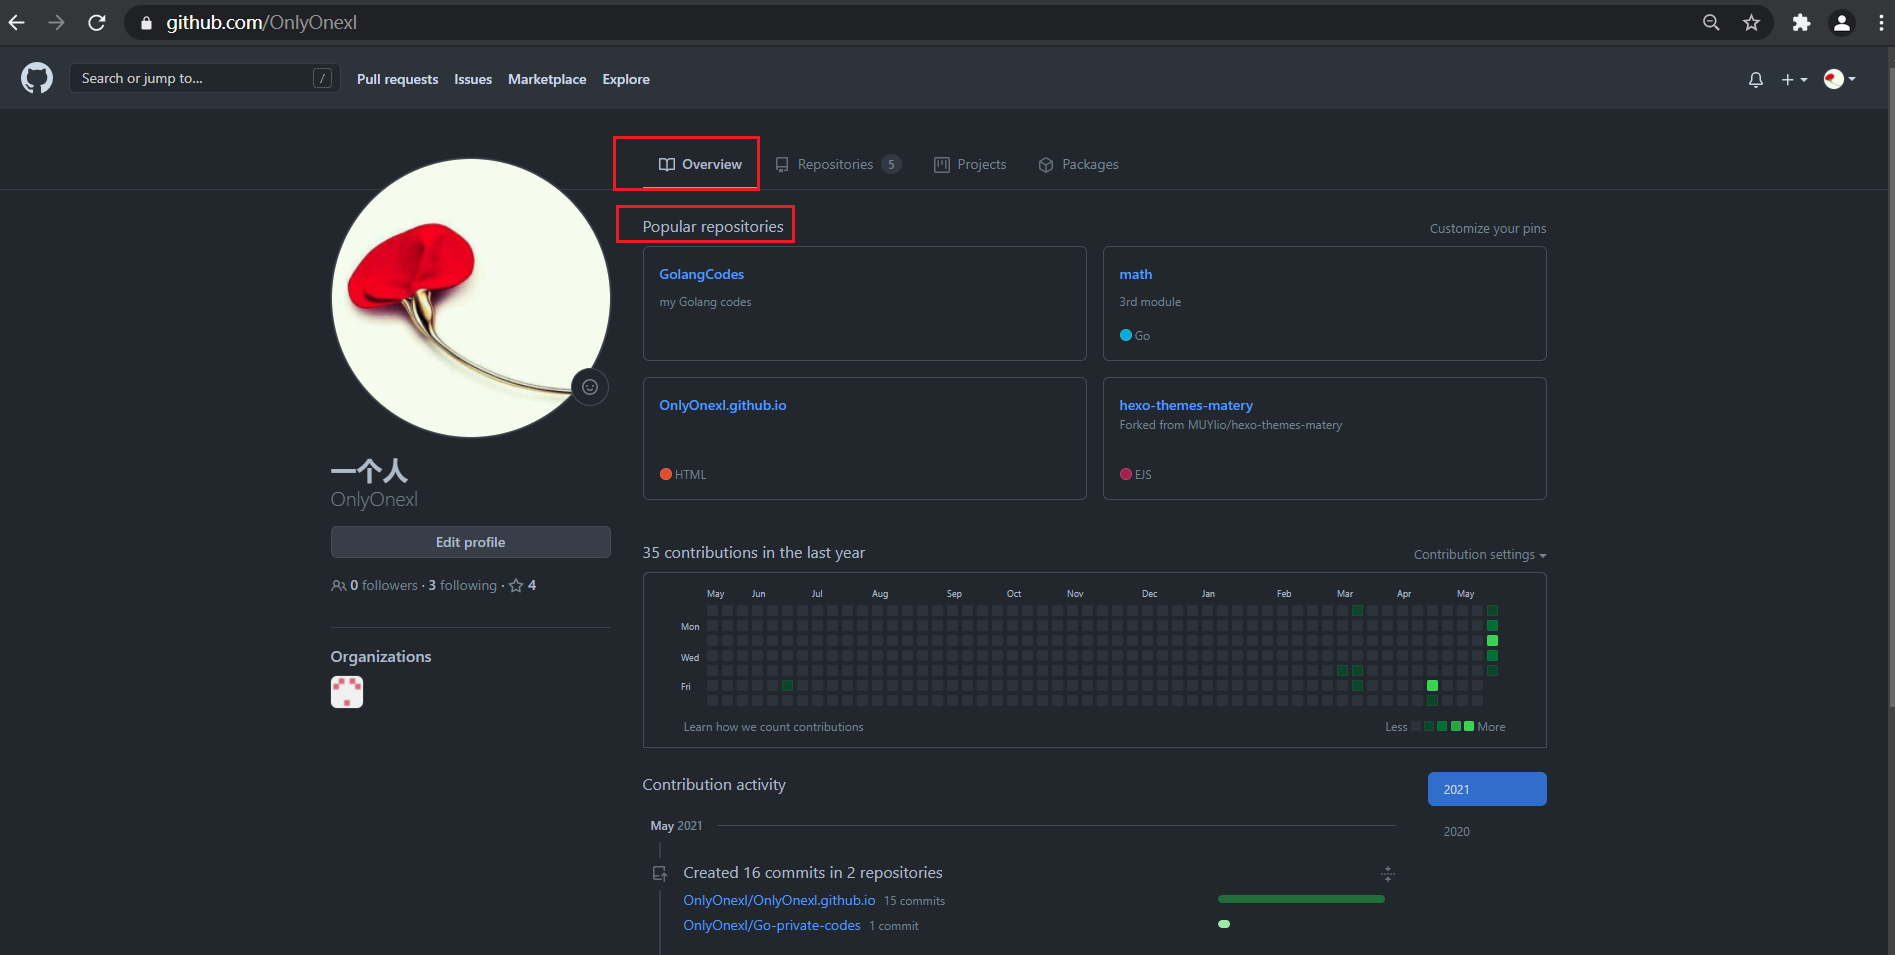
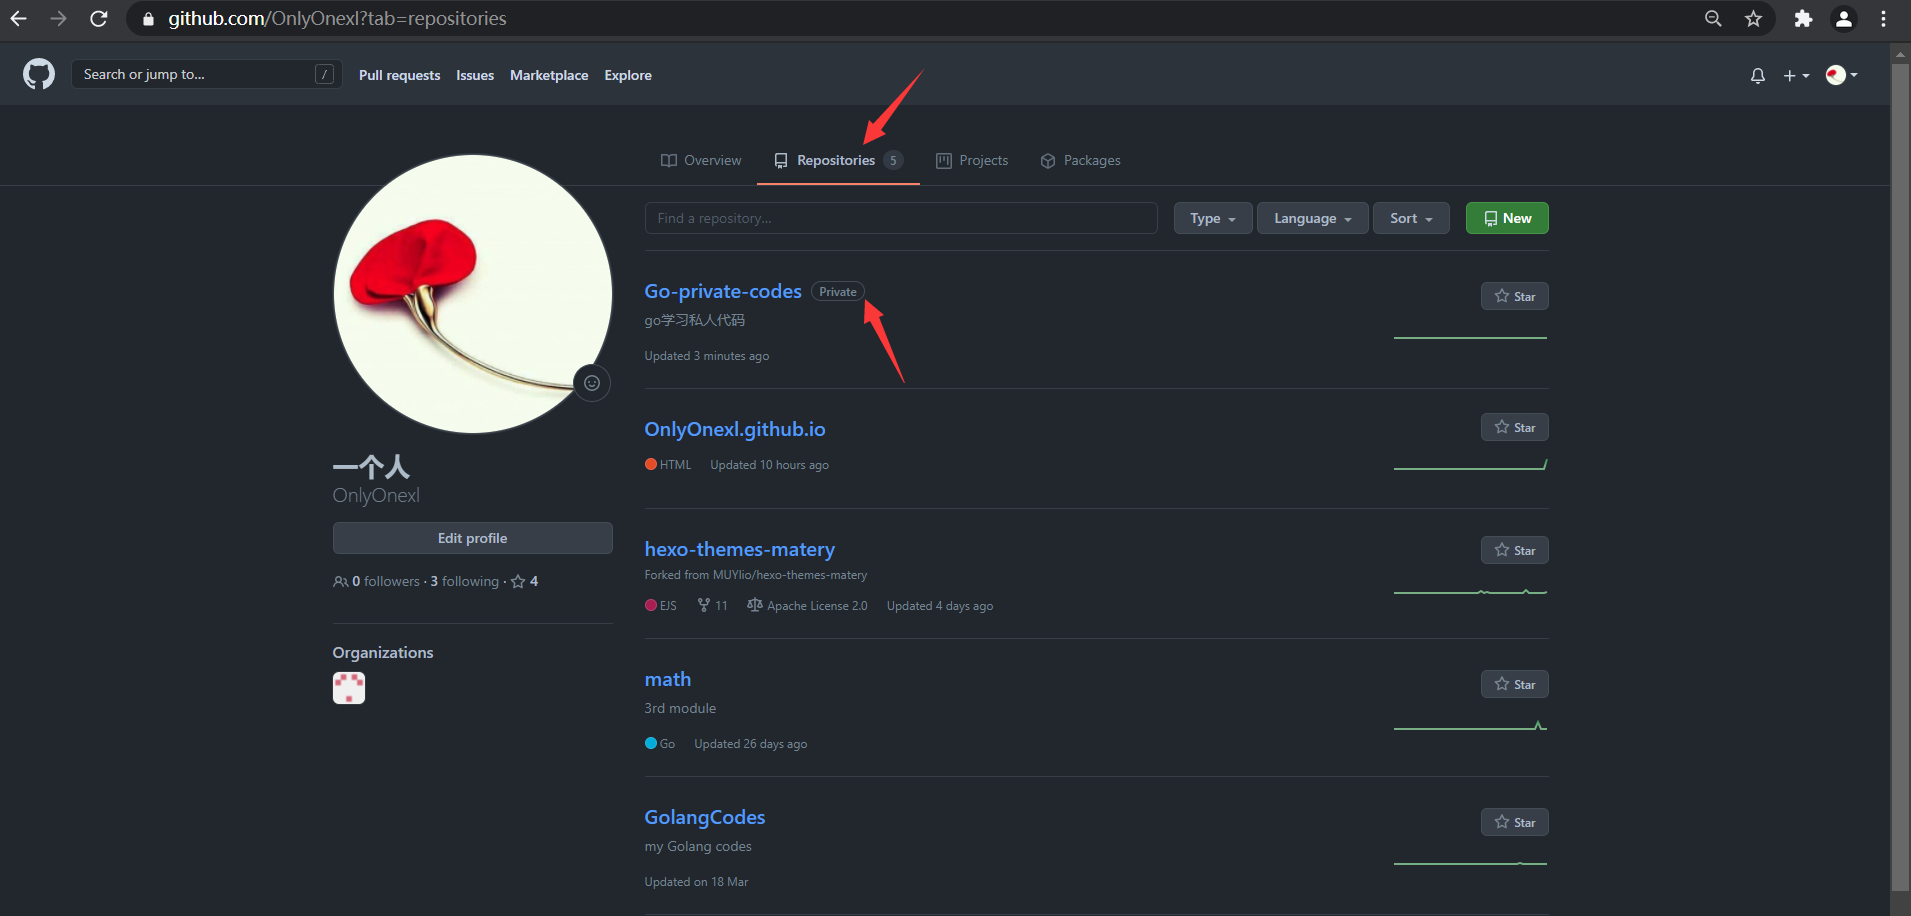
- 这里就有个问题了:如何确定自己github上的仓库是public,还是private呢?
一般出现在自己github首页的就是public项目:
而切换到Repositories那里就可以看到含有private的项目:
git@github.com:OnlyOnexl/Go-private-codes.git
实战:github下载加速地址(success)-2021.01.24
➜  ~ wget https://github.com/containerd/containerd/releases/download/v1.5.5/cri-containerd-cni-1.5.5-linux-amd64.tar.gz

# 如果有限制,也可以替换成下面的 URL 加速下载
# wget https://download.fastgit.org/containerd/containerd/releases/download/v1.5.5/cri-containerd-cni-1.5.5-linux-amd64.tar.gz
#下载后
[root@containerd ~]#ll -h
total 243M
-rw-r--r-- 1 root root 122M Jul 30 01:16 cri-containerd-cni-1.5.5-linux-amd64.tar.gz
-rw-r--r-- 1 root root 122M Oct  4 23:48 cri-containerd-cni-1.5.7-linux-amd64.tar.gz
[root@containerd ~]#4、github注意事项
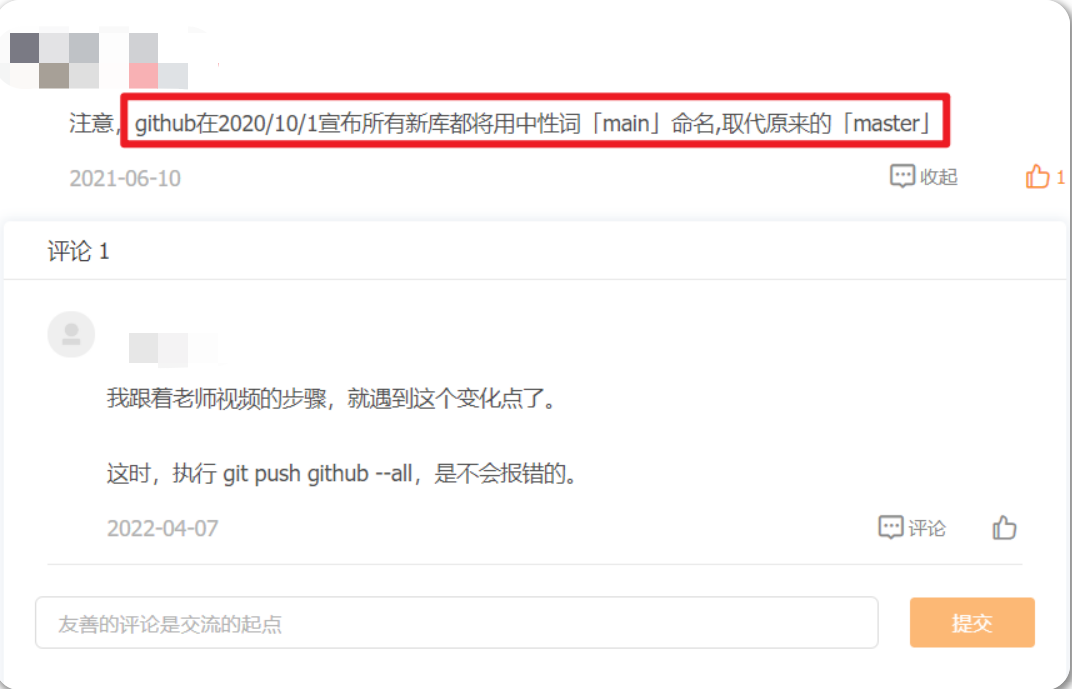
注意:2020.10.1 master->main
github在2020/10/1宣布所有新库都将用中性词「main」命名,取代原来的「master」
github和gitee的区别
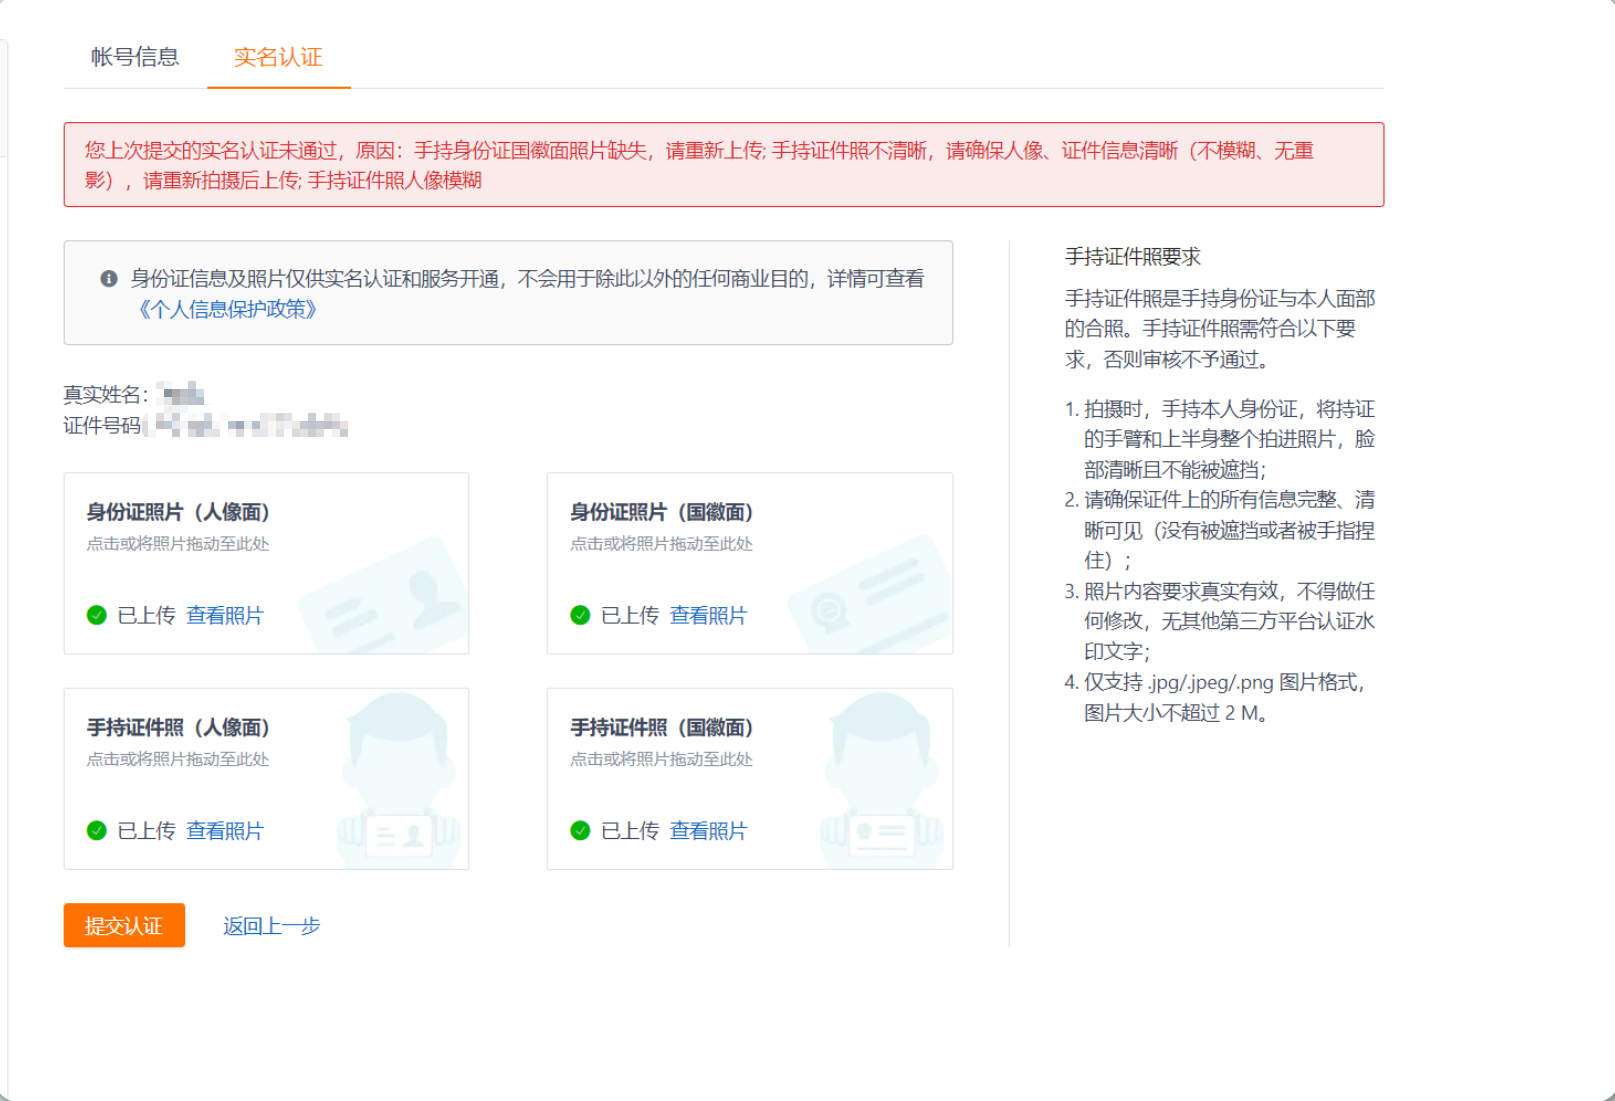
gitee限制太多

要实名

我打算再gitee用gitee pages,但还要用手持身份证来实名🤣。。。;
真的垃圾,这么繁琐的认证流程……;🤣2022年10月10日17:59:40
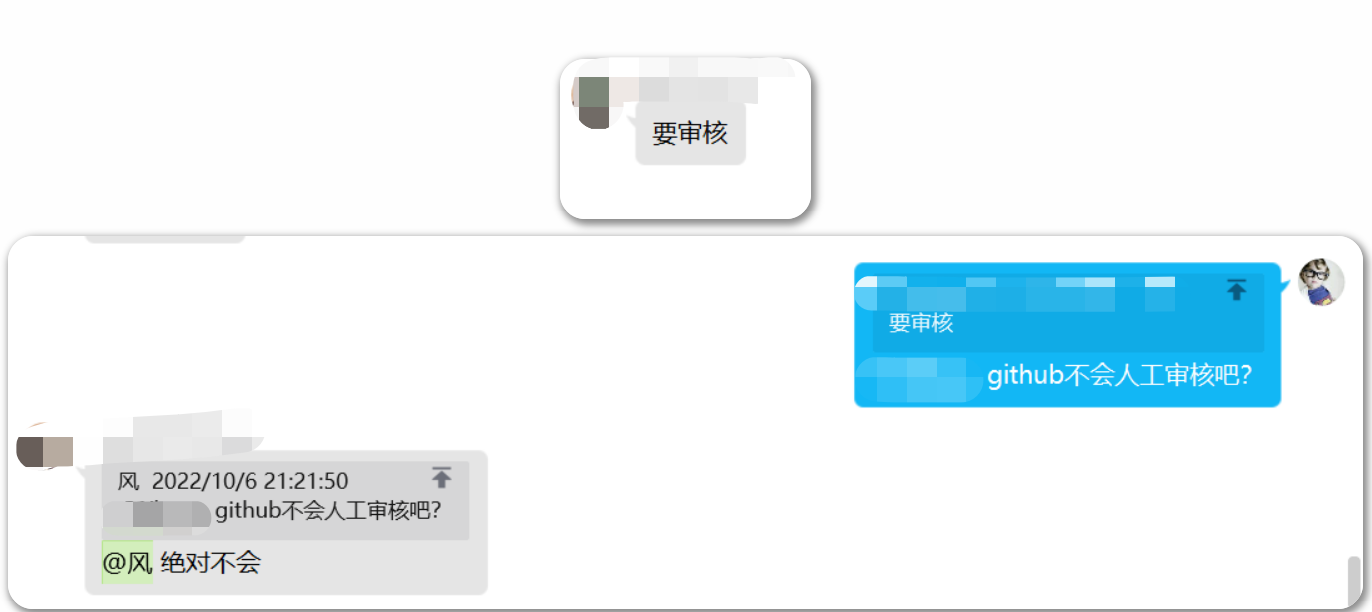
要审核
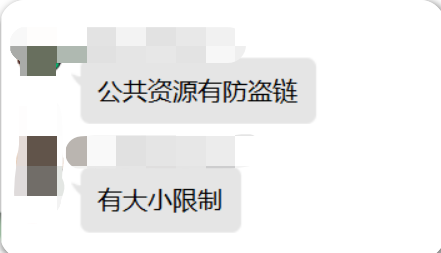
公共资源有防盗链,有大小限制
gitee国内速度快

关于我
我的博客主旨:
- 排版美观,语言精炼;
- 文档即手册,步骤明细,拒绝埋坑,提供源码;
- 本人实战文档都是亲测成功的,各位小伙伴在实际操作过程中如有什么疑问,可随时联系本人帮您解决问题,让我们一起进步!
🍀 微信二维码 x2675263825 (舍得), qq:2675263825。

🍀 微信公众号 《云原生架构师实战》

🍀 网站
🍀 语雀
https://www.yuque.com/xyy-onlyone

🍀 csdn https://blog.csdn.net/weixin_39246554?spm=1010.2135.3001.5421

🍀 知乎 https://www.zhihu.com/people/foryouone
最后
好了,关于本次就到这里了,感谢大家阅读,最后祝大家生活快乐,每天都过的有意义哦,我们下期见!

1