
快捷菜单
常用功能一站直达
更多功能请点顶栏「快捷菜单」
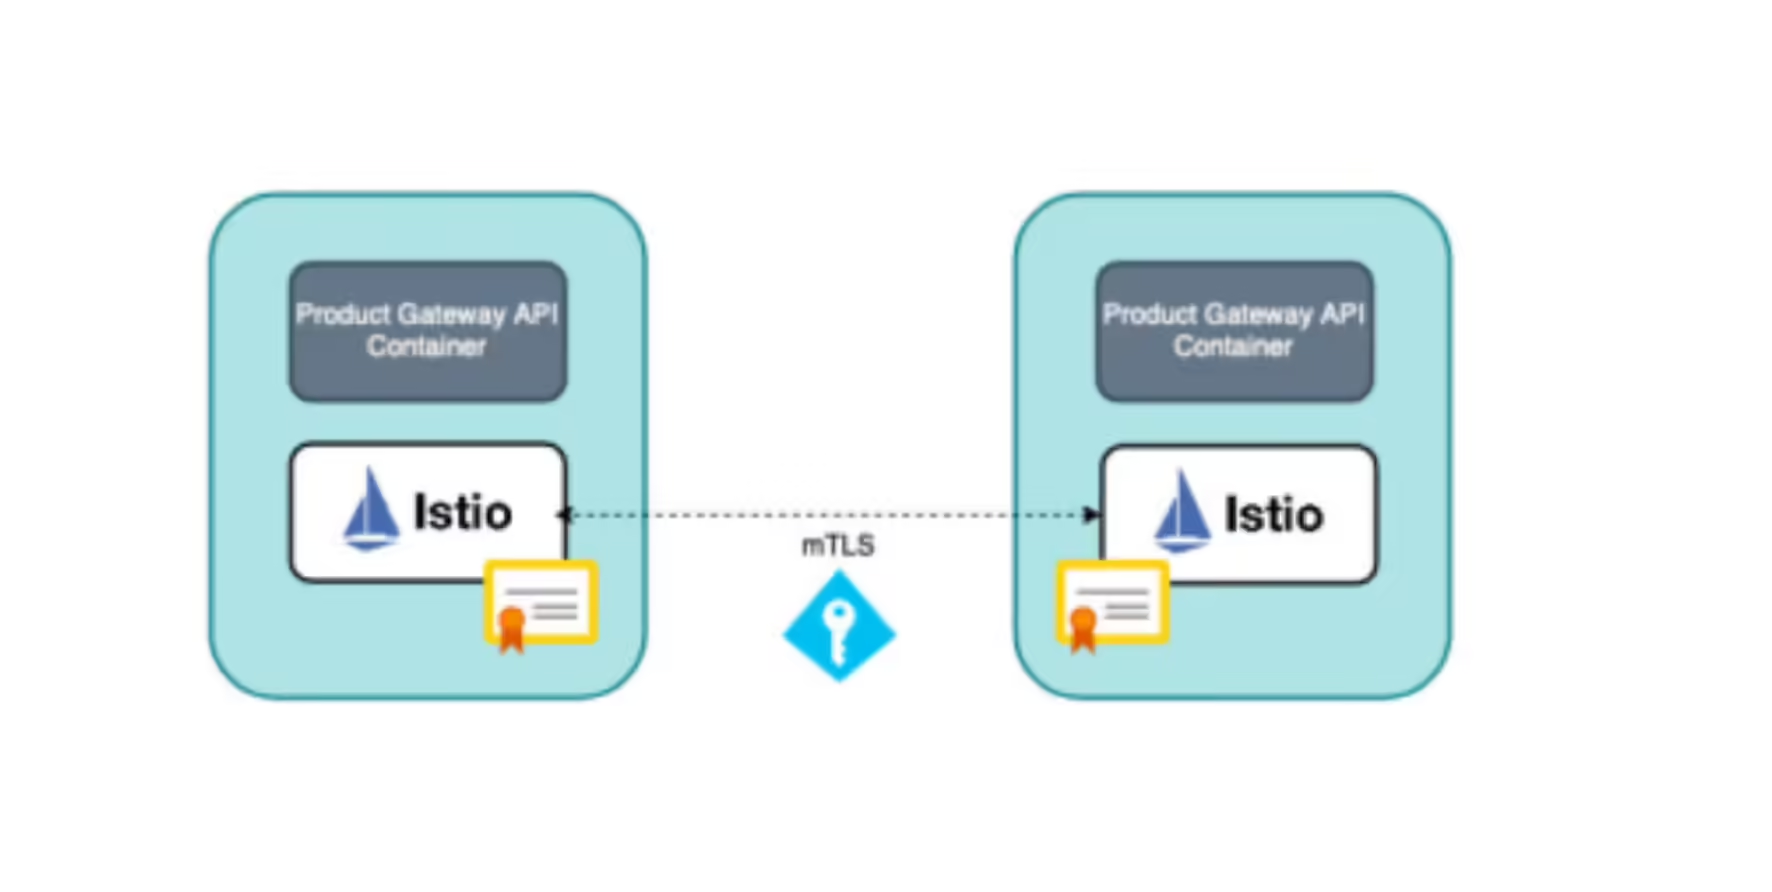
我们知道在 Kubernetes 中我们会使用 Ingress 来暴露 HTTP 流量的入口,在 Istio 中我们是通过 Gateway 来暴露流量入口的,那么我们是否可以使用 Ingress 对象来支持 Istio 的流量入口呢?答案是肯定的,但是我们还是建议使用 Gateway 而不是 Ingress 来使用 Istio 提供的完整功能集,例如丰富的流量管理和安全功能。
k8s gateway api。
[toc]
| 实战名称 |
|---|
| 🚩 实战:Kubernetes Ingress-2023.11.15(测试成功) |
| 🚩 实战:Ingress Gateway-2023.11.15(测试成功) |
| 🚩 实战:istio安全网关-2023.11.16(测试成功) |
| 🚩 实战:TLS 透传-2023.11.16(测试成功) |
==🚩 实战:Kubernetes Ingress-2023.11.15(测试成功)==
实验环境:
1k8s v1.27.6(containerd://1.6.20)(cni:flannel:v0.22.2)
2
3[root@master1 ~]#istioctl version
4client version: 1.19.3
5control plane version: 1.19.3
6data plane version: 1.19.3 (8 proxies)
实验软件:
链接:https://pan.baidu.com/s/1VEYZ8jPDGsHXvnxwkKHzZA?pwd=062k
提取码:062k
2023.11.15-实战:Kubernetes Ingress-2023.11.15(测试成功)

应用程序在以下链接里:
链接:https://pan.baidu.com/s/1pMnJxgL63oTlGFlhrfnXsA?pwd=7yqb
提取码:7yqb
2023.11.5-实战:BookInfo 示例应用-2023.11.5(测试成功)

实验步骤:
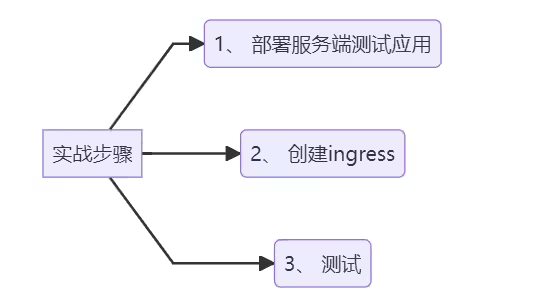
下面我们来使用 Ingress 资源配置 Istio 的入口网关,使用 Kubernetes Ingress 可以暴露从集群外到集群内服务的 HTTP 和 HTTPS 路由。
httpbin 应用,用来测试:1kubectl apply -f samples/httpbin/httpbin.yaml查看:
1[root@master1 istio-1.19.3]#kubectl get po -l app=httpbin
2NAME                       READY   STATUS    RESTARTS   AGE
3httpbin-86869bccff-7lpjx   2/2     Running   0          2d14h
4[root@master1 istio-1.19.3]#kubectl get svc
5NAME          TYPE        CLUSTER-IP       EXTERNAL-IP   PORT(S)             AGE
6httpbin       ClusterIP   10.111.57.195    <none>        8000/TCP            2d14h
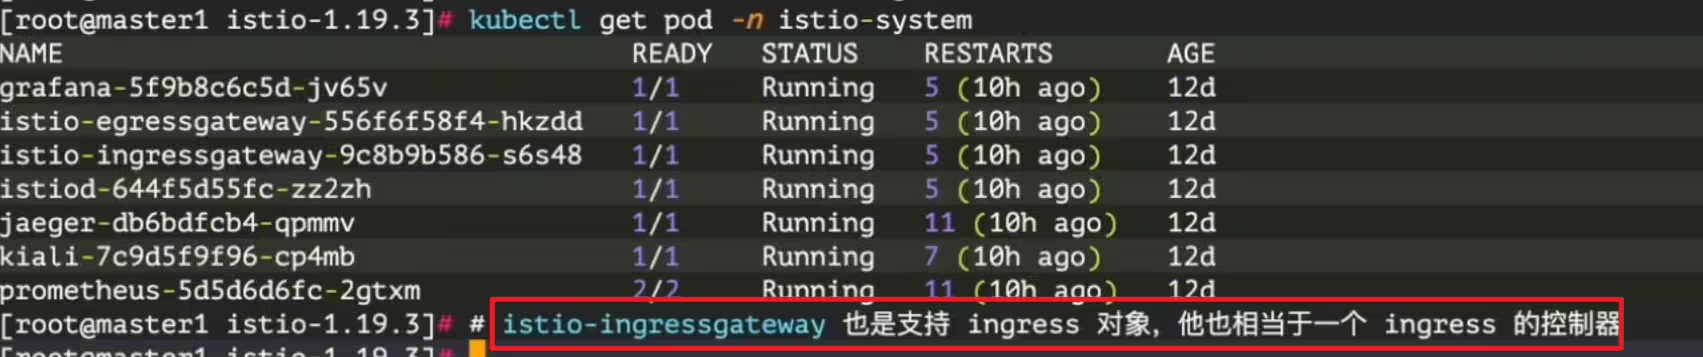
7……Ingress 对象来暴露 httpbin 服务了:⚠️ ==特别注意:==
 1#httpbin-ingress.yaml
 2apiVersion: networking.k8s.io/v1
 3kind: Ingress
 4metadata:
 5  annotations:
 6    kubernetes.io/ingress.class: istio
 7  name: httpbin
 8spec:
 9  rules:
10    - host: httpbin.k8s.local
11      http:
12        paths:
13          - path: /status
14            pathType: Prefix
15            backend:
16              service:
17                name: httpbin
18                port:
19                  number: 8000
可以看到这个 Ingress 对象和我们在 Kubernetes 中的使用方法没有什么区别,唯一不同的是我们这里使用了一个 kubernetes.io/ingress.class 注解来告知 Istio Ingress Gateway 它应该处理该 Ingress,否则它将被忽略。
我们应用上面的资源清单:
1[root@master1 istio-1.19.3]#kubectl apply -f httpbin-ingress.yaml
2ingress.networking.k8s.io/httpbin created
3Warning: annotation "kubernetes.io/ingress.class" is deprecated, please use 'spec.ingressClassName' instead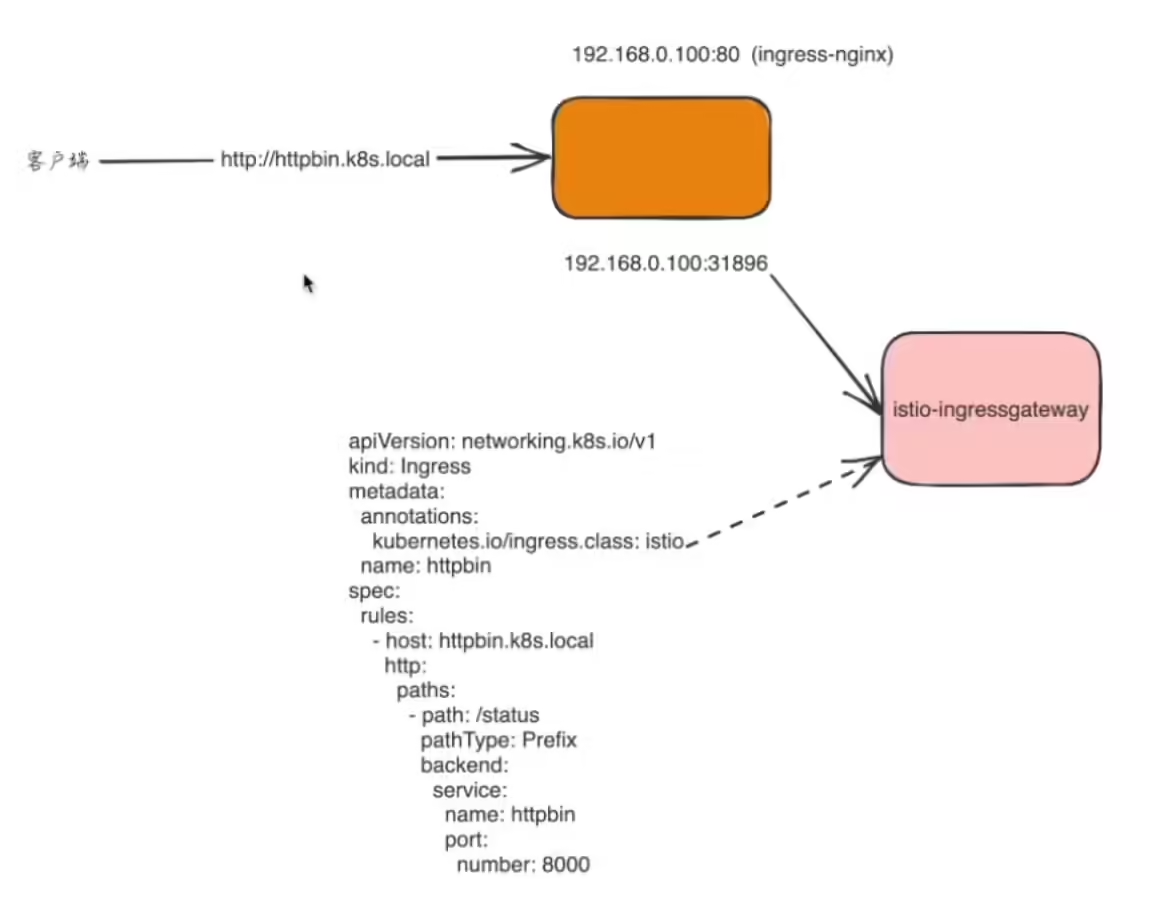
kubectl get ingress 命令来查看下 Ingress 对象的状态:1$ kubectl get ingress
2NAME CLASS HOSTS ADDRESS PORTS AGE
3httpbin <none> httpbin.k8s.local 80 6scurl 来访问 httpbin 服务: 1# 获取 Ingress Gateway 的地址和端口
2export INGRESS_PORT=$(kubectl -n istio-system get service istio-ingressgateway -o jsonpath='{.spec.ports[?(@.name=="http2")].nodePort}')
3export INGRESS_HOST=$(kubectl get pod -l istio=ingressgateway -n istio-system -o jsonpath='{.items[0].status.hostIP}')
4
5echo $INGRESS_PORT
6echo $INGRESS_HOST
7
8# 访问 httpbin 服务
9$ curl -s -I -HHost:httpbin.k8s.local "http://$INGRESS_HOST:$INGRESS_PORT/status/200"
10HTTP/1.1 200 OK
11server: istio-envoy
12date: Mon, 13 Nov 2023 06:10:13 GMT
13content-type: text/html; charset=utf-8
14# .......注意使用 -H 标志将 Host 的 HTTP 头设置为 httpbin.k8s.local, 因为 Ingress 中已经配置为处理访问该域名的请求,但是在测试环境中,该域名并没有相应的 DNS 绑定,当然我们也可以直接在 /etc/hosts 中添加一个映射(当然是istio-ingressgateway-9c8b9b586-vj44lpod所在node节点了)。

1$ curl -s -I -HHost:httpbin.k8s.local "http://$INGRESS_HOST:$INGRESS_PORT/headers"
2HTTP/1.1 404 Not Found
3#......
 1[root@master1 istio-1.19.3]#export INGRESS_PORT=$(kubectl -n istio-system get service istio-ingressgateway -o jsonpath='{.spec.ports[?(@.name=="http2")].nodePort}')
 2[root@master1 istio-1.19.3]#export INGRESS_HOST=$(kubectl get pod -l istio=ingressgateway -n istio-system -o jsonpath='{.items[0].status.hostIP}')
 3[root@master1 istio-1.19.3]#echo $INGRESS_PORT
 431666
 5[root@master1 istio-1.19.3]#echo $INGRESS_HOST
 6172.29.9.63
 7
 8[root@master1 istio-1.19.3]#kubectl get po -owide -l istio=ingressgateway -nistio-system
 9NAME                                   READY   STATUS    RESTARTS   AGE    IP            NODE    NOMINATED NODE   READINESS GATES
10istio-ingressgateway-9c8b9b586-vj44l   1/1     Running   0          3d6h   10.244.2.15   node2   <none>           <none>
11[root@master1 istio-1.19.3]#kubectl get svc -nistio-system
12NAME                   TYPE           CLUSTER-IP       EXTERNAL-IP   PORT(S)                                                                      AGE
13istio-egressgateway    ClusterIP      10.109.85.119    <none>        80/TCP,443/TCP                                                               8d
14istio-ingressgateway   LoadBalancer   10.105.233.167   <pending>     15021:31410/TCP,80:31666/TCP,443:32213/TCP,31400:30291/TCP,15443:31787/TCP   8d
15istiod ClusterIP 10.109.185.251 <none> 15010/TCP,15012/TCP,443/TCP,15014/TCP 8dIngressClass,以替换 Ingress 资源上的 kubernetes.io/ingress.class 注解,我们也可以使用该资源来替换注解的方式,需要将 controller 字段设置为 istio.io/ingress-controller,如下所示: 1#httpbin-ingress2.yaml
2apiVersion: networking.k8s.io/v1
3kind: IngressClass
4metadata:
5 name: istio
6spec:
7 controller: istio.io/ingress-controller # 指定 Ingress Controller 为 istio
8---
9apiVersion: networking.k8s.io/v1
10kind: Ingress
11metadata:
12 name: httpbin
13spec:
14 ingressClassName: istio # 指定 IngressClass 为 istio
15 rules:
16 - host: httpbin.k8s.local
17 http:
18 paths:
19 - path: /
20 pathType: Prefix
21 backend:
22 service:
23 name: httpbin
24 port:
25 number: 8000上面这种方式更加简洁,而且可以避免使用注解的方式,但是需要注意的是,该资源对象只能在 Kubernetes 1.18 及以上版本中使用。
 1#先删除旧的ingress对象
 2[root@master1 istio-1.19.3]#kubectl delete -f httpbin-ingress.yaml
 3ingress.networking.k8s.io "httpbin" deleted
 4
 5[root@master1 istio-1.19.3]#kubectl apply -f httpbin-ingress2.yaml
 6ingressclass.networking.k8s.io/istio created
 7ingress.networking.k8s.io/ingress created
 8
 9#查看
10[root@master1 istio-1.19.3]#kubectl get ingressclass
11NAME    CONTROLLER                    PARAMETERS   AGE
12istio   istio.io/ingress-controller   <none>       27s
13[root@master1 istio-1.19.3]#kubectl get ingress
14NAME      CLASS   HOSTS               ADDRESS   PORTS   AGE
15ingress istio httpbin.k8s.local 80 35s 1[root@master1 istio-1.19.3]#curl -s -I -HHost:httpbin.k8s.local "http://$INGRESS_HOST:$INGRESS_PORT/status/200"
2HTTP/1.1 200 OK
3server: istio-envoy
4date: Wed, 15 Nov 2023 12:51:24 GMT
5content-type: text/html; charset=utf-8
6access-control-allow-origin: *
7access-control-allow-credentials: true
8content-length: 0
9x-envoy-upstream-service-time: 6
10
11[root@master1 istio-1.19.3]#curl -s -I -HHost:httpbin.k8s.local "http://$INGRESS_HOST:$INGRESS_PORT/headers"
12HTTP/1.1 200 OK
13server: istio-envoy
14date: Wed, 15 Nov 2023 12:51:29 GMT
15content-type: application/json
16content-length: 597
17access-control-allow-origin: *
18access-control-allow-credentials: true
19x-envoy-upstream-service-time: 12符合预期,测试结束。😘
1[root@master1 istio-1.19.3]#kubectl delete -f httpbin-ingress2.yaml
2ingressclass.networking.k8s.io "istio" deleted
3ingress.networking.k8s.io "ingress" deleted
此外 Ingress 还可以进行 TLS 设置,Istio 支持此功能,但是引用的 Secret 必须存在于 istio-ingressgateway 部署的命名空间(通常是 istio-system)中。
通过 Kubernetes Ingress 我们可以将流量导入到 Istio 中,但是对于一些高级的流量管理功能,比如路由、熔断、限流等就很难实现了,所以我们还是建议使用 Istio 的 Gateway 资源来暴露流量入口。

前面我们都是通过 Istio 提供的 Gateway 资源来暴露流量入口,与 Ingress 相比,Gateway 提供了更广泛的自定义和灵活性,并允许将 Istio 功能(例如监控和路由规则)应用于进入集群的流量。
==🚩 实战:Ingress Gateway-2023.11.15(测试成功)==
实验环境:
1k8s v1.27.6(containerd://1.6.20)(cni:flannel:v0.22.2)
2
3[root@master1 ~]#istioctl version
4client version: 1.19.3
5control plane version: 1.19.3
6data plane version: 1.19.3 (8 proxies)
实验软件:
链接:https://pan.baidu.com/s/1C-ZlPHuXzzXGPAlNEYdySA?pwd=lpyx
提取码:lpyx
2023.11.15-实战:Ingress Gateway-2023.11.15(测试成功)

应用程序在以下链接里:
链接:https://pan.baidu.com/s/1pMnJxgL63oTlGFlhrfnXsA?pwd=7yqb
提取码:7yqb
2023.11.5-实战:BookInfo 示例应用-2023.11.5(测试成功)
实验步骤:
Ingress Gateway 描述在网格边界运作的负载均衡器,用于接收传入的 HTTP/TCP 连接。它会配置暴露的端口、协议等,但与 Kubernetes Ingress 资源不同,Gateway 对象不会包括任何流量路由配置,和路由规则相关的配置需要使用 VirtualService 和 DestinationRule 资源来实现。
httpbin 应用,如果通过 Gateway 对象来暴露流量入口,那么我们需要创建一个 Gateway 对象,然后再创建一个 VirtualService 对象来配置流量路由,内容如下所示: 1#ingress-gateway.yaml
2apiVersion: networking.istio.io/v1alpha3
3kind: Gateway
4metadata:
5 name: httpbin-gateway
6spec:
7 selector:
8 istio: ingressgateway
9 servers:
10 - port:
11 number: 80
12 name: http
13 protocol: HTTP
14 hosts:
15 - "httpbin.k8s.local"
16---
17apiVersion: networking.istio.io/v1alpha3
18kind: VirtualService
19metadata:
20 name: httpbin
21spec:
22 hosts:
23 - "httpbin.k8s.local"
24 gateways:
25 - httpbin-gateway
26 http:
27 - match:
28 - uri:
29 prefix: /status
30 - uri:
31 prefix: /delay
32 route:
33 - destination:
34 port:
35 number: 8000
36 host: httpbin上面的资源清单我们就通过 Gateway 对象暴露了 HTTP 流量的入口,然后通过 VirtualService 对象来配置流量路由,一共配置了两个路由规则,允许流量流向路径 /status 和 /delay。gateways 列表指定了哪些请求允许通 httpbin-gateway 网关,所有其他外部请求均被拒绝并返回 404 响应。
1kubectl apply -f ingress-gateway.yamlcurl 来访问 httpbin 服务: 1# 获取 Ingress Gateway 的地址和端口
2export INGRESS_PORT=$(kubectl -n istio-system get service istio-ingressgateway -o jsonpath='{.spec.ports[?(@.name=="http2")].nodePort}')
3export INGRESS_HOST=$(kubectl get pod -l istio=ingressgateway -n istio-system -o jsonpath='{.items[0].status.hostIP}')
4
5# 访问 httpbin 服务
6$ curl -s -I -HHost:httpbin.k8s.local "http://$INGRESS_HOST:$INGRESS_PORT/status/200"
7HTTP/1.1 200 OK
8server: istio-envoy
9date: Mon, 13 Nov 2023 06:32:58 GMT
10content-type: text/html; charset=utf-8
11# .......
12
13$ curl -s -I -HHost:httpbin.k8s.local "http://$INGRESS_HOST:$INGRESS_PORT/delay/2" #延迟2s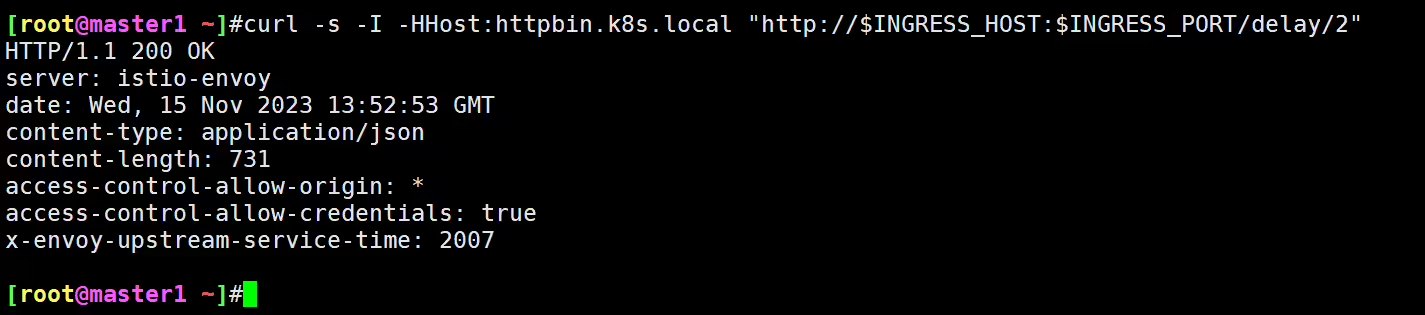
/status、/delay 以外的路径,将会返回 404 错误:1$ curl -s -I -HHost:httpbin.k8s.local "http://$INGRESS_HOST:$INGRESS_PORT/headers"
2HTTP/1.1 404 Not Found
3...测试结束。😘
1kubectl delete -f ingress-gateway.yaml当然除了这最基本的功能之外,Gateway 还支持很多其他高级功能,比如 TLS、SNI 等。
我们已经了解了如何使用 Gateway 对象来对外暴露 HTTP 服务,那么我们如何使用 TLS 或 mTLS 来暴露安全的 HTTPS 服务呢?
==🚩 实战:istio安全网关-2023.11.16(测试成功)==
实验环境:
1k8s v1.27.6(containerd://1.6.20)(cni:flannel:v0.22.2)
2
3[root@master1 ~]#istioctl version
4client version: 1.19.3
5control plane version: 1.19.3
6data plane version: 1.19.3 (8 proxies)
实验软件:
链接:https://pan.baidu.com/s/1jw67Xvj-2ZYl3uuq59kO1g?pwd=p2mr
提取码:p2mr
–来自百度网盘超级会员V8的分享
2023.11.16-实战:istio安全网关-2023.11.16(测试成功)

应用程序在以下链接里:
链接:https://pan.baidu.com/s/1pMnJxgL63oTlGFlhrfnXsA?pwd=7yqb
提取码:7yqb
2023.11.5-实战:BookInfo 示例应用-2023.11.5(测试成功)
前期准备:
httpbin 应用来演示:1kubectl apply -f samples/httpbin/httpbin.yaml接下来我们需要使用 openssl 命令==来生成客户端和服务器证书和密钥。==
⚠️ 注意:
以下证书、私钥创建的有点多哦,注意下。
(0)
1mkdir example_certs1
2openssl req -x509 -sha256 -nodes -days 365 -newkey rsa:2048 -subj '/O=example Inc./CN=example.com' -keyout example_certs1/example.com.key -out example_certs1/example.com.crt
1[root@master1 ~]#ll example_certs1/
2total 8
3-rw-r--r-- 1 root root 1164 Nov 16 05:59 example.com.crt
4-rw-r--r-- 1 root root 1708 Nov 16 05:59 example.com.key
(1)
httpbin.example.com 创建证书和私钥:1openssl req -out example_certs1/httpbin.example.com.csr -newkey rsa:2048 -nodes -keyout example_certs1/httpbin.example.com.key -subj "/CN=httpbin.example.com/O=httpbin organization"
2
3openssl x509 -req -sha256 -days 365 -CA example_certs1/example.com.crt -CAkey example_certs1/example.com.key -set_serial 0 -in example_certs1/httpbin.example.com.csr -out example_certs1/httpbin.example.com.crt

1mkdir example_certs2
2openssl req -x509 -sha256 -nodes -days 365 -newkey rsa:2048 -subj '/O=example Inc./CN=example.com' -keyout example_certs2/example.com.key -out example_certs2/example.com.crt
3
4openssl req -out example_certs2/httpbin.example.com.csr -newkey rsa:2048 -nodes -keyout example_certs2/httpbin.example.com.key -subj "/CN=httpbin.example.com/O=httpbin organization"
5openssl x509 -req -sha256 -days 365 -CA example_certs2/example.com.crt -CAkey example_certs2/example.com.key -set_serial 0 -in example_certs2/httpbin.example.com.csr -out example_certs2/httpbin.example.com.crt
查看:
1[root@master1 ~]#ll example_certs2/
2total 20
3-rw-r--r-- 1 root root 1164 Nov 16 06:08 example.com.crt
4-rw-r--r-- 1 root root 1704 Nov 16 06:08 example.com.key
5-rw-r--r-- 1 root root 1054 Nov 16 06:08 httpbin.example.com.crt
6-rw-r--r-- 1 root root  948 Nov 16 06:08 httpbin.example.com.csr
7-rw-r--r-- 1 root root 1704 Nov 16 06:08 httpbin.example.com.key
(2)
helloworld.example.com 生成证书和私钥:1openssl req -out example_certs1/helloworld.example.com.csr -newkey rsa:2048 -nodes -keyout example_certs1/helloworld.example.com.key -subj "/CN=helloworld.example.com/O=helloworld organization"
2
3openssl x509 -req -sha256 -days 365 -CA example_certs1/example.com.crt -CAkey example_certs1/example.com.key -set_serial 1 -in example_certs1/helloworld.example.com.csr -out example_certs1/helloworld.example.com.crt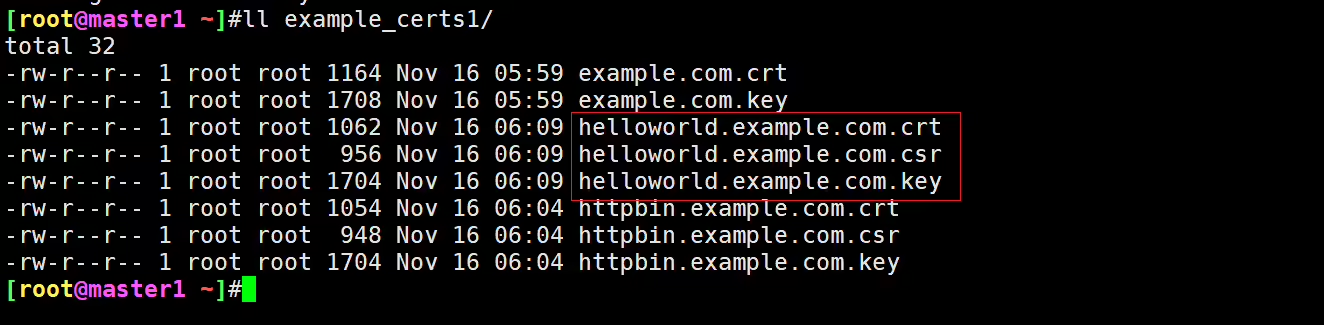
(3)
1openssl req -out example_certs1/client.example.com.csr -newkey rsa:2048 -nodes -keyout example_certs1/client.example.com.key -subj "/CN=client.example.com/O=client organization"
2
3openssl x509 -req -sha256 -days 365 -CA example_certs1/example.com.crt -CAkey example_certs1/example.com.key -set_serial 1 -in example_certs1/client.example.com.csr -out example_certs1/client.example.com.crt 1$ ls example_cert*
2example_certs1:
3client.example.com.crt example.com.key httpbin.example.com.crt
4client.example.com.csr helloworld.example.com.crt httpbin.example.com.csr
5client.example.com.key helloworld.example.com.csr httpbin.example.com.key
6example.com.crt helloworld.example.com.key
7
8example_certs2:
9example.com.crt httpbin.example.com.crt httpbin.example.com.key
10example.com.key httpbin.example.com.csr接下来我们就可以在 Gateway 对象中配置 TLS 了。
Secret 对象,用来存储证书和密钥:1$ kubectl create -n istio-system secret tls httpbin-credential \
2 --key=example_certs1/httpbin.example.com.key \
3 --cert=example_certs1/httpbin.example.com.crt查看:
1[root@master1 ~]#kubectl get secret -nistio-system
2NAME                 TYPE                DATA   AGE
3httpbin-credential   kubernetes.io/tls   2      11s
4……Gateway 对象中需要定义一个 443 端口的网关,并将 credentialName 的值设置为 httpbin-credential,该值与 Secret 的名称相同,TLS 模式的值应为 SIMPLE,内容如下所示: 1#tls-gateway.yaml
2apiVersion: networking.istio.io/v1alpha3
3kind: Gateway
4metadata:
5 name: mygateway
6spec:
7 selector:
8 istio: ingressgateway # use istio default ingress gateway
9 servers:
10 - port:
11 number: 443
12 name: https
13 protocol: HTTPS
14 tls:
15 mode: SIMPLE
16 credentialName: httpbin-credential # 必须和 secret 对象名称一致
17 hosts:
18 - httpbin.example.comVirtualService 对象来配置网关的入口流量路由: 1#tls-gateway.yaml
2apiVersion: networking.istio.io/v1alpha3
3kind: VirtualService
4metadata:
5 name: httpbin
6spec:
7 hosts:
8 - "httpbin.example.com"
9 gateways:
10 - mygateway
11 http:
12 - match:
13 - uri:
14 prefix: /status
15 - uri:
16 prefix: /delay
17 route:
18 - destination:
19 port:
20 number: 8000
21 host: httpbin完整清单:
 1#tls-gateway.yaml
 2apiVersion: networking.istio.io/v1alpha3
 3kind: Gateway
 4metadata:
 5  name: mygateway
 6spec:
 7  selector:
 8    istio: ingressgateway # use istio default ingress gateway
 9  servers:
10    - port:
11        number: 443
12        name: https
13        protocol: HTTPS
14      tls:
15        mode: SIMPLE
16        credentialName: httpbin-credential # 必须和 secret 对象名称一致
17      hosts:
18        - httpbin.example.com
19
20---
21apiVersion: networking.istio.io/v1alpha3
22kind: VirtualService
23metadata:
24 name: httpbin
25spec:
26 hosts:
27 - "httpbin.example.com"
28 gateways:
29 - mygateway
30 http:
31 - match:
32 - uri:
33 prefix: /status
34 - uri:
35 prefix: /delay
36 route:
37 - destination:
38 port:
39 number: 8000
40 host: httpbin部署:
1[root@master1 istio-1.19.3]#kubectl apply -f tls-gateway.yaml
2gateway.networking.istio.io/mygateway created
3virtualservice.networking.istio.io/httpbin created
查看:
1[root@master1 istio-1.19.3]#kubectl get gateway
2NAME               AGE
3……
4mygateway          26s
5[root@master1 istio-1.19.3]#kubectl get vs
6NAME          GATEWAYS               HOSTS                     AGE
7……
8httpbin       ["mygateway"]          ["httpbin.example.com"]   26s
9……httpbin 服务发送 HTTPS 请求了:这里要用到的是istio-ingressgateway的443端口:
1[root@master1 istio-1.19.3]#kubectl get svc -nistio-system
2NAME                   TYPE           CLUSTER-IP       EXTERNAL-IP   PORT(S)                                                                      AGE
3istio-egressgateway    ClusterIP      10.109.85.119    <none>        80/TCP,443/TCP                                                               8d
4istio-ingressgateway   LoadBalancer   10.105.233.167   <pending>     15021:31410/TCP,80:31666/TCP,443:32213/TCP,31400:30291/TCP,15443:31787/TCP   8d
5istiod ClusterIP 10.109.185.251 <none> 15010/TCP,15012/TCP,443/TCP,15014/TCP 8d 1# 获取 Ingress Gateway 的地址和 HTTPS 端口
2export INGRESS_HOST=$(kubectl get pod -l istio=ingressgateway -n istio-system -o jsonpath='{.items[0].status.hostIP}')
3export SECURE_INGRESS_PORT=$(kubectl -n istio-system get service istio-ingressgateway -o jsonpath='{.spec.ports[?(@.name=="https")].nodePort}')
4echo $INGRESS_HOST
5echo $SECURE_INGRESS_PORT
6#[root@master1 istio-1.19.3]#echo $INGRESS_HOST
7#172.29.9.63
8#[root@master1 istio-1.19.3]#echo $SECURE_INGRESS_PORT
9#32213
10
11# 访问 httpbin 服务
12$ curl -v -HHost:httpbin.example.com --resolve "httpbin.example.com:$SECURE_INGRESS_PORT:$INGRESS_HOST" \
13 --cacert example_certs1/example.com.crt "https://httpbin.example.com:$SECURE_INGRESS_PORT/status/418"
14# ......
15* Initializing NSS with certpath: sql:/etc/pki/nssdb
16* CAfile: example_certs1/example.com.crt
17 CApath: none
18* SSL connection using TLS_ECDHE_RSA_WITH_AES_128_GCM_SHA256
19* Server certificate:
20* subject: O=httpbin organization,CN=httpbin.example.com
21* start date: Nov 13 06:58:40 2023 GMT
22* expire date: Nov 12 06:58:40 2024 GMT
23* common name: httpbin.example.com
24* issuer: CN=example.com,O=example Inc.
25> GET /status/418 HTTP/1.1
26> User-Agent: curl/7.29.0
27> Accept: */*
28> Host:httpbin.example.com
29>
30< HTTP/1.1 418 Unknown
31< server: istio-envoy
32# ......
33
34 -=[ teapot ]=-
35
36 _...._
37 .' _ _ `.
38 | ."` ^ `". _,
39 \_;`"---"`|//
40 | ;/
41 \_ _/
42 `"""`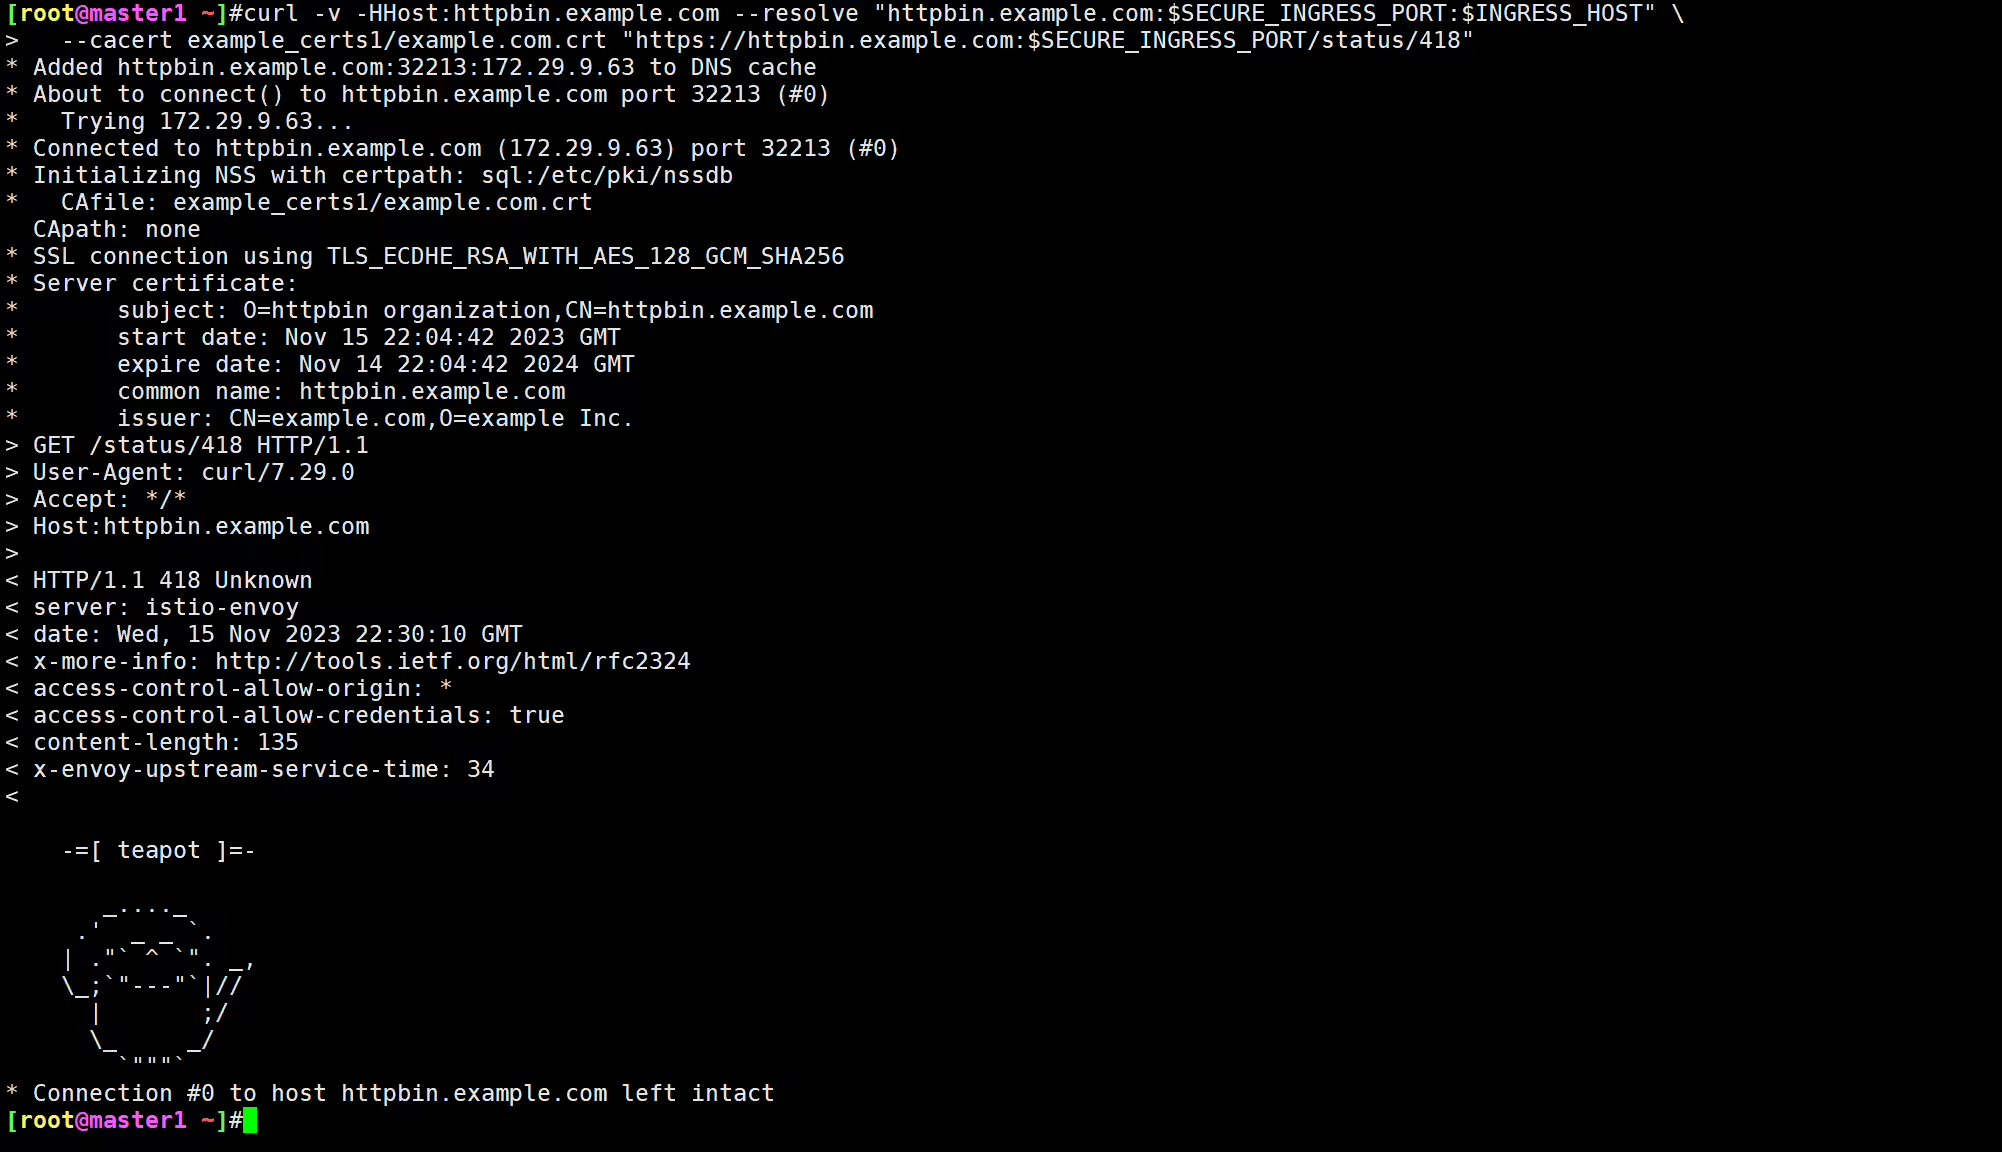
1kubectl -n istio-system delete secret httpbin-credential
2
3# 创建新的证书和密钥
4kubectl create -n istio-system secret tls httpbin-credential \
5  --key=example_certs2/httpbin.example.com.key \
6 --cert=example_certs2/httpbin.example.com.crtcurl 来访问 httpbin 服务: 1$ curl -v -HHost:httpbin.example.com --resolve "httpbin.example.com:$SECURE_INGRESS_PORT:$INGRESS_HOST" \
2 --cacert example_certs2/example.com.crt "https://httpbin.example.com:$SECURE_INGRESS_PORT/status/418"
3...
4HTTP/1.1 418 Unknown
5...
6
7 -=[ teapot ]=-
8
9 _...._
10 .' _ _ `.
11 | ."` ^ `". _,
12 \_;`"---"`|//
13 | ;/
14 \_ _/
15 `"""`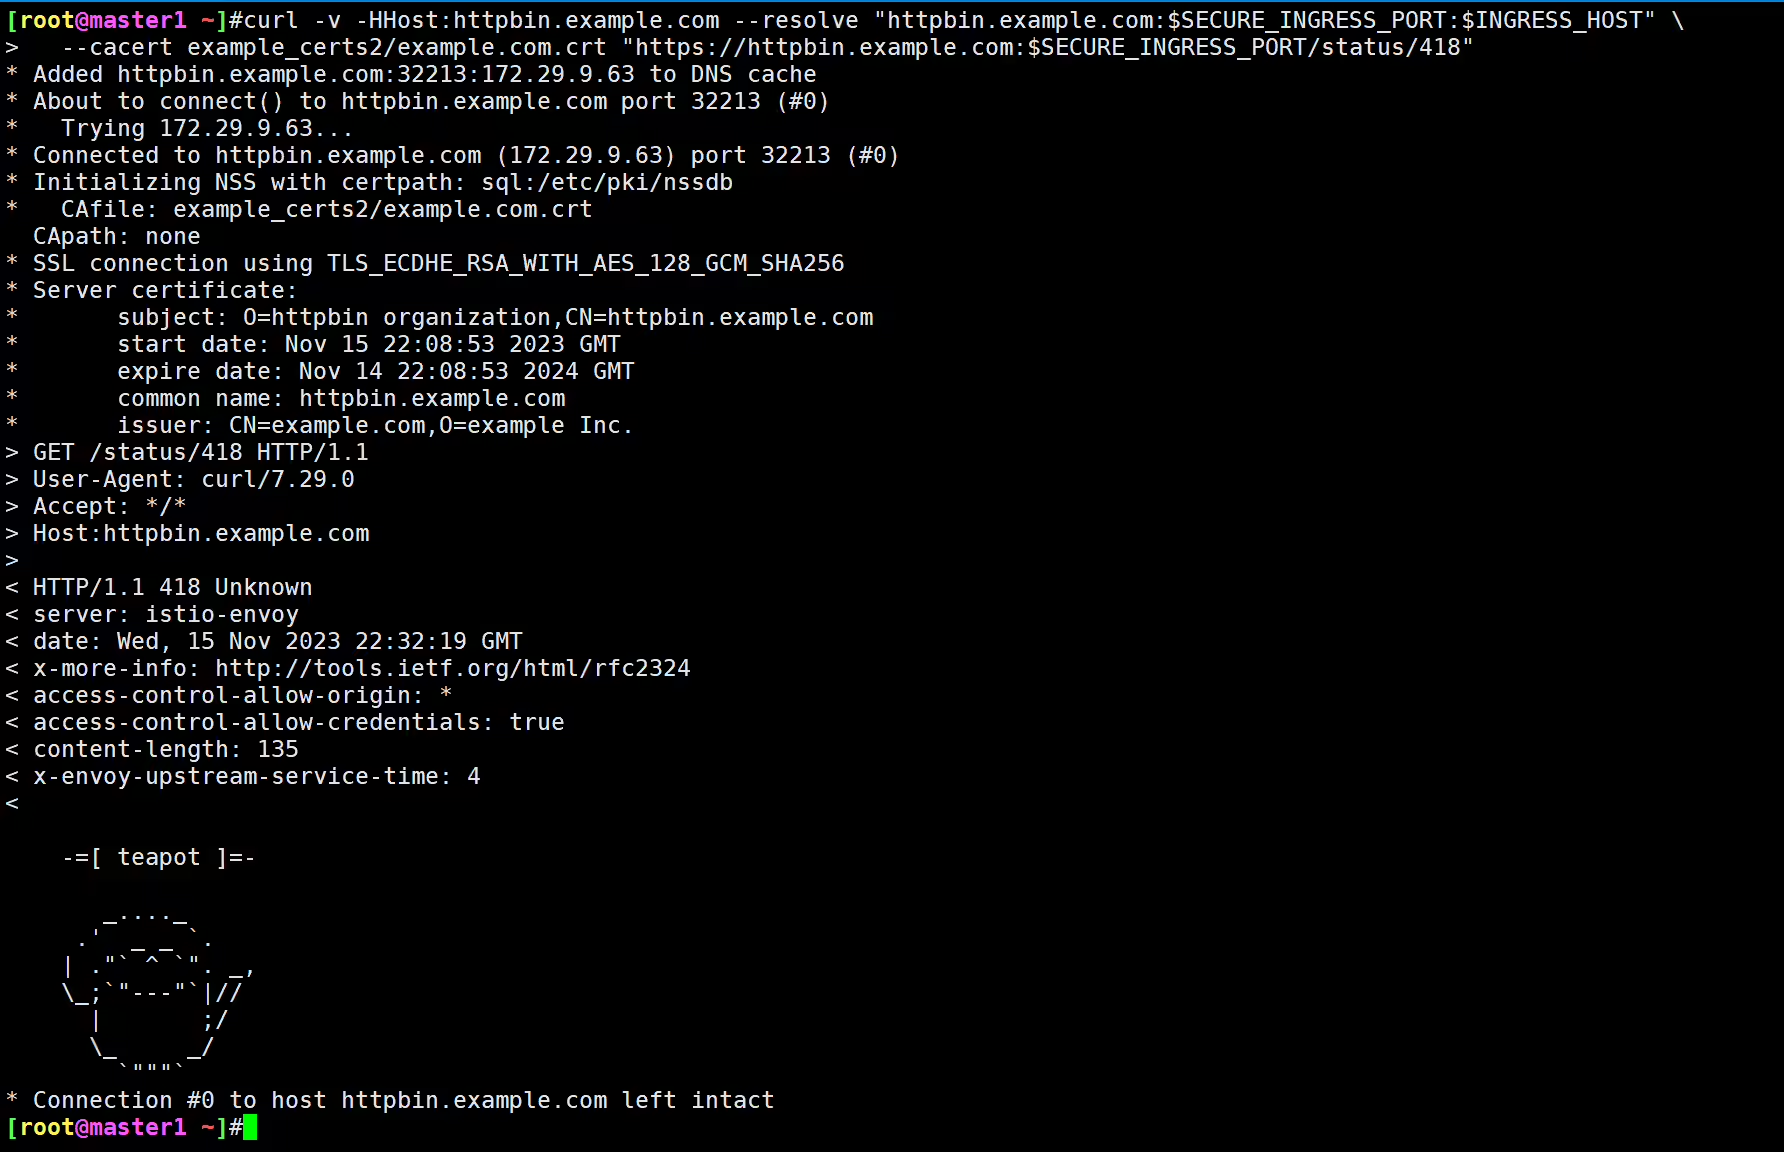
 1$ curl -v -HHost:httpbin.example.com --resolve "httpbin.example.com:$SECURE_INGRESS_PORT:$INGRESS_HOST" \
 2 --cacert example_certs1/example.com.crt "https://httpbin.example.com:$SECURE_INGRESS_PORT/status/418"
 3# ......
 4* Initializing NSS with certpath: sql:/etc/pki/nssdb
 5*   CAfile: example_certs1/example.com.crt
 6  CApath: none
 7* Server certificate:
 8*       subject: O=httpbin organization,CN=httpbin.example.com
 9*       start date: Nov 13 06:59:17 2023 GMT
10*       expire date: Nov 12 06:59:17 2024 GMT
11*       common name: httpbin.example.com
12*       issuer: CN=example.com,O=example Inc.
13* NSS error -8182 (SEC_ERROR_BAD_SIGNATURE)
14* Peer's certificate has an invalid signature.
15* Closing connection 0
16curl: (60) Peer's certificate has an invalid signature.
17# ......
测试结束。😘
上面是为单个主机配置 TLS 入口网关的方法。
此外我们还可以为多个主机(例如 httpbin.example.com 和 helloworld-v1.example.com)配置入口网关,入口网关配置有与每个主机相对应的唯一凭据。
httpbin 凭据:1kubectl -n istio-system delete secret httpbin-credential
2
3kubectl create -n istio-system secret tls httpbin-credential \
4 --key=example_certs1/httpbin.example.com.key \
5 --cert=example_certs1/httpbin.example.com.crthelloworld-v1 示例:还可以这样搞哦:
1# 创建 service=helloworld 的服务
2$ kubectl apply -f samples/helloworld/helloworld.yaml -l service=helloworld
3
4# 创建 version=v1 的应用
5$ kubectl apply -f samples/helloworld/helloworld.yaml -l version=v1helloworld-credential Secret:1$ kubectl create -n istio-system secret tls helloworld-credential --key=example_certs1/helloworld.example.com.key --cert=example_certs1/helloworld.example.com.crthttpbin.example.com 和 helloworld.example.com 主机配置入口网关,创建如下所示的 Gateway 对象: 1#tls2-gateway.yaml
2apiVersion: networking.istio.io/v1alpha3
3kind: Gateway
4metadata:
5 name: mygateway
6spec:
7 selector:
8 istio: ingressgateway # use istio default ingress gateway
9 servers:
10 - port:
11 number: 443
12 name: https-httpbin
13 protocol: HTTPS
14 tls:
15 mode: SIMPLE
16 credentialName: httpbin-credential
17 hosts:
18 - httpbin.example.com
19 - port:
20 number: 443
21 name: https-helloworld
22 protocol: HTTPS
23 tls:
24 mode: SIMPLE
25 credentialName: helloworld-credential
26 hosts:
27 - helloworld.example.com这里我们为 443 端口定义一个具有两个 server 配置的网关,将每个端口上的 credentialName 值分别设置为 httpbin-credential 和 helloworld-credential,将 TLS 模式设置为 SIMPLE。
VirtualService 来配置网关的流量路由。 1#tls2-gateway.yaml
2apiVersion: networking.istio.io/v1alpha3
3kind: VirtualService
4metadata:
5 name: helloworld
6spec:
7 hosts:
8 - helloworld.example.com
9 gateways:
10 - mygateway
11 http:
12 - match:
13 - uri:
14 exact: /hello
15 route:
16 - destination:
17 host: helloworld
18 port:
19 number: 5000完整清单如下:
 1#tls2-gateway.yaml
 2apiVersion: networking.istio.io/v1alpha3
 3kind: Gateway
 4metadata:
 5  name: mygateway
 6spec:
 7  selector:
 8    istio: ingressgateway # use istio default ingress gateway
 9  servers:
10    - port:
11        number: 443
12        name: https-httpbin
13        protocol: HTTPS
14      tls:
15        mode: SIMPLE
16        credentialName: httpbin-credential
17      hosts:
18        - httpbin.example.com
19    - port:
20        number: 443
21        name: https-helloworld
22        protocol: HTTPS
23      tls:
24        mode: SIMPLE
25        credentialName: helloworld-credential
26      hosts:
27        - helloworld.example.com
28
29---
30apiVersion: networking.istio.io/v1alpha3
31kind: VirtualService
32metadata:
33 name: helloworld
34spec:
35 hosts:
36 - helloworld.example.com
37 gateways:
38 - mygateway
39 http:
40 - match:
41 - uri:
42 exact: /hello
43 route:
44 - destination:
45 host: helloworld
46 port:
47 number: 5000部署:
1kubectl apply -f tls2-gateway.yaml查看:
1[root@master1 ~]#kubectl get gateway
2NAME               AGE
3mygateway          20m
4[root@master1 ~]#kubectl get vs
5NAME          GATEWAYS               HOSTS                        AGE
6helloworld    ["mygateway"]          ["helloworld.example.com"]   19s
7httpbin ["mygateway"] ["httpbin.example.com"] 20mhelloworld.example.com 发送 HTTPS 请求: 1$ curl -v -HHost:helloworld.example.com --resolve "helloworld.example.com:$SECURE_INGRESS_PORT:$INGRESS_HOST" \
2 --cacert example_certs1/example.com.crt "https://helloworld.example.com:$SECURE_INGRESS_PORT/hello"
3# ......
4* Initializing NSS with certpath: sql:/etc/pki/nssdb
5* CAfile: example_certs1/example.com.crt
6 CApath: none
7* SSL connection using TLS_ECDHE_RSA_WITH_AES_128_GCM_SHA256
8* Server certificate:
9* subject: O=helloworld organization,CN=helloworld.example.com
10* start date: Nov 13 07:01:57 2023 GMT
11* expire date: Nov 12 07:01:57 2024 GMT
12* common name: helloworld.example.com
13* issuer: CN=example.com,O=example Inc.
14# ......
15< HTTP/1.1 200 OK
16# ......
17Hello version: v1, instance: helloworld-v1-b6c45f55-85l49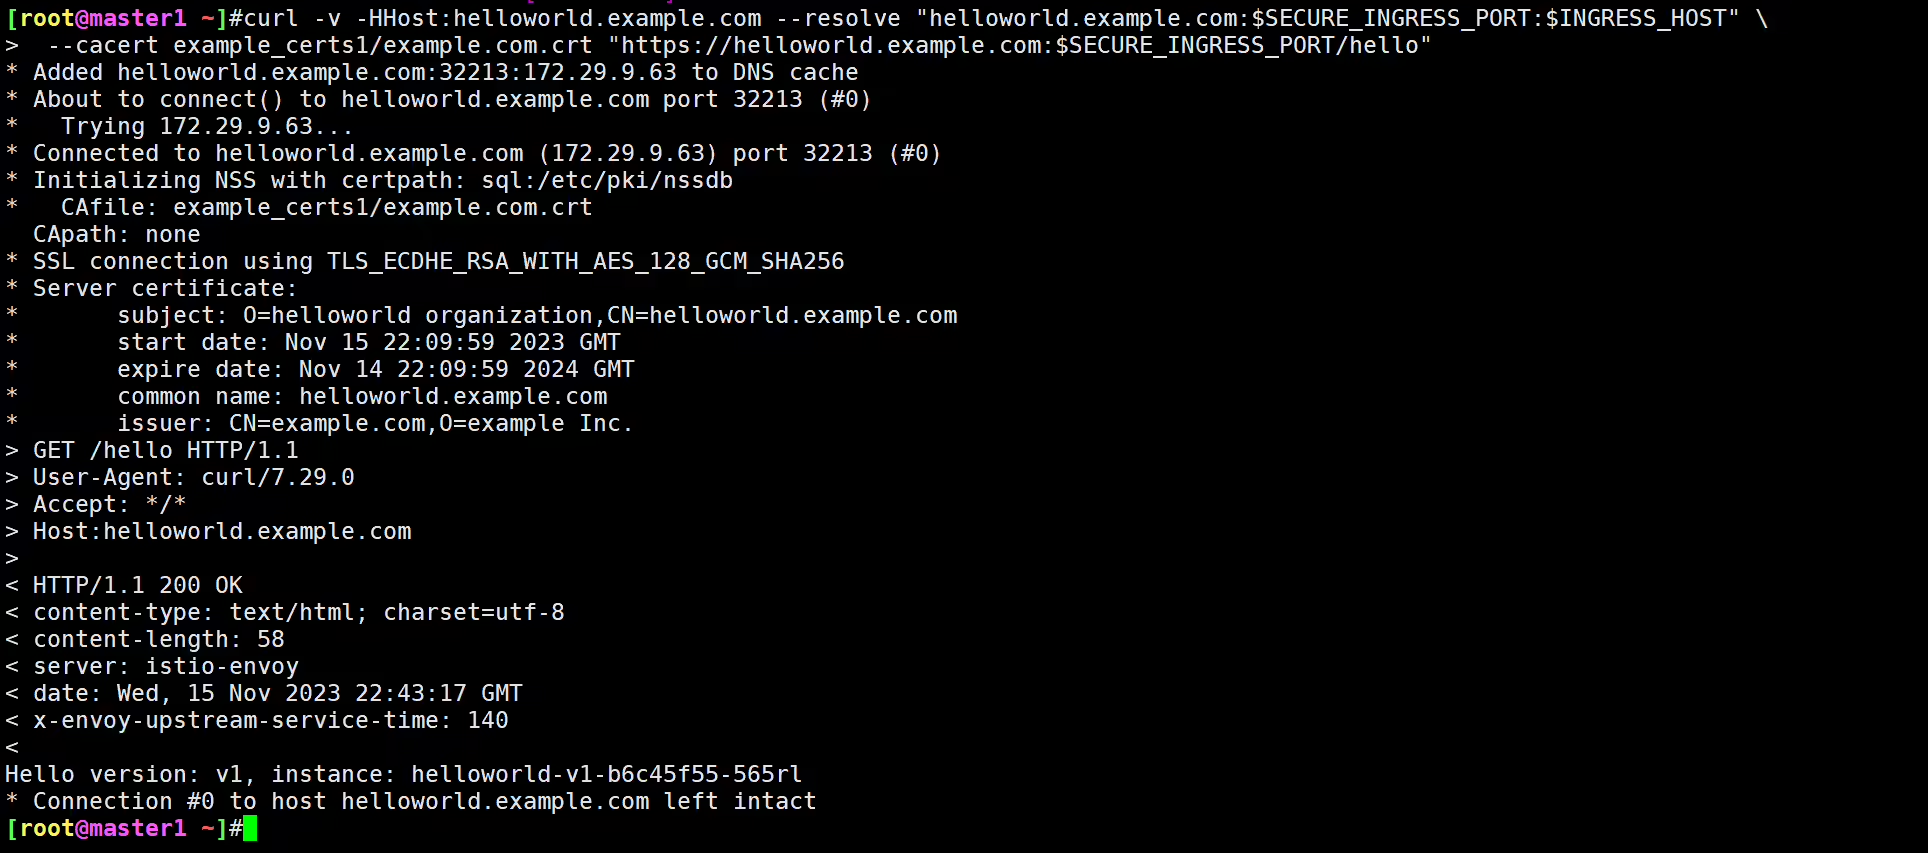
httpbin.example.com 发送一个 HTTPS 请求,仍然返回一个茶壶: 1$ curl -v -HHost:httpbin.example.com --resolve "httpbin.example.com:$SECURE_INGRESS_PORT:$INGRESS_HOST" \
2 --cacert example_certs1/example.com.crt "https://httpbin.example.com:$SECURE_INGRESS_PORT/status/418"
3# ......
4
5 -=[ teapot ]=-
6
7 _...._
8 .' _ _ `.
9 | ."` ^ `". _,
10 \_;`"---"`|//
11 | ;/
12 \_ _/
13 `"""`测试结束。😘
同样我们还可以扩展网关的定义以支持==双向 TLS==。双向 TLS 简称 mTLS,是一种相互身份验证的方法。mTLS 通过验证他们都拥有正确的私人密钥来确保网络连接两端的各方都是他们声称的身份。他们各自的 TLS 证书中的信息提供了额外的验证。
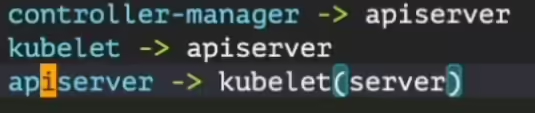
k8s里很多地方都是一个双向认证。
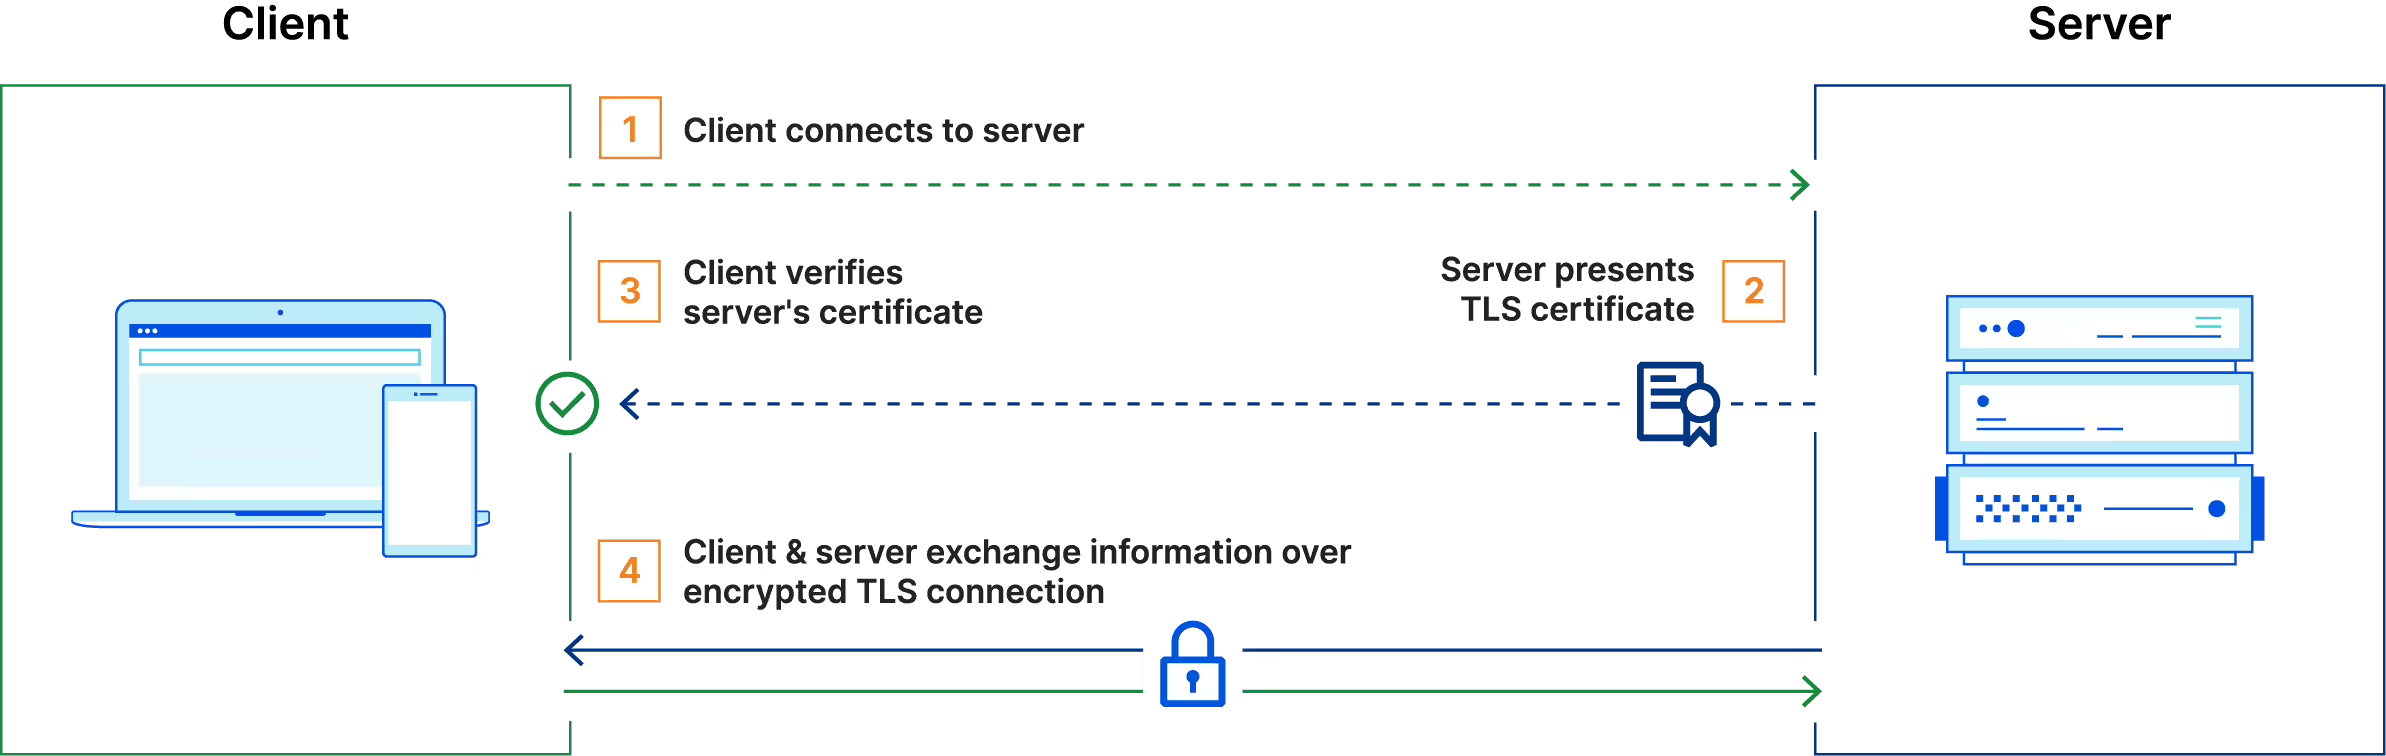
通常在 TLS 中,服务器有一个 TLS 证书和一个公钥/私钥对,而客户端没有,典型的 TLS 流程是这样运作的:
然而,在 mTLS 中,客户端和服务器都有一个证书,并且双方都使用它们的公钥/私钥对进行身份验证。与常规 TLS 相比,mTLS 中有一些额外步骤来验证双方。
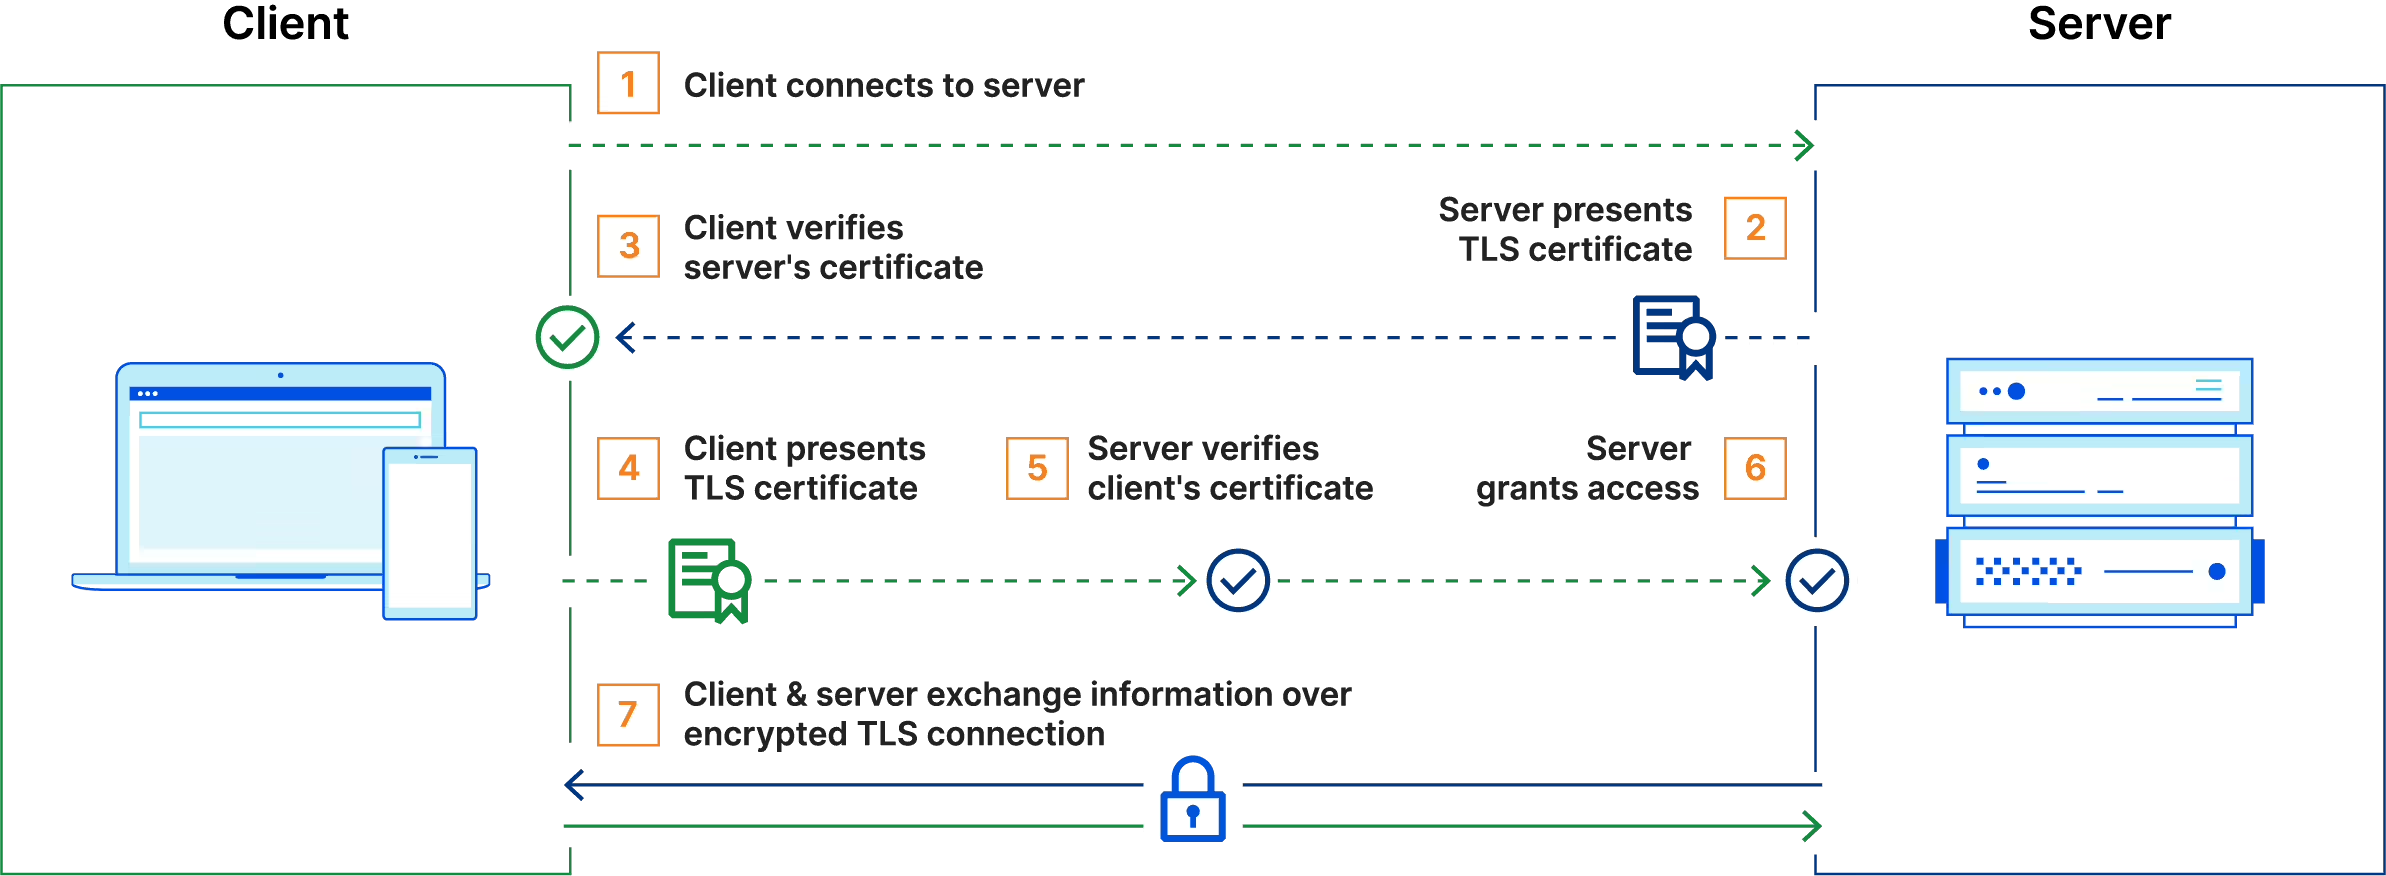
接下来我们就来使用 mTLS 来配置 Ingress Gateway。
cacert 来持有 CA 证书。==1$ kubectl -n istio-system delete secret httpbin-credential
2
3$ kubectl create -n istio-system secret generic httpbin-credential \
4 --from-file=tls.key=example_certs1/httpbin.example.com.key \
5 --from-file=tls.crt=example_certs1/httpbin.example.com.crt \
6 --from-file=ca.crt=example_certs1/example.com.crtGateway 的定义将 TLS 模式设置为 MUTUAL。 1#tls3-gateway.yaml
2apiVersion: networking.istio.io/v1alpha3
3kind: Gateway
4metadata:
5 name: mygateway
6spec:
7 selector:
8 istio: ingressgateway # use istio default ingress gateway
9 servers:
10 - port:
11 number: 443
12 name: https
13 protocol: HTTPS
14 tls:
15 mode: MUTUAL # 设置为 MUTUAL,双向 TLS
16 credentialName: httpbin-credential
17 hosts:
18 - httpbin.example.com部署:
1kubectl apply -f tls3-gateway.yaml 1$ curl -v -HHost:httpbin.example.com --resolve "httpbin.example.com:$SECURE_INGRESS_PORT:$INGRESS_HOST" \
2--cacert example_certs1/example.com.crt "https://httpbin.example.com:$SECURE_INGRESS_PORT/status/418"
3# ......
4* CAfile: example_certs1/example.com.crt
5 CApath: none
6* NSS: client certificate not found (nickname not specified)
7* NSS error -12227 (SSL_ERROR_HANDSHAKE_FAILURE_ALERT)
8* SSL peer was unable to negotiate an acceptable set of security parameters.
9* Closing connection 0
10curl: (35) NSS: client certificate not found (nickname not specified)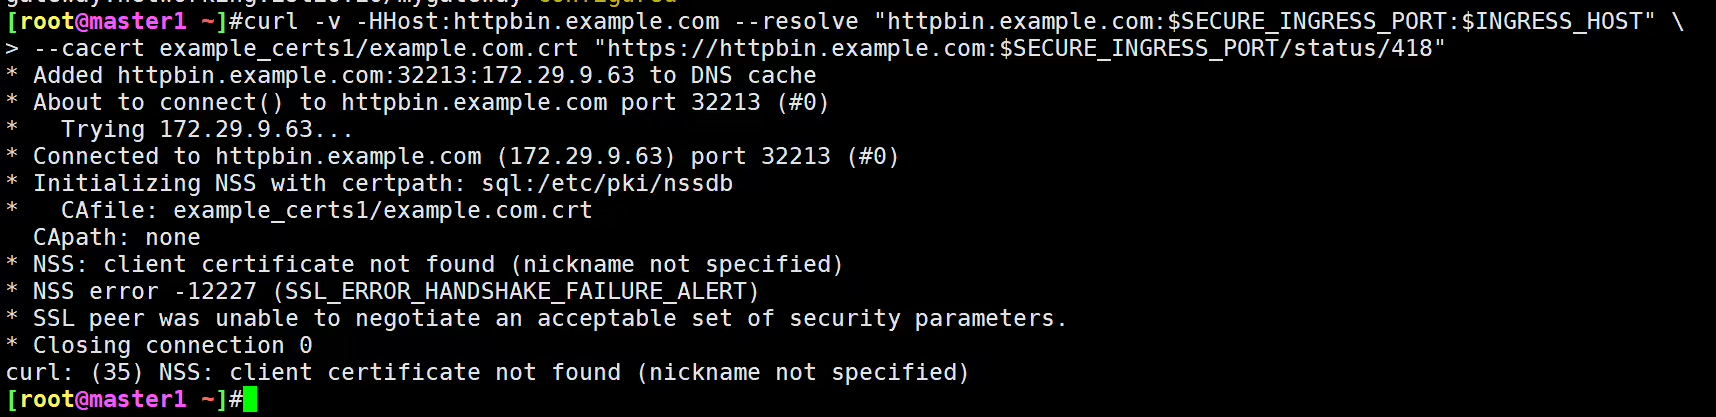
--cert 和 --key 标志来进行传递: 1$ curl -v -HHost:httpbin.example.com --resolve "httpbin.example.com:$SECURE_INGRESS_PORT:$INGRESS_HOST" \
2 --cacert example_certs1/example.com.crt --cert example_certs1/client.example.com.crt --key example_certs1/client.example.com.key \
3 "https://httpbin.example.com:$SECURE_INGRESS_PORT/status/418"
4# ......
5* Initializing NSS with certpath: sql:/etc/pki/nssdb
6* CAfile: example_certs1/example.com.crt
7 CApath: none
8* NSS: client certificate from file
9* subject: O=client organization,CN=client.example.com
10* start date: Nov 13 07:02:22 2023 GMT
11* expire date: Nov 12 07:02:22 2024 GMT
12* common name: client.example.com
13* issuer: CN=example.com,O=example Inc.
14* SSL connection using TLS_ECDHE_RSA_WITH_AES_128_GCM_SHA256
15* Server certificate:
16* subject: O=httpbin organization,CN=httpbin.example.com
17* start date: Nov 13 06:58:40 2023 GMT
18* expire date: Nov 12 06:58:40 2024 GMT
19* common name: httpbin.example.com
20* issuer: CN=example.com,O=example Inc.
21< HTTP/1.1 418 Unknown
22# ......
23<
24
25 -=[ teapot ]=-
26
27 _...._
28 .' _ _ `.
29 | ."` ^ `". _,
30 \_;`"---"`|//
31 | ;/
32 \_ _/
33 `"""`到这里我们就验证了通过 TLS 或 mTLS 将服务暴露到服务网格外。
 1# 删除网关配置和路由:
 2kubectl delete gateway mygateway
 3kubectl delete virtualservice httpbin helloworld
 4
 5# 删除 Secret、证书和密钥:
 6kubectl delete -n istio-system secret httpbin-credential helloworld-credential
 7rm -rf ./example_certs1 ./example_certs2
 8
 9# 关闭 httpbin 和 helloworld 服务:
10kubectl delete -f samples/httpbin/httpbin.yaml
11kubectl delete deployment helloworld-v1
12kubectl delete service helloworld前面我们了解了如何为 HTTP 服务配置 HTTPS 访问入口,那如果我们的后台服务本身就是 HTTPS 的,那么如何为 HTTPS 服务配置 HTTPS 访问入口,即配置 Ingress Gateway 执行 SNI 透传,而不是对传入请求进行 TLS 终止。
既然提到了 TLS 终止,那么我们可以先了解下什么是 ==TLS 终止==(TLS Termination)。
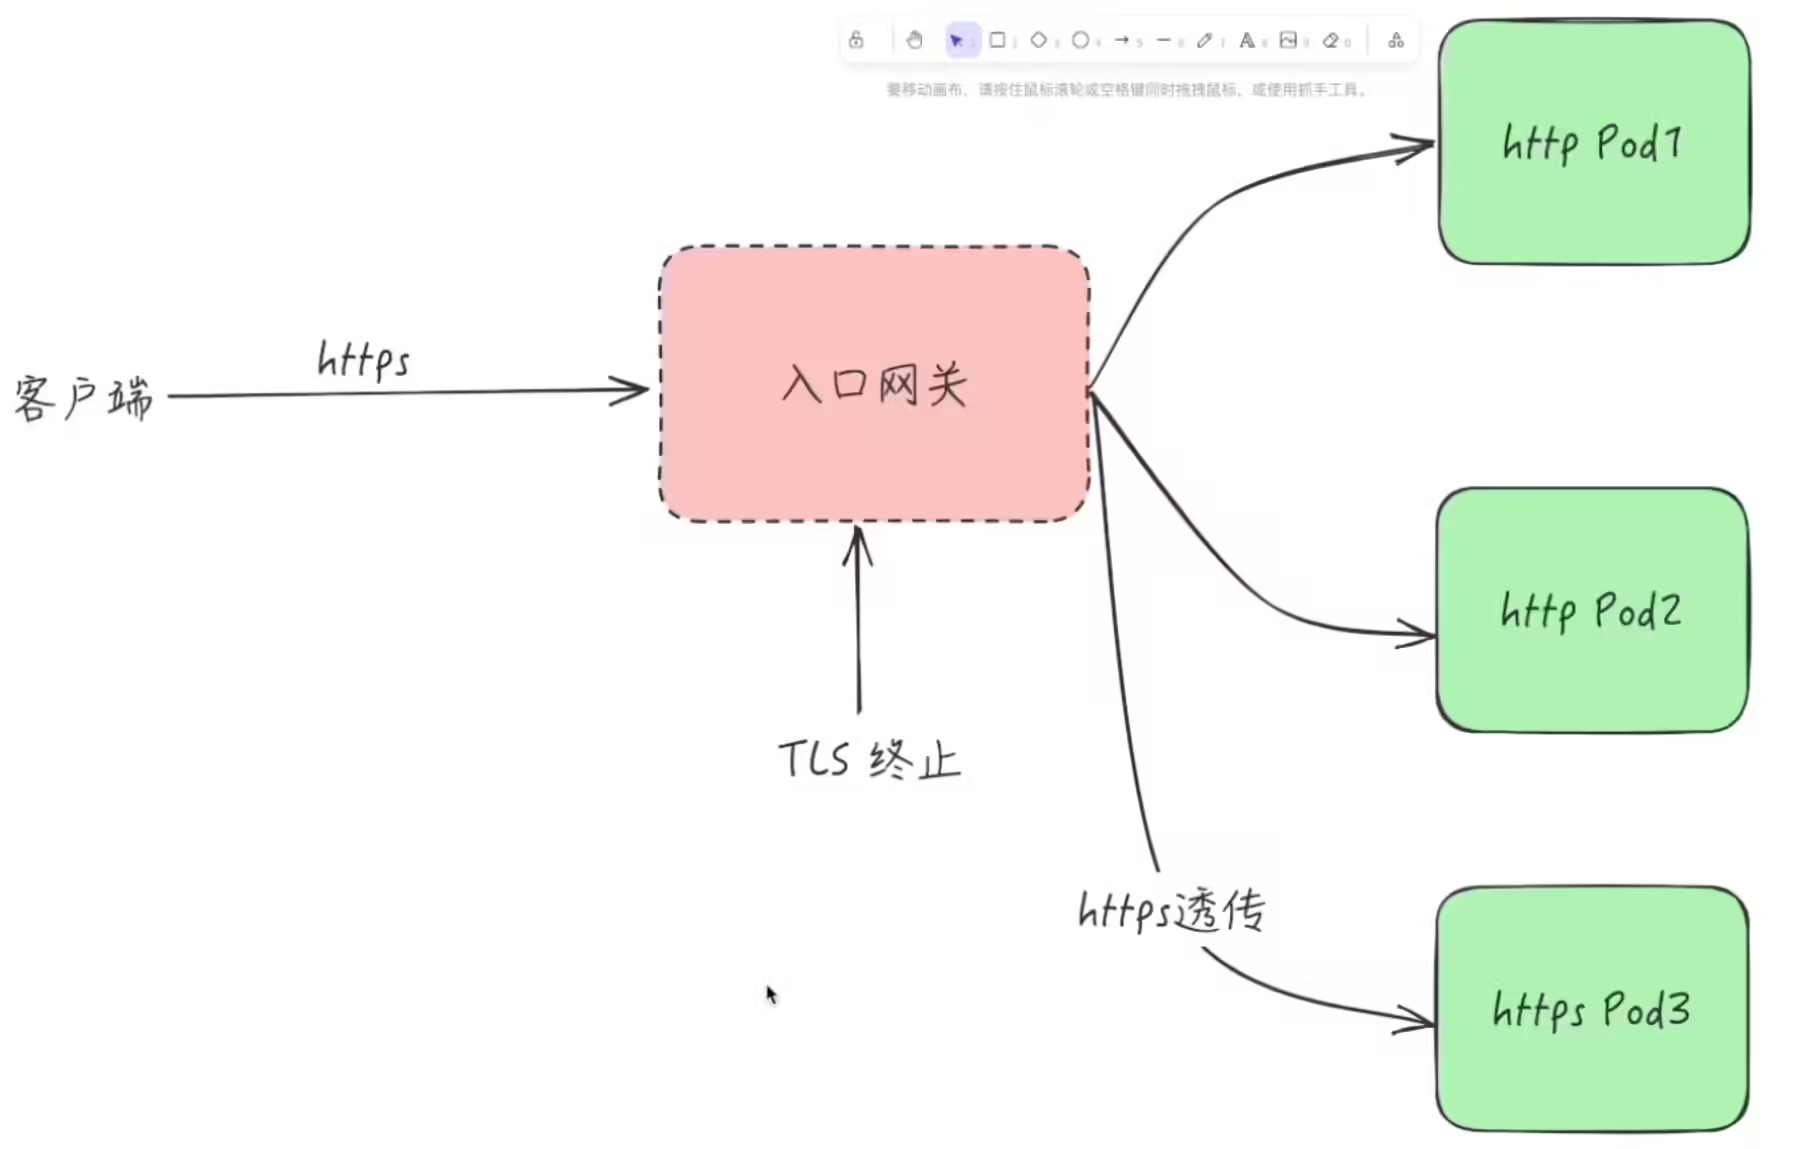
它的主要作用是,作为一个前置代理服务器接收外部到达的加密 TLS 流量,然后将其解密为 HTTP 明文,最后再将流量转发到内部的某个服务。
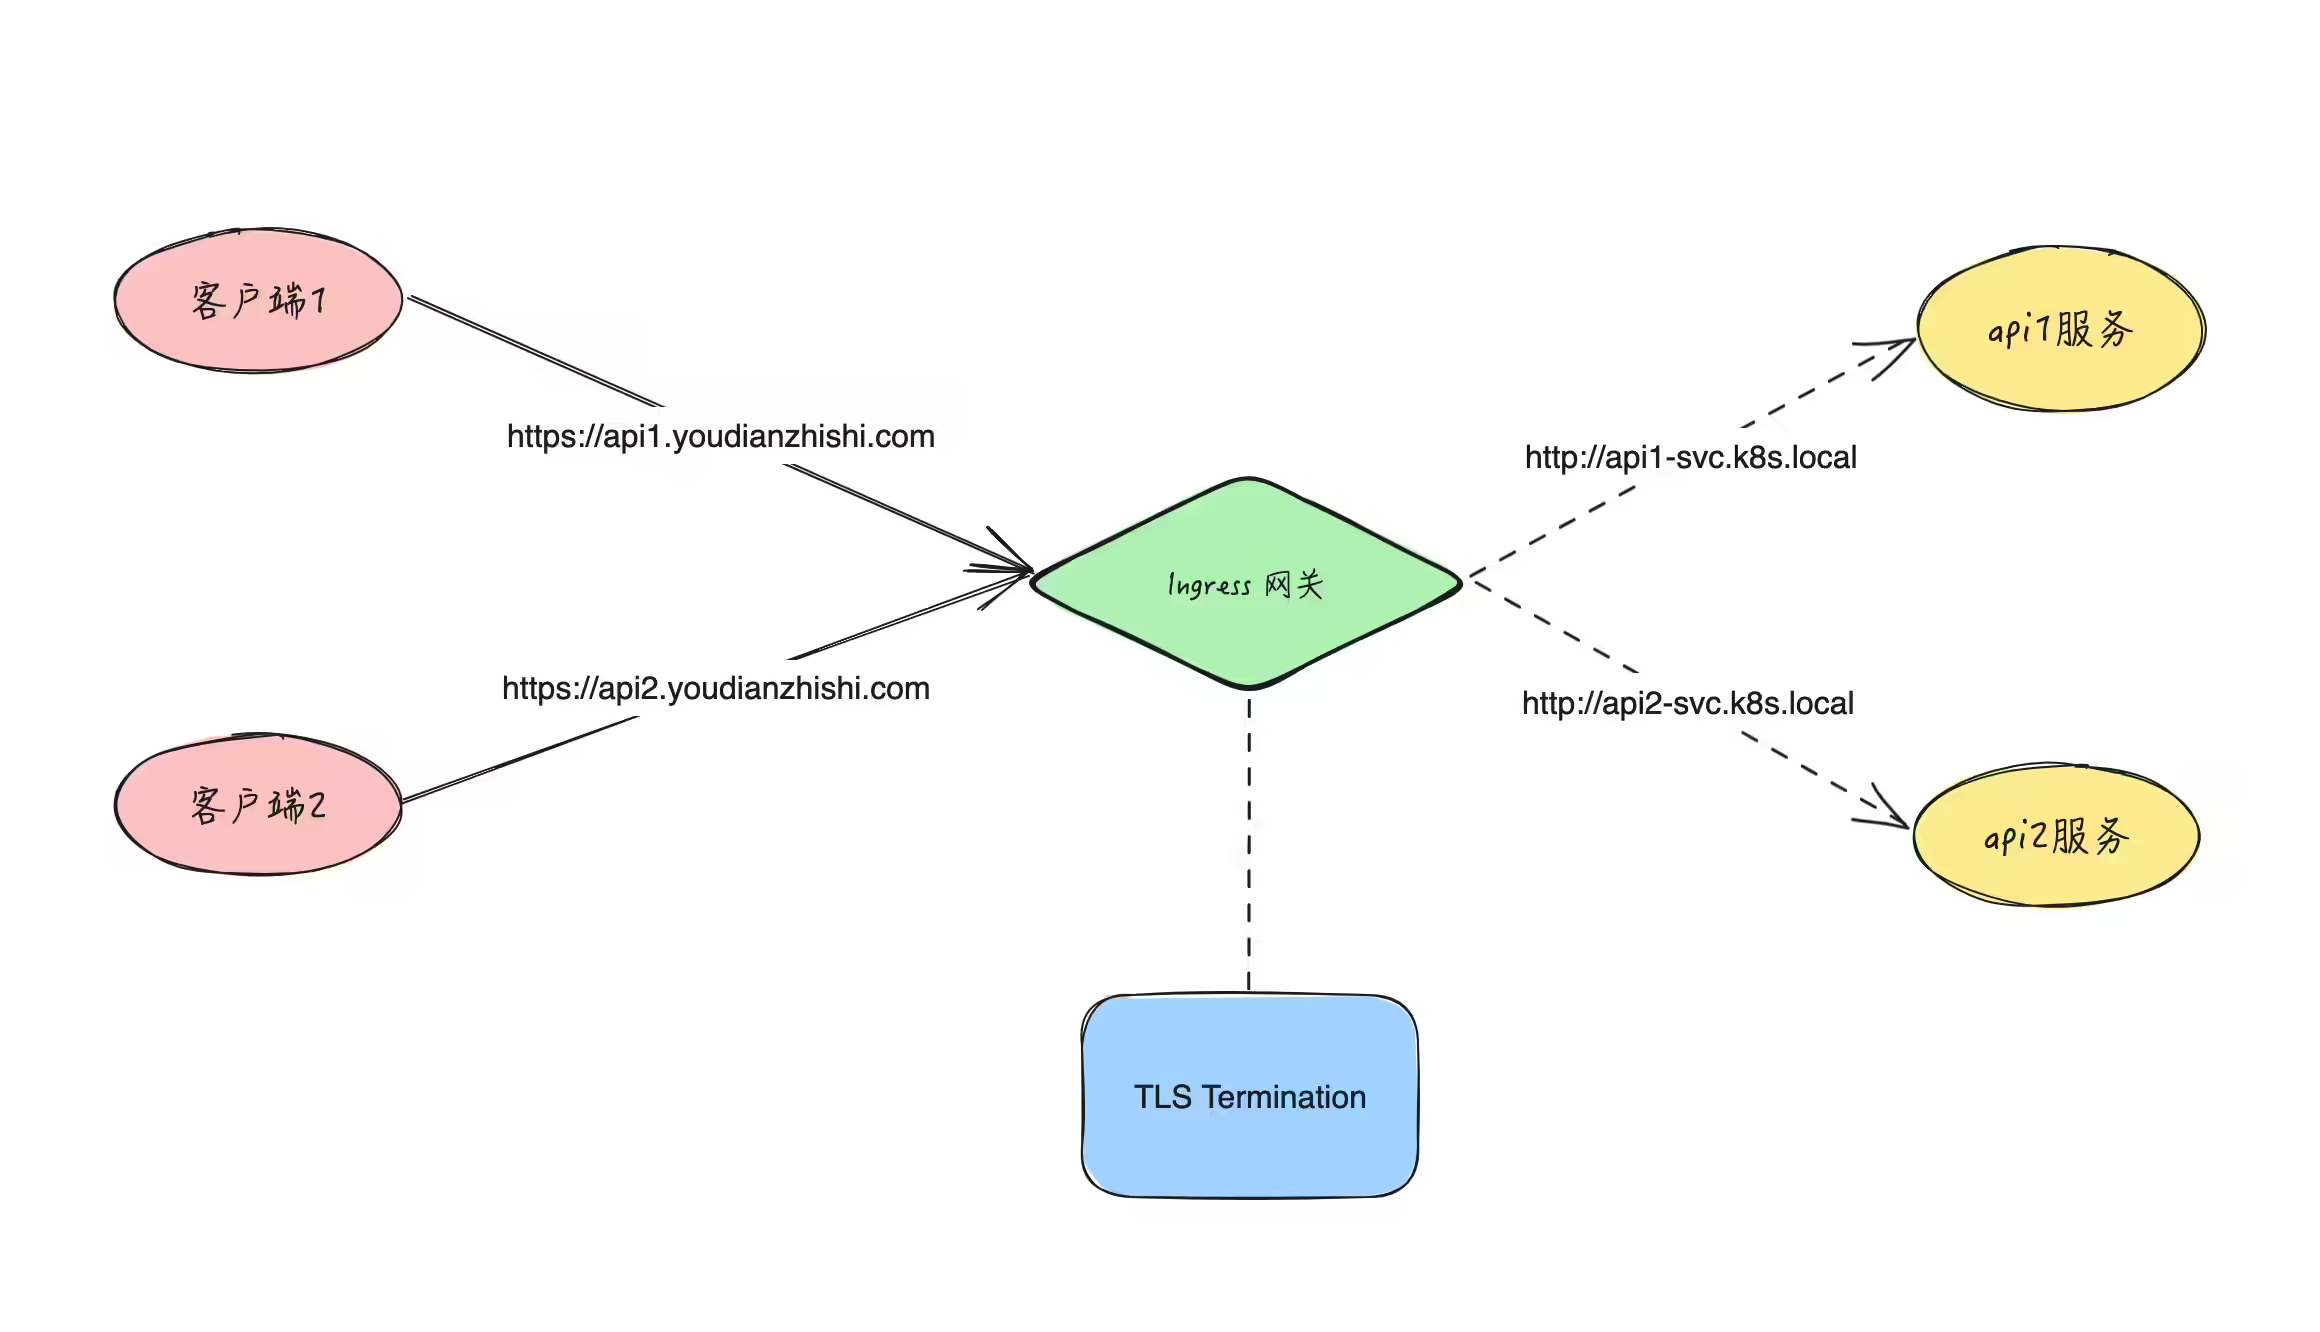
在实际应用中,内部的服务通常是以 HTTP 明文的方式通信,然后通过一个边界入口网关(ingress gateway)统一处理所有的 TLS 流量。这样 TLS 对所有的内部服务都是透明的,无需对每个服务去配置证书和私钥。通过一个统一的入口配置,我们还可以做很多事情,如日志,路由,路由策略等。
当然,对于一些安全级别较高的内部服务来说,未加密的流量可能是不可接受的,我们也可以配置来将加密的流量透传到该服务中,也就是这里我们需要的 SNI 透传。
同样的如果反过来,就是 TLS Origination。
作为一个代理服务器,接收内部服务的 HTTP 明文流量,然后将其加密,最后转发到一个 HTTPS 服务上,该服务既可以是内部,也可以是外部的,但看起来就像是一个内部的服务,流程如下,
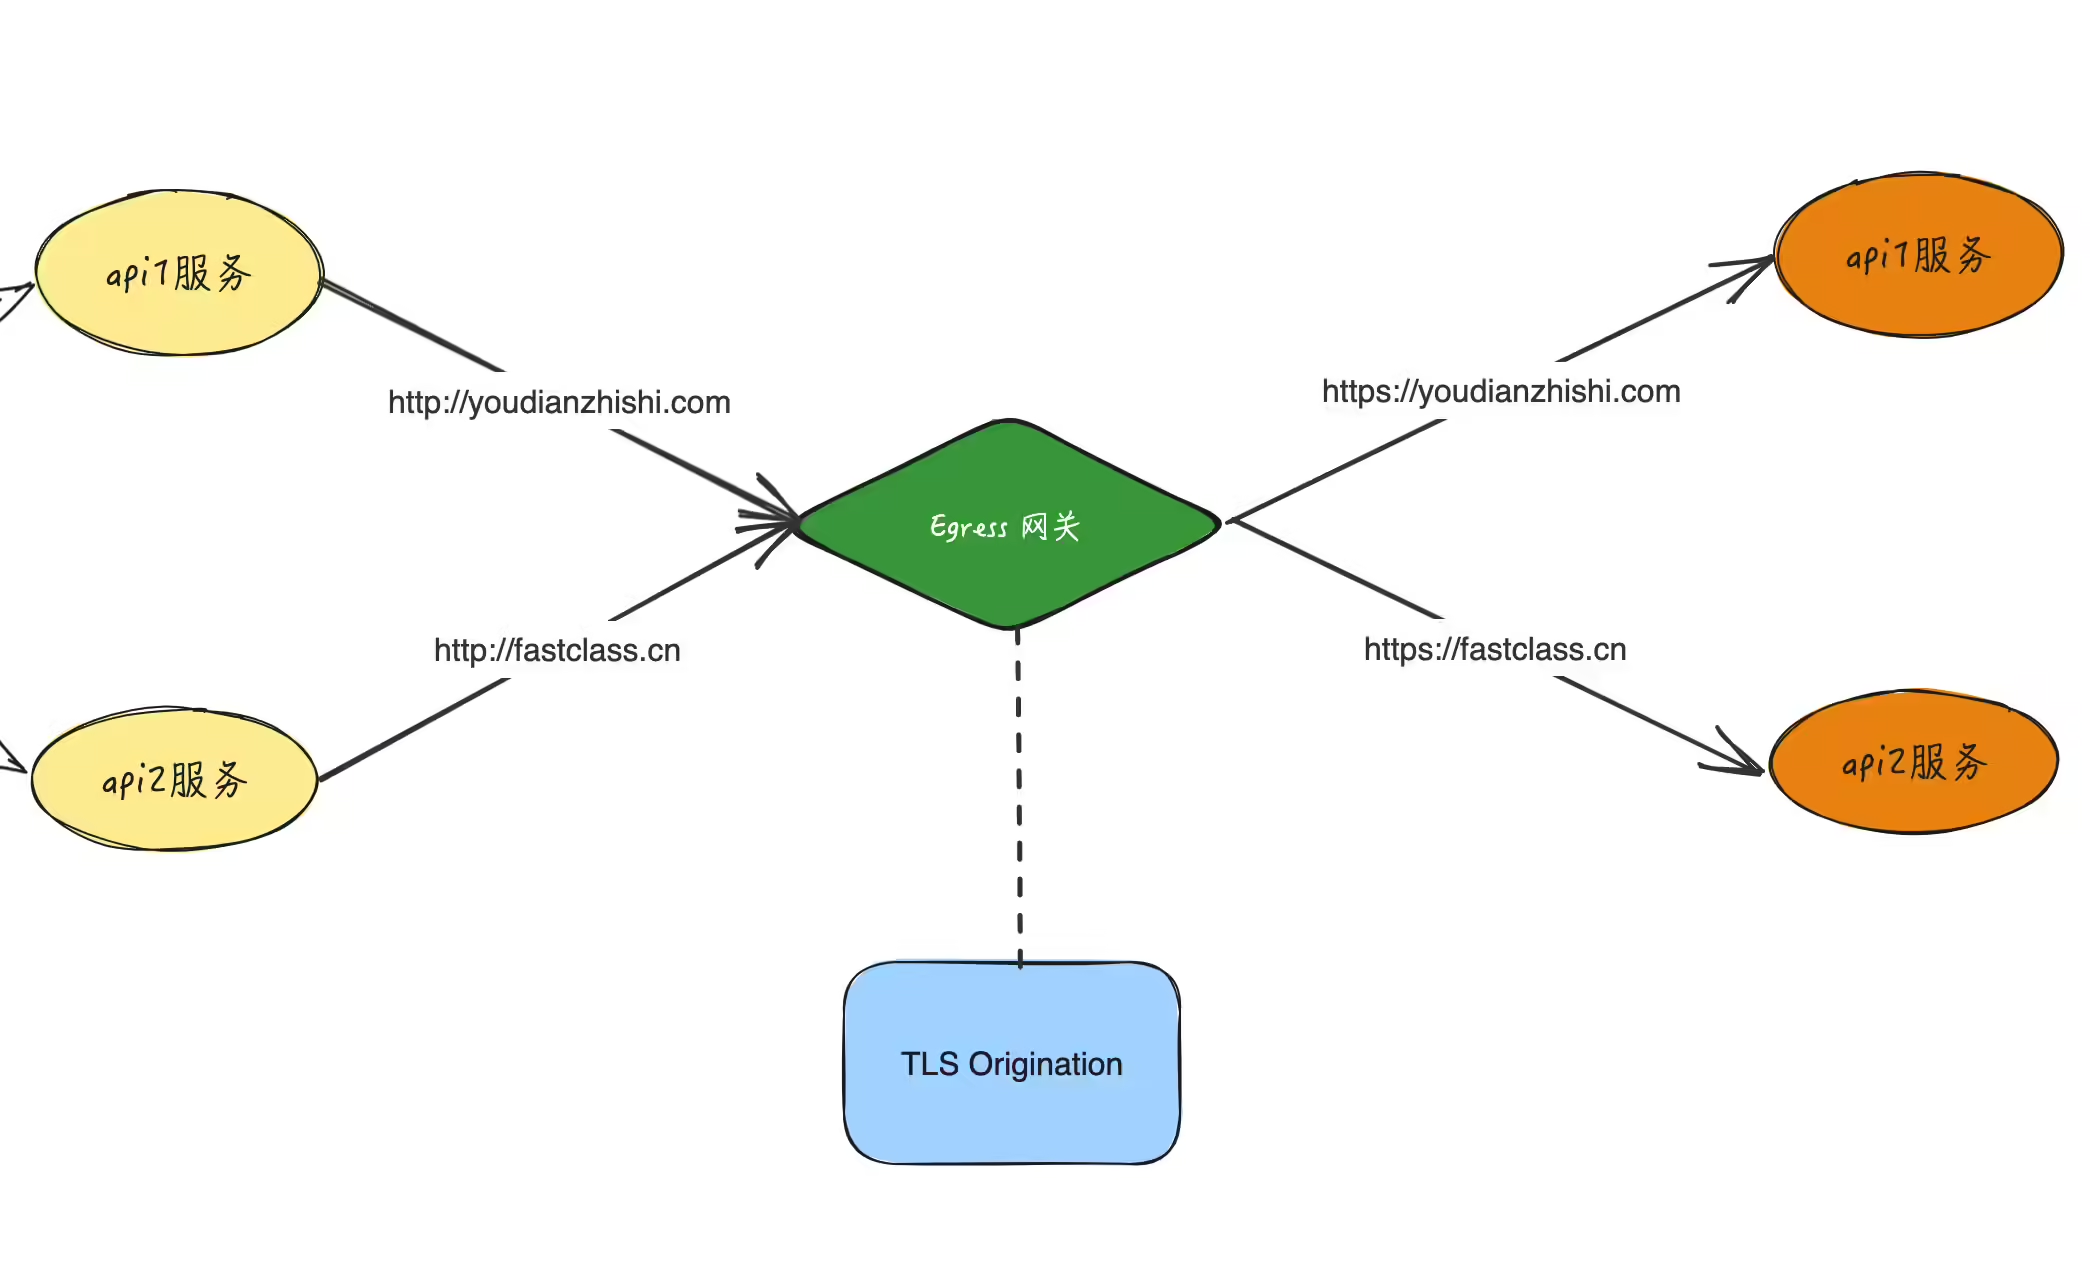
作为与边界入口网关对立的存在,出口网关也通常放置在网络的边界。所有的出口流量都被它接管,在这个节点上我们可以统一实施一些访问控制策略,或监控,或日志等,这和 Ingres Gateway 的功能其实是一样的,最大的不同在于将明文流量加密再转发。
==🚩 实战:TLS 透传-2023.11.16(测试成功)==
实验环境:
1k8s v1.27.6(containerd://1.6.20)(cni:flannel:v0.22.2)
2
3[root@master1 ~]#istioctl version
4client version: 1.19.3
5control plane version: 1.19.3
6data plane version: 1.19.3 (8 proxies)
实验软件:
链接:https://pan.baidu.com/s/1tpP4vWjOUqNyW2rBLqzVZg?pwd=0l54
提取码:0l54
–来自百度网盘超级会员V8的分享
2023.11.16-实战:TLS 透传-2023.11.16(测试成功)
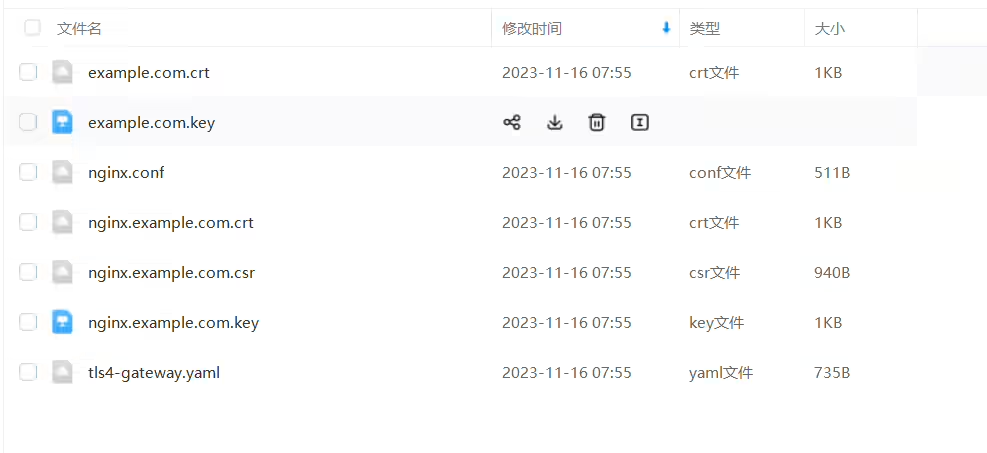
接下来我们用一个 NGINX 服务来演示下 TLS 透传的配置。首先在 Kubernetes 集群中创建一个 NGINX 服务,然后通过 Gateway 给这个服务配置一个域名是 nginx.example.com 的访问入口。
首先生成客户端和服务端的证书和密钥,同样我们这里使用 openssl 命令来生成。
1openssl req -x509 -sha256 -nodes -days 365 -newkey rsa:2048 -subj '/O=example Inc./CN=example.com' -keyout example.com.key -out example.com.crtnginx.example.com 创建证书和私钥:1openssl req -out nginx.example.com.csr -newkey rsa:2048 -nodes -keyout nginx.example.com.key -subj "/CN=nginx.example.com/O=some organization"
2
3openssl x509 -req -sha256 -days 365 -CA example.com.crt -CAkey example.com.key -set_serial 0 -in nginx.example.com.csr -out nginx.example.com.crt查看:
1[root@master1 ~]#ll nginx.example.com.*
2-rw-r--r-- 1 root root 1050 Nov 16 07:24 nginx.example.com.crt
3-rw-r--r-- 1 root root  940 Nov 16 07:24 nginx.example.com.csr
4-rw-r--r-- 1 root root 1704 Nov 16 07:24 nginx.example.com.key1kubectl create secret tls nginx-server-certs --key nginx.example.com.key --cert nginx.example.com.crt 1cat <<\EOF > ./nginx.conf
2events {
3}
4
5http {
6 log_format main '$remote_addr - $remote_user [$time_local] $status '
7 '"$request" $body_bytes_sent "$http_referer" '
8 '"$http_user_agent" "$http_x_forwarded_for"';
9 access_log /var/log/nginx/access.log main;
10 error_log /var/log/nginx/error.log;
11
12 server {
13 listen 443 ssl;
14
15 root /usr/share/nginx/html;
16 index index.html;
17
18 server_name nginx.example.com;
19 ssl_certificate /etc/nginx-server-certs/tls.crt;
20 ssl_certificate_key /etc/nginx-server-certs/tls.key;
21 }
22}
23EOF1kubectl create configmap nginx-configmap --from-file=nginx.conf=./nginx.conf 1cat <<EOF | istioctl kube-inject -f - | kubectl apply -f -
2apiVersion: v1
3kind: Service
4metadata:
5 name: my-nginx
6 labels:
7 run: my-nginx
8spec:
9 ports:
10 - port: 443
11 protocol: TCP
12 selector:
13 run: my-nginx
14---
15apiVersion: apps/v1
16kind: Deployment
17metadata:
18 name: my-nginx
19spec:
20 selector:
21 matchLabels:
22 run: my-nginx
23 template:
24 metadata:
25 labels:
26 run: my-nginx
27 spec:
28 containers:
29 - name: my-nginx
30 image: nginx
31 ports:
32 - containerPort: 443
33 volumeMounts:
34 - name: nginx-config
35 mountPath: /etc/nginx
36 readOnly: true
37 - name: nginx-server-certs
38 mountPath: /etc/nginx-server-certs
39 readOnly: true
40 volumes:
41 - name: nginx-config
42 configMap:
43 name: nginx-configmap
44 - name: nginx-server-certs
45 secret:
46 secretName: nginx-server-certs
47EOFcurl 的 -k 选项)。确保正确打印服务端的证书,即 common name (CN) 等于 nginx.example.com 即可: 1$ kubectl get pods -l run=my-nginx
2NAME READY STATUS RESTARTS AGE
3my-nginx-74df679cd5-5g7ss 2/2 Running 0 5m47s
4
5$ kubectl exec "$(kubectl get pod -l run=my-nginx -o jsonpath={.items..metadata.name})" -c istio-proxy -- curl -sS -v -k --resolve nginx.example.com:443:127.0.0.1 https://nginx.example.com
6# ......
7* SSL connection using TLSv1.2 / ECDHE-RSA-AES256-GCM-SHA384
8* ALPN, server accepted to use http/1.1
9* Server certificate:
10* subject: CN=nginx.example.com; O=some organization
11* start date: Nov 13 08:27:26 2023 GMT
12* expire date: Nov 12 08:27:26 2024 GMT
13* issuer: O=example Inc.; CN=example.com
14* SSL certificate verify result: unable to get local issuer certificate (20), continuing anyway.
15* TLSv1.2 (OUT), TLS header, Supplemental data (23):
16} [5 bytes data]
17
18> GET / HTTP/1.1
19> User-Agent: curl/7.58.0
20> Host: nginx.example.com
21# ......
22<!DOCTYPE html>
23<html>
24<head>
25<title>Welcome to nginx!</title>
26<style>
27html { color-scheme: light dark; }
28body { width: 35em; margin: 0 auto;
29font-family: Tahoma, Verdana, Arial, sans-serif; }
30</style>
31</head>
32# ......
到这里我们的 HTTPS 服务就准备好了。
Gateway 对象中定义 443 端口的网关,需要注意的是将 TLS 模式设置为 PASSTHROUGH,该模式指示 Gateway 以透传方式传递入口流量,而不终止 TLS,内容如下所示: 1#tls4-gateway.yaml
2apiVersion: networking.istio.io/v1alpha3
3kind: Gateway
4metadata:
5 name: mygateway
6spec:
7 selector:
8 istio: ingressgateway # use istio default ingress gateway
9 servers:
10 - port:
11 number: 443
12 name: https
13 protocol: HTTPS
14 tls:
15 mode: PASSTHROUGH
16 hosts:
17 - nginx.example.comGateway 进入的流量配置路由规则: 1#tls4-gateway.yaml
2apiVersion: networking.istio.io/v1alpha3
3kind: VirtualService
4metadata:
5 name: nginx
6spec:
7 hosts:
8 - nginx.example.com
9 gateways:
10 - mygateway
11 tls:
12 - match:
13 - port: 443
14 sniHosts: # 指定 SNI 主机名
15 - nginx.example.com
16 route:
17 - destination:
18 host: my-nginx
19 port:
20 number: 443需要注意的是,这里的 VirtualService 对象中我们配置的 tls 字段了,描述了用于路由未终止的 TLS 流量(TLS/HTTPS)的匹配条件和动作。它通过 sniHosts 指定了 SNI 主机名,以便 Gateway 可以将流量路由到正确的 VirtualService。
完整清单如下:
 1#tls4-gateway.yaml
 2apiVersion: networking.istio.io/v1alpha3
 3kind: Gateway
 4metadata:
 5  name: mygateway
 6spec:
 7  selector:
 8    istio: ingressgateway # use istio default ingress gateway
 9  servers:
10    - port:
11        number: 443
12        name: https
13        protocol: HTTPS
14      tls:
15        mode: PASSTHROUGH
16      hosts:
17        - nginx.example.com
18
19---
20apiVersion: networking.istio.io/v1alpha3
21kind: VirtualService
22metadata:
23 name: nginx
24spec:
25 hosts:
26 - nginx.example.com
27 gateways:
28 - mygateway
29 tls:
30 - match:
31 - port: 443
32 sniHosts: # 指定 SNI 主机名
33 - nginx.example.com
34 route:
35 - destination:
36 host: my-nginx
37 port:
38 number: 443部署:
1[root@master1 ~]#kubectl apply -f tls4-gateway.yaml
2gateway.networking.istio.io/mygateway created
3virtualservice.networking.istio.io/nginx creatednginx.example.com 发送 HTTPS 请求了: 1# 获取 Ingress Gateway 的地址和 HTTPS 端口
2export INGRESS_HOST=$(kubectl get pod -l istio=ingressgateway -n istio-system -o jsonpath='{.items[0].status.hostIP}')
3export SECURE_INGRESS_PORT=$(kubectl -n istio-system get service istio-ingressgateway -o jsonpath='{.spec.ports[?(@.name=="https")].nodePort}')
4
5
6# 访问 nginx 服务
7$ curl -v --resolve "nginx.example.com:$SECURE_INGRESS_PORT:$INGRESS_HOST" --cacert example.com.crt "https://nginx.example.com:$SECURE_INGRESS_PORT"
8# ......
9* SSL connection using TLS_ECDHE_RSA_WITH_AES_256_GCM_SHA384
10* Server certificate:
11* subject: O=some organization,CN=nginx.example.com
12* start date: Nov 13 08:27:26 2023 GMT
13* expire date: Nov 12 08:27:26 2024 GMT
14* common name: nginx.example.com
15* issuer: CN=example.com,O=example Inc.
16> GET / HTTP/1.1
17> User-Agent: curl/7.29.0
18> Host: nginx.example.com:30808
19> Accept: */*
20>
21< HTTP/1.1 200 OK
22< Server: nginx/1.21.5
23< Date: Mon, 13 Nov 2023 08:50:27 GMT
24< Content-Type: text/html
25< Content-Length: 615
26< Last-Modified: Tue, 28 Dec 2021 15:28:38 GMT
27< Connection: keep-alive
28< ETag: "61cb2d26-267"
29< Accept-Ranges: bytes
30<
31<!DOCTYPE html>
32<html>
33<head>
34<title>Welcome to nginx!</title>
35<style>
36html { color-scheme: light dark; }
37body { width: 35em; margin: 0 auto;
38font-family: Tahoma, Verdana, Arial, sans-serif; }
39</style>
40</head>
41<body>
42<h1>Welcome to nginx!</h1>
43<p>If you see this page, the nginx web server is successfully installed and
44working. Further configuration is required.</p>
45
46<p>For online documentation and support please refer to
47<a href="http://nginx.org/">nginx.org</a>.<br/>
48Commercial support is available at
49<a href="http://nginx.com/">nginx.com</a>.</p>
50
51<p><em>Thank you for using nginx.</em></p>
52</body>
53</html>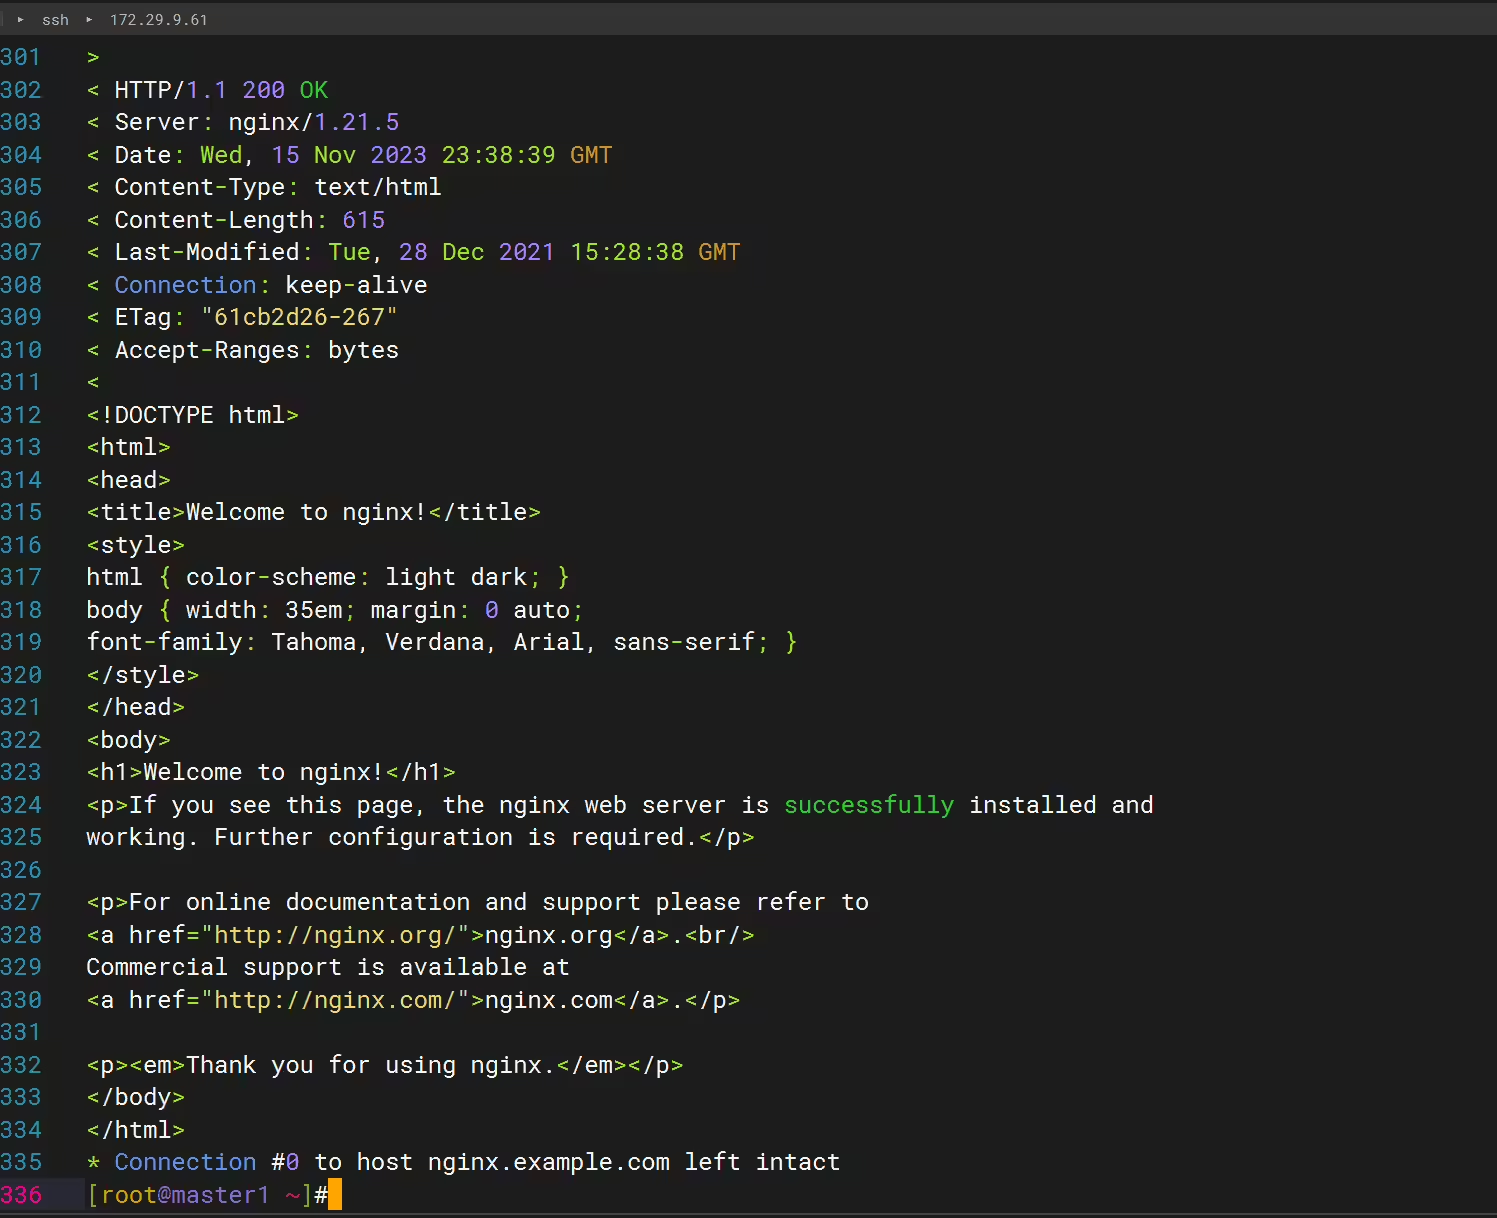
可以看到,我们成功访问了 NGINX 服务。
测试结束。😘
精选 · 友链 · 更多

One的公众号
爱折腾博客的小白
